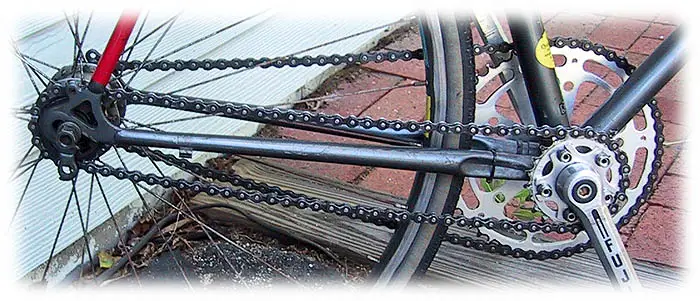
Disclaimer: This is a highly-advanced hack! Do not attempt it unless you have great confidence in your metalworking and mechanical ability. This article assumes that you are already very familiar with the inner workings of Sturmey-Archer AW 3-speed hubs.If you have any questions that you can't figure out the answer to from this article, you're not ready for this!
Sheldon Brown
![]()
I got the idea for a bichain drive from "The Dancing Chain " a while ago, finally had some time to get it working on Friday and took it out for an 80-mile ride Sunday...so now I have a working bike with 37" freewheel, 70" fixed and 94" fixed gears, all selectable with a single lever. It's quite fun to ride.
Drivetrain details:
- The hub is a steel shell, splined left ball cup Sturmey-Archer AW modified to 2-speed fixed by brazing the planet cage to the left ball cup with a MAPP torch and removing the low-gear pawls. The ring gear is modified to give a neutral position at the "normal" position by grinding away the dogs which engage the clutch at this position. So normally, this would give a 3/4 reduction fixed gear, neutral (freewheeling in both directions) position, and a direct fixed gear. A 15 tooth sprocket is used with the hub.
- The outside of the left hand ball cup is the same diameter as the interior of a freewheel thread, and after brazing, is soft enough that a freewheel can cut threads into it. So, a 16 tooth BMX freewheel is threaded onto the left side. This results in a hub that can be driven via a freewheel on the left and via fixed gear on the right, but the freewheel is reversed, so the hub is used with the freewheel is on the right and the shift chain is on the left. Despite the suspect nature of the mechanical connection, I've cranked the crap out of it and it appears to be holding quite well.
- At the crank end, two right-hand cranks are used to accommodate chainrings on both sides and an identical pair of pedals (some well-worn Look PP76's, in this case) have the axles swapped to make them compatible with the cranks. Thread locking compound is used to secure the left pedal. Both cranks are arms swaged to 52 tooth rings; the right ring is cut from the arms and replaced with a 22 tooth cog, which fits the lightening holes in the remains of the spider.
A better, but more costly solution would be to use a tandem synch crank on the left side, as I did on my Gunnar 3-speed fixed gear. -SCB
- A 3/32" old (with high side plates) derailleur chain is used with the 52/15 normal gear on the left and the freewheeling 22/16 gear on the right. The frame has horizontal dropouts and the chain lengths are pretty good match at this gearing, so neither side is very slack.
- A left Shimano bar-end shifter set up for a center index (insert turned 90°) on the right end of the drop bar is used for selecting gears. It doesn't provide protection for the axle key from overtensioning of the shift cable, but it's preferable to the sudden unintended shift from a bump which can result from using a Sturmey trigger. An unintended shift while coasting on a fast downhill could very easily cause sudden engagement of a fixed gear and a subsequent loss of control.
The fixed gears overrun the pawls in the freewheel gear when they are engaged.When the neutral position is selected, pedaling forward engages the freewheel gear. The main design constraint is that the (highest) freewheel gear must be lower than the lowest fixed gear, or else the drivetrain will bind up.
Interesting results:
- Whenever a fixed gear is engaged, the drivetrain will bind in reverse. This can make trackstanding somewhat tricky, but it works as along as you understand that you have only a little bit of lash (the pawls in the freewheel and the clutch in the fixed gear) to work with.
- When trackstanding uphill in a fixed gear, the freewheel gear is engaged until the lash is taken up between the clutch and dogs in the fixed gear hub, at which point the fixed gear is engaged -- the mechanical advantage changes at this point, and on the setup I've created it's fairly obvious when it happens. When trackstanding downhill, only the fixed gear can be engaged.
- On this particular setup, first gear can be preselected by shifting the lever down from the lowest fixed gear, then engaged by relieving pedal pressure (a little jump will do.)
I really like this setup. It's a fixed gear that fears nothing...I'll generally leave it in high gear if I'm noodling along but downshift to the lower fixed gear for intersections (to slow down and accelerate quickly) or for power work. The low freewheel gear is great for diving off the road into the woods or loose gravel for a nature break. I'm seriously considering using it for the Deerfield Dirt Road Randonnee, which features some very steep climbs (~20%) on dirt roads.It is very mesmerizing to watch while spinning on a workstand.
Keep your hands away to avoid this (icky!)
![]()
![]()
![]()
![]()
Possible improvements:
- One possibility is to add a derailleur drivetrain to the right side, which would add more freewheel gears. This only works as long as the maximum freewheel gear does not exceed the minimum fixed gear. I personally don't favor adding the extra maintenance of jockey pulleys and I prefer a narrow tread, which favors no front derailleur, but it might suit somebody else. One advantage would be increased backlash (from chain slap) in the derailleur drivetrain, which would allow the user to operate further in reverse during a trackstand. If a 6-speed freewheel isn't practical for space constraints, a 1- or 2-speed BMX freewheel could be used with multiple chainrings.
- Another possibility would be to install a different ring gear with the low gear dogs ground off instead of the normal gear dogs, which would yield a sequential shifting pattern (1-2-3 instead of 2-1-3)...although I like being able to preselect the lowest gear, and the current setup also allows me to shift to coasting from the highest fixed gear instead of the lowest.
Bruce, It's not clear to me how you assemble the hub after brazing the planet cage to the ball cup, nor how you get the planet cage properly aligned with the ball cup prior to brazing? -SCBIn the last few I've created, the (splined) left cup is removed from the steel shell by placing the flanges on a vise and using a hammer and pipe to bang it out. The left shield and bearing are removed and the cup cleaned so that no grease is left to burn in place; all the components in the planet cage are removed as well. The finish needs to be removed from the the edge of the ratchet (using a Dremel) and the outside of the interior flange of the planet cage (with a grinder) to give clean surfaces for brazing.To assemble the ball cup and planet cage for brazing, three 1/4" balls are placed in the planet cage pawl recesses at three locations approximately 120° apart. The planet cage is then press-fit using hand pressure into the ratchet track; this centers it well enough for the brazing operation. Grease (or some other "dirty" compound) should be applied to the splines to avoid wicking the braze onto them, which would make fitting the left ball cup back into the shell difficult. The planet cage is then brazed to the ball cup just inside the spline.
After brazing, the left ball cup is pressed back into the hub shell using the vise.
Reassembly is a bit of a jigsaw puzzle. The normal means of assembly won't work, since the planet cage is normally part of the internal assembly. The planet gears are inserted through the left axle hole, then secured in place with the pinions. After that, the axle, left bearing and shield are installed, in that order (don't let the pinions fall out!) The remainder of the internal can then be built normally inside the hub, save for screwing the right ball cup into the hub shell before installing the driver and excluding the ring gear pawls, pins and springs.
The "right hand ball cup" (now on the left side) needs to be secured with Loctite or similar thread-locking adhesive, or it will loosen up
I've built three or four this way and although they can be a bit noisy, the friction has never been excessive.
I normally grind out the normal-position dogs on the gear ring to give a neutral (freewheeling in both directions) position between the decrease and normal gear. If this is done, it's vital to use a shifter which can't easily be bumped out of position (as trigger shifters are designed to be); an unexpected shift out of the neutral gear when coasting could easily result in a crash!
Coasting in the neutral gear can also be a bit unnerving, since in this setup the planetary gears are always rotating and making noise regardless of the shifter position, and they're more noisy from lash when unloaded.
By the way, it appears the brake thread on the current SRB3, AWB or RS-RB3 may make them better candidates for use with a bichain setup, although I'm not sure how easily the rotary changer models would convert to 2-speed fixed.
Bruce Ingle wrote this, Sheldon Brown edited and HTMLed it.