Chain Maintenance

|

|
|
This is one of several articles on this site about chain drive. Our table of contents page on gearing and drivetrains lists them, along with other articles on related topics.
Sheldon says:
Chain maintenance is one of the most controversial aspects of bicycle mechanics. Chain durability is affected by riding style, gear choice, whether the bicycle is ridden in rain or snow, type of soil in the local terrain, type of lubricant, lubrication techniques, and the sizes and condition of the bicycle's sprockets. Because there are so many variables, it has not been possible to do controlled experiments under real-world conditions. As a result, everybody's advice about chain maintenance is based on anecdotal "evidence" and experience. Experts disagree on this subject, sometimes bitterly. This is sometimes considered a "religious" matter in the bicycle community, and much vituperative invective has been uttered in this regard between different schismatic cults.
This article is based on my personal and professional experience and my own theories. If you disagree with them, I won't call you a fool or a villain, you may be right. I hope you will extend me the same courtesy.
And a comment from John Allen:
The problem becomes religious because it addresses mysteries of existence, life and death (of chains...) to which there is no clear and obvious answer -- as long as the chain is exposed to dirt.
On the other hand...the Sunbeam oil-bath full chain case solved the problem in 1908. High-end Raleigh Industries three-speeds were available with a full chain case as late as the 1950s, and their chain life was impressive. In the 21st century we are beginning to see high-impact molded plastic chain cases, rather than the complicated sheet-metal assemblies of old.
Chain cases have been marketed only for single-sprocket utility bicycles, they are an extra-cost item and they add weight and complication. All derailer chains and most single-sprocket chains run bare, exposed to dirt. Belt drive is sometimes put forward as a solution, but it has its own problems and limitations.
Name your poison, as the saying goes. I might as well finish here with a quote from a philosopher whose writings helped spark the French Revolution.
Man is born free but everywhere he is in chains.
Jean-Jacques Rousseau
The past fifteen years [as of Sheldon's writing, in 1996] have seen many revolutions in bicycle design. Some of them have been conspicuously visible, such as the development of mountain bikes, disc wheels, new handlebar designs. Some have been less visible, but just as important, including clipless pedals, cyclecomputers, indexed shifting. Bicycle chains come in a greater range of widths, for different sprockets. This is addressed in our article on 6, 7, 8 (etc.) speed systems.
There has also been an invisible and little noted revolution in the construction of chains. People don't pay much attention to bicycle chains. After all, they all look basically alike. Derailers are much more interesting to look at and talk about, but the chain still has to do the shifting.
An old-style bicycle chain has ten parts per link. The typical 57-link chain used on the average multi-speed bike had 570 parts, more than the whole rest of the bicycle put together. There were 114 outer plates, 114 inner plates, 114 rollers, 114 link pins, and 114 bushings.
The major revolution in chain design has been the introduction of the bushingless chain. The first of this type was the Sedisport (now made by SRAM), and it has acquired such a good reputation that other manufacturers have copied the design.
Bushingless chains have only eight parts per link. You cannot tell by looking at a chain on a bike whether it is of bushingless design, because the bushings are hidden by other parts of the chain. The bushings can be seen only if you disassemble the chain.
In a conventional chain, the two inner side plates are held together by tubular bushings, which are like hollow rivets. If you open a link of conventional chain, you can see the ends of the bushings flush with the outsides of the inner side plates. When the chain is assembled, the outer side plates hide the ends of the bushings. The middles of the bushings are not visible because they are surrounded by the rollers.
The link pins that hold the chain together run through the middle of the bushings, and the rollers roll around the outside of the bushings, so both the inside and the outside surfaces of the bushings are subject to wear.
The inner side plates of a bushingless chain are three-dimensional. Instead of having a simple hole at each end with a bushing pressed through it, each inner side plate hole has a protruding shoulder that amounts to half of a bushing. Since the side plates have an inside and an outside determined by the existence of the shoulders, they can also have bevels on the inside edges without further complicating the manufacturing process. These bevels permit the chain to run more smoothly when it is not perfectly lined up with the sprocket than a conventional chain with flat inner plates. They probably also improve shifting performance.
Since the "bushing" of a bushingless chain is made up of two halves that don't connect directly with each other, this type of chain is more flexible sideways than a conventional chain. This is because the two halves of the "bushing" have a bit of "wiggle room" with respect to each other.
![]()
![]()
Cyclists often speak of chain "stretch", as if the side plates of an old chain were pulled out of shape by the repeated stresses of pedaling. This is not actually how chains elongate. The major cause of chain "stretch" is wear. (See our article on chain wear for more details.)
In our estimation, a major reason for the greater durability of bushingless chains is the improved flow of lubricant to the vulnerable parts of the chain.
There are three points where a chain needs lubrication. First, and most importantly, the link pins need to be lubricated where they move inside the inner links as the chain bends and straightens. Second, the insides of the rollers need lubrication to let them revolve freely around the bushings as they engage and disengage the sprocket teeth. If the rollers don't roll, they slide along the sprocket teeth, causing accelerated sprocket wear. Third, the surface where the outer side plates overlap the inner side plates can benefit from lubrication as well, although this contact surface is much more lightly loaded than the first two.
When a conventional chain is oiled, before oil can reach inside of the bushings to lubricate the link pins, it has to pass between the inner side plates and the outer side plates. With usual oiling techniques, such as sprays, the oil tries to get into both ends of the bushing at once. Air bubbles can get trapped in the space between the link pins and the bushings, and with oil at both ends of the bushings there is no place for the air bubbles to escape. In addition, the cracks between the inner and outer side plates are highly exposed to road dirt, and are often quite grungy. Thus, even if you are able to get oil into the bushing, it is likely to be contaminated.
The air bubble problem may also exist with lubricant flow into the inside of the roller to let it turn freely around the bushing, but the shorter length and larger diameter of the roller, compared to the inside of the bushing, probably make this a non-issue. The contamination problem here is also probably less severe, because the sprockets tend to clean the rollers automatically.
With bushingless chains, the lubricant flow is entirely different. If oil is applied to the rollers, it can easily flow into both sides of the rollers, because air (and oil) can flow through the gap between the "half bushings". If a bushingless chain is oiled only on the rollers, for instance by a narrow-spout oil can, the oil is able to flow into both sides of the rollers, through the gap and onto the middles of the link pins. The oil then flows out along the link pins to the side-plate junctions. Since the side plates are oiled from the inside, there is a natural self-flushing action that brings dirt and sand out of the chain instead of into it.
The outside of the rollers is cleaned by contact with the sprockets.
![]()
![]()
New chains come pre-lubricated with a grease-type lubricant which has been installed at the factory. This is an excellent lubricant, and has been made to permeate all of the internal interstices in the chain. The chain and this lubricant need to be warmed during application.
This factory lube is superior to any lube that you can apply after the fact -- well, unless...see below.
Some people make the bad mistake of deliberately removing this superior lubricant. Don't do this!
The factory lubricant all by itself is usually good for several hundred miles of service if the bike is not ridden in wet or dusty conditions. It is best not to apply any sort of lube to a new chain until it is clearly needed, because any wet lube you can apply will dilute the factory lube.
One of the great controversies of chain maintenance is whether you should oil a chain or not. The downside of oiling a chain is that the oil may carry grit into the interior of the chain, and that this grit-mixed-with-oil will act as grinding compound, causing accelerated wear. Many experts whose judgment I highly respect hold this opinion, but I do not believe that this is always the case. I have no doubt that this "grinding-compound" effect can occur, but the severity of the risk depends upon the sort of dust/soil prevalent in a given area, and, particularly, the oiling technique used -- and on whether the chain is relubricated before it gets very dirty.
Many cyclists oil their chains by spraying, usually aiming the spray can at the rear of the derailer cage, because this reduces the risk of overspray getting on their rims or tires. In my opinion, spray lubricants should not be used on bicycle chains, because they get too much oil where you don't need it and/or too little where you do.
Most of the schmutz that contaminates a chain is thrown up by the front tire and lands on the outer circumference of the chain. For this reason, you should always oil a chain on the inner circumference, the side that faces the sprockets. This decreases the tendency of the oil to carry crud into the interior bearing surfaces of the chain. The best way to apply the oil is with a drip-type oil can, along the top of the lower run of the chain. This applies the oil to the cleanest part of the chain. [But -- the rollers turn so no side is clean, and you never really get a chain clean unless you wash it. Some of the grit is metal wear particles from the sprockets and from the chain itself. Aluminum oxide from chainrings makes chain dirt black -- and it is very hard and abrasive. Grinding wheels are made of aluminum oxide! -- John Allen]
I just run the pedals backwards while applying a line of oil down the rollers. It takes 15 or 20 seconds to oil a chain this way. In the case of old-fashioned bushing-type chains, I usually run the oil along the left side only, in hope that the clean oil will be able to flush through the bushings from left to right. I have used many different oils, my favorite is Phil Wood Tenacious oil.
Some oils are better than others. Phil Wood oil is great for brake pivots and the like. On a chain, it works fine at first, but tenacious means sticky. When applying it, and turning the crank, it forms little strings that break and splatter the bicycle. With time, Phil Oil accumulates dirt, turning to sludge that is hard to clean off the chain and sprockets. Automotive automatic transmission fluid instead may continue to lubricate for long enough and be easier to clean -- though long-term experimentation results are not yet in...
While it's hard to say which lubricants are best for chains, some lubricants are real no-nos:
An alternative approach to chain lubrication is to immerse the chain in hot wax. This is a variation on the oil/solvent approach. The hot wax is of a thin enough consistency that it can theoretically penetrate into the private parts of the chain, then when it cools off, you have a nice thick lubricant in place where it can do the most good. The major advantage to this approach is that, once cooled off, the wax is not sticky, and doesn't attract dirt to the outside of the chain as readily. The wax approach is a great deal of trouble, and wax is probably not as good a lubricant as oil or grease.
Recent research has suggested, though, that wax in fact has lower friction than other lubricants. See links at the end of this article.
Wax is flammable and should be heated in a double boiler or a warm oven.
Reader Dana Munelt has made an outside the box suggestion:
"My two cents on chain lube: hot waxing with wax toilet ring seals. A soft, low temp, almost greasy wax available at home centers. Doesn't seem to clean off with citrus cleaner, but paint thinner works, and WD40 really works." Use a new one. -- John Allen
The advice inside this box offers a formula for something similar to factory lube.

(I thank Richard Bryne of Speedplay for permission to use these photos from the Speedplay online museum. The translation from French is mine -- John Allen.)
Always keep your chain properly tensioned, neither too tight nor too slack. If the upper run of chain mates well with the two sprockets, the lower run should have about 16 to 18 mm of side play.
NOTICE: Each outer plate carries the name GALLIA.

![]()
![]()
 If you wish to make a habit of cleaning your chain off-the-bike, the best approach is to buy a master link, such as the SRAM PowerLink -- available separately, but it also comes with new SRAM chains. This permits removal and re-installation of the chain without pressing out a link pin. The link pins of the PowerLink also give you an inside look at chain wear. Install a new chain and PowerLink at the same time, so the links are all the same length.
The 7 or 8 speed SRAM PowerLink works with SRAM and Shimano chains, probably others too. The link pins must be of the same diameter as the others in the chain, and they aren't the same for every brand of chain. If too big, the link can't be installed, and if too small, the chain will clunk each time the link comes around, and may jump forward. The 9-speed PowerLink  works reliably with SRAM chains, but it reportedly may lead to a Shimano chain's jumping forward.
The 10-speed SRAM Powerlock (note different name) is good for one-time use only: This results in annoying expense, and also the replacement link is shorter than the other links if they have worn, and can result in a noticeable "clunk" each time it comes around. You're better off sticking with 9 or fewer rear sprockets.
Wipperman makes a similar "Connex" link and. KMC also makes a similar product called the "Missing Link".
Park Tool has a special tool for master links. You can also remove a PowerLink by placing the jaws of a needle-nose pliers diagonally across the link to press the side plates out of position. You can use larger-jaw pliers if you form a "Z" of chain links with the PowerLink as the diagonal part. The link is shorter during installation or removal, and so this is impossible on a derailerless bicycle without loosening or removing the rear wheel.
 Reader Chris Elson has suggested a cool improvised technique to remove one of these links using only an old piece of brake cable. Here is his description:
"Grab an old brake cable, thread it around the two rollers of either side of the power link, cross the ends over and pull. This method is extremely easy and can be done with your bare hands in a few seconds. This can even be done roadside if a little length is kept on the end of the rear brake cable to thread through."
Be sure to capture the two halves of the master link -- placing a shop rag over them helps. They do tend to fly away and get lost.
Shimano chains 9-speed and up are reattachable only by inserting a special new link pin, using a special tool.
 Chains with 1/8 inch-wide rollers, used in non-derailer drivetrains, have a different kind of master link.
Both link pins are permanently attached to one side plate. The other side plate is held in place by a clip, as shown. The clip may be pried open with a flat-blade screwdriver. Sometimes there is no clip and the other side plate only snaps into place. It is installed or removed by bending the chain toward its side, pushing the ends of the link pins closer together. This type of master link can usually be removed from a derailerless bicycle without sliding the rear wheel forward.
Chains with 1/8 inch-wide rollers, used in non-derailer drivetrains, have a different kind of master link.
Both link pins are permanently attached to one side plate. The other side plate is held in place by a clip, as shown. The clip may be pried open with a flat-blade screwdriver. Sometimes there is no clip and the other side plate only snaps into place. It is installed or removed by bending the chain toward its side, pushing the ends of the link pins closer together. This type of master link can usually be removed from a derailerless bicycle without sliding the rear wheel forward.
The master link looks different from the other links, so you can identify it for removal.
![]()
![]()
There are several ways that people try to clean their chains. Only those which involve removing the chain from the bicycle are very satisfactory.
The traditional way to clean a bicycle chain is to remove it from the bike, then soak it in a degreasing solvent.
[Paint thinner will work, also isopropyl alcohol. The best choice these days is a citrus-based solvent, which is less toxic, smelly and environmentally damaging than others. Professional-quality solvents are designed to be followed up with a water rinse to remove remaining dirt. Any of these solvents, and more so if contaminated with chain grunge, are bad news if they get into the water supply. An automobile repair shop will usually have a tank to collect used oil and/or solvents for recycling.]
Improved sprocket designs, such as Shimano's "Hyperglide", have made it possible to shift under full power, which is very stressful to chains. (Older derailer systems with plain sprockets required the rider to ease up on the pedals while shifting.) To withstand these high stresses, the link pins of modern chains are tighter fitting into the chain plates. The new link pins are difficult to remove and reinstall without damaging either the link pin or the side plate. The thinner side plates of 9- and higher-speed chains worsen this problem. Using a master link, or using a cassette with 8 speeds or fewer, with a chain made for the same number of sprockets, avoids the problem -- John Allen.
I (Sheldon) used to use a parts cleaning tank and a toothbrush to clean chains, but Zaven Ghazarian, an excellent mechanic I used to work with, came up with a better system: drop the chain into a plastic Coke bottle with a couple of ounces of un-diluted citrus degreaser, cap it, and shake thoroughly. Fish the chain out with a spoke, rinse in water, and you are all set! (I am told that Pepsi bottles also work, and are easier to remove the chain from, because they have a wider mouth...but I'm a Coke guy, not a Pepsi guy.)[And a note from John Allen: I tried this. One part of the chain got twisted into a little loop inside the bottle, and I had to cut the mouth of the bottle open to get the chain out. I'm glad it was a plastic bottle! Use a bottle with a mouth at least two inches across.]
 Another major way to clean chains is with an on-the-bike cleaning machine. These are boxes which clip over the lower run of chain. They contain brushes and rollers that flex the chain and run it through a bath of solvent.
The off-the-bike approach has the advantage that it usually uses more solvent than will fit into an on-the-bike cleaning machine. Thus, it can dilute away more of the scuzz from the chain.
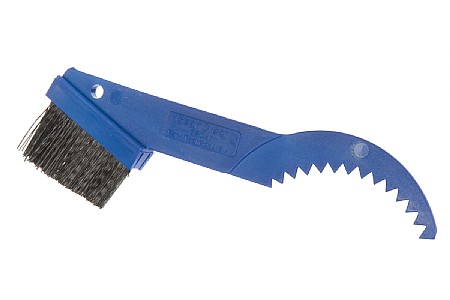 Also the machine drips solvent all over the sprockets and chainrings, and besides, they probably also need cleaning, which is easier with the chain removed. Park Tool makes a special brush to clean sprockets, with a toothed hook to extract grunge from between the sprockets.
The on-the-bike system has the advantage that the cleaning machine flexes the links and spins the rollers. This scrubbing action may do a better job of cleaning the innards.
You could have a dummy drivetrain in your workshop where you install a chain for cleaning using the cleaning machine...
Want to get a chain really clean? Here are a couple of ways.
One expensive but effective procedure requires an ultrasonic cleaner, such as is often used for jewelry and calligraphic pens. This has a pan where you put solvent and the chain. The ultrasonic vibration will shake dirt deposits loose.
You could also boil the chain. It should preferably be a modern 4-unit chain, so liquids can easily flow through it. Take it off the bicycle, and first clean it in solvent in one of the ways already described, to remove all visible surface dirt. Then coil the chain into a pancake shape so it makes a single layer in the bottom of an old stainless steel or aluminum frying pan. (Don't use a cast-iron skillet: you would remove the layer of hardened oil that keeps it from rusting.) A 6-inch pan is big enough for a typical chain. Pour in a heavy concentration of dishwashing detergent in water, and boil the chain. Boiling will liquefy congealed lubricant and wash it out of the chain. If you're a real fanatic, turn the chain over and do this again with it lying on its other side. Spill the liquid out and repeat with clean rinse water. Spill that out and heat the chain in the bottom of the pan until the water boils out, so the chain doesn't rust. Then relubricate. This is a smelly procedure and you probably want to do it on a hot plate outdoors rather than on your kitchen stove.
Now, if you had that special grease which chain manufacturers use, you could heat it up in a double boiler and it would liquefy and flow into the chain links -- same idea as when waxing the chain. Oh, that's more or less what Gallia recommended, lo, so many years ago.
![]()
![]()
![]()