Some Repair Tricks

|

As you ride, a pound or two of tools doesn't slow you much. Still, an on-road toolkit is always a compromise. I like to think of it this way: would you get where you are going sooner, on average, by carrying a larger toolkit? How does a 1/2 of 1% decrease in speed from carrying tools stack up against having to call for a ride, or missing an appointment, or ruining your plans during a bicycle tour?
So, carry tools to fix the most common problems. We have an article suggesting which ones to carry. Sometimes, though, you may need to use improvised or borrowed tools, or unusual repair techniques. If you are stuck, you have little to lose by trying them. And unusual repairs at home also can save money and keep a bicycle going.
Necessity is the mother of invention. Here we describe some unusual and heroic emergency repairs, in case you might find one of them useful, and to spur your imagination.
The trick here is to use foot power, and to keep the cranks from turning.
Remove your pedals occasionally to regrease the pedal threads. This is especially important if you have to remvoe the pedals to ship your bike in a box. Out on the road, you may have only a small adjustable wrench or Allen wrench to turn the pedal axles in the cranks.
When you are removing a pedal, it will try to turn the crank backwards (backpedaling). To prevent this, face the pedal toward the front of the bicycle as much as possible. Aim the wrench handle back toward the center of the crank. Adjust the pedal height until the wrench is horizontal. Most open-end wrenches have offset jaws, giving you two angle choices. Press down on the handle of the wrench with your foot, while holding the rear of the bicycle down so the wheel doesn't spin. If the wrench extends past the bottom bracket or won't sit horizontal, use an old toe strap, fabric strap or rope to tie the other crank to a chainstay, the downtube or seat tube -- whichever faces the wrench most nearly facing horizontal and to the rear..
Replacing a pedal is easier -- place the pedal in a forward position and aim the wrench forward from the pedal. Secure the other crank or hold the rear wheel down.
![]()
![]()
This is really easy. There's no need to get black chain dirt all over your hands!
Lean against the bicycle to hold it up. Hold a crank with one hand. Hold a stick you have picked up at the side of the road, or an Allen wrench or screwdriver, in the pther hand. Use this tool to position the chain on the teeth at the bottom of the chainwheel, and turn the crank backward. You may have to reposition the front derailer to get the chain to glide through it. Working from the left side of the bicycle may be better if the chain has fallen off to the inside. We have an article about this, with a video.
You need to carry replacement inner cables long enough to reach the rear of the bicycle. When replacing a short cable with a longer one,, you can form the excess into a loop and spiral the last few turns around the others so they stay put. That way there's no need to carry a cable cutter.
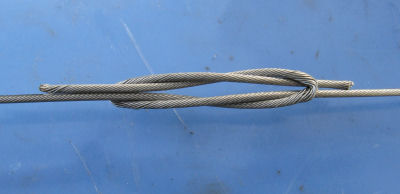 Splicing cables
If you don't have long enough cables to carry out a repair, you can tie lengths of cable together, if the knot can be where the cable is not inside cable housing.
Form the ends of the cables you will tie together into tight U shapes and slide them over each other to form a square knot.
The knot will tighten as you pull on the brake or shift lever. You will have to readjust the cable once or twice before the knot holds.

The usual reason to remove rear sprockets during a ride is to replace a broken spoke.
If a bicycle has a modern Shimano-compatible cassette Freehub, the Unior tool (described in our main article about on-road repairs) removes the lockring so you can slide off the sprockets to replace a broken spoke.
With a freewheel or older cassette, one sprocket, sometimes more, is threaded on. The sprockets can be removed without using any tools, except on some very old freewheels which have sprockets that remove to the inside.
But usually the freewheel body is too large to allow removal and replacement of a spoke. You need to carry a freewheel remover, and get ot the next place where you can borrow a large wrench to turn it. There was a tool to hold a SunTour freewheel, with the hanclebar stem for leverage, but that tool has not been made for many years.
But if you want to remove the sprockets from a freewheel or an old Uniglde Freehub, there's a cool trick to use the chain itself to unscrew sprocekts. Place the chain on the smallest front sprocket, and remove the chain from the rear derailer. A chain with a SRAM PowerLink or other removable and replaceable link can easily be disconnected. With another chain, you may have to remove the lower (tension) pulley of the rear derailer to extract the chain, or disconnect the chain using a chain tool-- see our article on chains.
With the right pedal behind top position (around 10 o'clock), wrap the lower run of chain around the the outermost sprocket, starting at the bottom, and the upper run around an inner sprocket, starting at the top. The closer the two sprockets are in size the better this works. Get as much slack out of the chain as you can. If you haven't disconnected the chain, shape it into a figure-8 behind the sprockets.
Now step down on the right pedal, backpedaling. Because the outer sprocket is smaller, it will turn faster and unscrew. You may have to reposition the chain once or twice before the sprocket is completely loose.
Repeat as necessary to remove additional sprockets until you reach a splined sprocket and can lift the rest of the sprockets off. Be sure to keep all sprockets and spacers in order for replacement.
The bearing races of many headsets are press-fit into place; similarly with the hub bearing cups and some cartridge bearings of hubs and bottom brackets.
It is fairly common for the race seats of the bicycle's steerer tube to expand slightly due to hard use or in a crash. I have also read of a loose bearing cup of a wheel bearing, probably due to poor manufacturing tolerances. Check first for a crack, but if there is none, plastic steel may offer a solution. This is epoxy resin with embedded steel particles. It makes a very strong and durable filler. I think "Magic Weld" is probably the same thing.
A good hardware store will have plastic steel, or you can get it online. Coat the inside of a hub cup with grease, so plastic steel will not adhere there. Place plastic steel in the hub's recess for the cup, and on the outside of the cup -- not too much so it spreads much, but enough so it fills the space. Coat the axle with grease too. Reassemble the hub, using the bearings to press the cup firmly into place. Let the epoxy set, and clean up. You might have to drill plastic steel out of the axle hole in the hub. similarly, use grease to prevent plastic steel from adhering where you don't want it to with other repairs.
Headset repair is similar: also reassemble the bearing after applying plastic steel, to seat the parts. This headset repair has lasted for many years on a couple of my bicycles. Removing parts will be more difficult after performing this kind of repair, but plastic steel will break loose if you tap hard enough on the back of a part.
It is hard to avoid forcing epoxy and steel particles into a cartridge bearing if the back of it rests against a surface with a hole that is smaller than the inside of its outer race. I don't have a good solution for that problem. Maybe you can think of one!
A chain can become bent or broken due to any of several types of mishap. Chain failure is most common on newer derailer-equipped bicycles with 9 or more rear sprockets: chains have become thinner and weaker to cram more sprockets between the spokes and the right-side dropout.
If you carry a chain tool and an adjustable wrench, you can usually straighten a bent chain link. Clamp the chain tool on the link to one side of the bent link, and the adjustable wrench on the other side. Twist the bent link into line. This will often get the chain working as well as it did before the mishap -- but it should be replaced at the first opportunity, as it is probably weakened.
In case a chain breaks, carrying spare links is a good idea. One of these should be a master link, if available for the type of chain you are using. A master link replaces only the outer link plates and pins, so you should also carry a few additional links of chain. If you carry two master links, a few spare links and a chain tool, you can restore the chain to its original length even if it does not allow the use of the chain tool to press in a replacement pin -- as is usual with 9-speed-and-up systems.
If you remove only one link, the bicycle can still be shifted into most gear combinations -- but don't try to use the large chainwheel with the larger sprockets. Adjusting one of the derailers so these combinations can't be used makes mistakes impossible
Shortening a chain requires a special chain tool and a replacement link pin with Shimano chains, 9-speed and up.
![]()
![]()
If you can secure the derailer somehow so it will tension the chain, then you can probably keep going as long as you don't try to shift. Otherwise, you shorten the chain to make your bicycle into a one-speed. A bicycle with horizontal dropouts is at an advantage, allowing the chain to be adjusted as described in another article.
This is covered in our article about on-road wheel repairs.
Improvised tire boots (to prevent the inner tube from ballooning out of a gashed tire and blowing out) are described in another article. If a tire is completely unrepairable, it is not unknown to wrap a number of turns of rope around the rim.
Many frame and fork repairs are covered in our article about frame repair.
As noted there, steel is by far the preferred frame material for cyclists who tour into remote areas. Welders anywhere can repair a steel bicycle frame. Aluminum, titanium and carbon fiber frames require sophisticated tools to repair, if they can be repaired at all.
Sometimes it helps to have a steel frame and find a friend too. I can speak from personal experience.
My wife and I were on tour in the summer of 1989, passing through a small town in France one afternoon when the front fork of her bicycle broke. (Lesson here: she had noticed pedal strikes on the pavement. These were not normal, on her recumbent.bicycle.) To her right in the photo, you can see the little bump in the road which finished breaking the fork, and the scrape marks the bicycle left as it fell. Saving grace: because the bicycle is a recumbent, she got away with only a bruised hip, slightly sprained ankle and scraped elbow.

We walked back to the middle of town, wondering how we might possibly salvage our tour. The fork was nonstandard, the manufacturer was in California and it was July 4th weekend. We wouldn't be able to get a replacement for several days.

We happened on a wedding party at a small hotel in the middle of town. There we met Phillipe Raby. He is holding up the fork and wheel in the photo above.

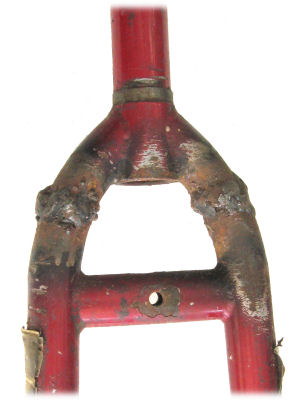 Phillipe had a home welding shop. He dropped everything he was doing, drove us to his home and performed an ugly but strong weld on the fork. His wife fed us cheese and crackers and we watched "Who's the Boss" on television, dubbed into French. When he finished, we asked what we could do for him in return. He replied that we need do nothing, we would do the same for him.
The little hotel held a late dinner for us. We spent the night there and resumed our tour the next day.
You might not be as very fortunate as we were, but again: if your bicycle has a steel frame, you can get it repaired anywhere in the world.
Another lesson from this experience would be to choose a bicycle with standard, widely-available components. But my wife can only ride a recumbent, so that was out of the question for her.
![]()
![]()