Trick Measurement Techniques
|
|

|

"Mr. Natural sez, Use the right tool for the job." -- R. Crumb
![]()
![]()
Precise measurements are often needed so bicycle parts will assemble correctly. It is usual to perform many of these measurements with special tools. Some of these tools have only a single use, and they can be rather expensive.
Certainly, you should have a tape measure for large-scale measurements -- frame height, rim diameter, wheel roll-out. A ruler is more convenient for many measurements. Neither of these, though, can perform the measurements needed when checking many bicycle components for compatibility. Measurements need to be very precise for machining work, or to make a few bicycle-related measurements -- for example, whether a handlebar center 25.4, 25.8 or 26,0mm in diameter.
To understand the challenge, let's first look at some measuring tools you won't be carrying around in your on-road toolkit, or might not own if you are a home mechanic. The good news though is that common tools or parts of the bicycle itself can perform most needed measurements. Often, too, trick measurement techniques are time savers. This article describes a number of such techniques. At the end of the article is a list of links to other articles about measurements.
This is very versatile and very precise, for internal, external and depth measurements. The traditional kind is a vernier caliper, which allows measurements to a thousandth of an inch by lining up markings. Instructions. A dial caliper reads directly. A digital caliper can be set to inch or metric at the push of a button, but requires battery replacement from time to time. You wouldn't normally carry this tool on the bicycle, even in its protective case; but there are other ways to do most of the measurements it might perform on a bicycle.
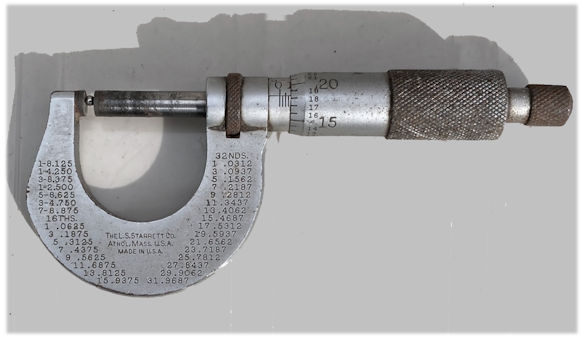
A micrometer is more convenient than a caliper to measure bearing balls and other small parts which have rounded surfaces How to use one. It can measure the thickness of concave parts such as worn disc-brake rotors. The photo is of a micrometer measuring a 3/32" bearing ball.
This tool with saw-toothed feelers is important for a machinist or auto mechanic, but much more versatile and expensive than needed for bicycle use. The example in the image has an upper and lower bay. The feelers in one bay are metric and in the other, inch-size. Bicycles use both metric and inch-sized threads, but in only a few sizes. This article will show how to use bicycle parts themselves to check each other's thread pitch.

The inside diameter of most bicycle components where precise fit is needed is standardized, with only a few variations. The seat tube's outside diameter, on the other hand, is usually standardized, but the inside diameter is not.
The Stein tools are quick to check a bicycle frame for seat-post size, and can also check the inside diameter of a fork-crown bearing race. These tools can measure an outside diameter, transferring it using an adjustable wrench. The Stein tools pay for themselves in bike-shop service, but they are way too heavy to carry with you, and expensive.
A caliper can do what the Stein tools do, though less conveniently. Lacking the Stein tools or a caliper, however, you can still easily compare the diameters of an old seatpost and its replacement, as this article will describe.
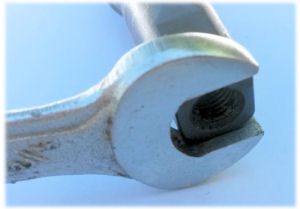
An open-end wrench can provide a direct measurement for its one size. Though most nuts and bolts used on bicycles are metric, inch-size wrenches can come in handy as measuring tools. Open-end wrenches can be used directly to measure the outside diameter of axles, seatposts, stems and other parts. A wrench will be very slightly larger than the labeled size, to fit easily over wrench flats. Sometimes an inch-size wrench is convenient to measure a metric part. In particular, 3/8 inch is almost exactly the same as 9.5 mm, the diameter of many hub axles.
An adjustable wrench, on the other hand, can't offer a measurement, but allows you to compare two dimensions precisely, often all you need to do. For many such comparisons on a bicycle, you'll need a 10" or larger adjustable wrench, which will open up to more than an inch. It's good to have one around the shop anyway, for the occasional odd-sized headset top nut. Tighten the wrench till is is a friction fit, then hold the adjustable wrench's grub screw with your thumb so the measurement doesn't drift.
Vise-grip pliers also allow comparison after screwing down the adjustment so the jaws can just slip over the part to be measured.
A 13 mm or 1/2" (12.7 mm) open-end wrench can compare the taper width of bottom bracket spindles, and can measure them with the help of a little math. Sliding the wrench up the taper of two spindles until it stops shows the difference of their penetration into a crank directly. The width where the wrench contacts the spindle (at the wider, inboard side of the taper), minus 0.07 times the distance to the standard measuring location 1.5 mm from the end gives the width at that location. (Math background: the standard taper is 2 degrees, the sine of 2 degrees is 0.035, but the taper is on both sides of the crank, so double that.) If you need spot-on accuracy, account for the looseness of the wrench compared with its nominal size: you could measure the wrench once with a caliper.
The left spindle below is a Sugino MW-70, probably an N.J.S. spindle and similar to older Campagnolo spindles. The spindle at the right is a J.I.S. (Japan Industrial Standard) spindle. The wrench size is 1/2 inch.
An adjustable wrench will allow you to compare spindles but not to measure them.
The bearing seats of spindles of some cartridge-bearing bottom brackets differ slightly in diameter, and can also be compared using an adjustable wrench. Same with the ends of cottered spindles. French cottered spindles have a diameter of 15.5 mm (0.610") and most others, 0.625 (5/8 inch) -- too similar to notice by eye but obvious if you check with a wrench.
The fit of cup-and cone bottom bracket bearings can be checked with the use of a little grease, as described in our page about Raleigh bottom brackets.
When replacing a seatpost which lacks markings or is munged up so you can't read the diameter, screw down a large adjustable wrench so it is a slip fit on the old seatpost, and test the fit on the replacement seatpost.
If you do have the Stein seat-tube measuring tool set, you could use it with the adjustable wrench to get a seatpost measurement. Another option is a caliper, but again, you may not have one.
An adjustable wrench can be used to discern the difference in diameter between a French fork steerer tube (25.0 mm) and a British/ISO/Italian one (25.4 mm), or between fork crown race seats, or to identify a steel frame as French (26mm top tube, 28mm seat tube and down tube) vs. a British or Italian (25.4 mm top tube, slightly smaller, 26.8mm seat tube and down tube, slightly larger). The French fork steerer tube can also be identified by its thread pitch (see below).
![]()
![]()
 Most handlebars have a larger diameter at the center, tapering to a smaller diameter at either side. Standard diameters are listed in our handlebar and stem dimension crib sheet. Most of these diameters are common inch sizes and can be checked directly with inch-size wrenches.
The most common handlebar center diameter is 1 inch, same as with a standard British, Italian or ISO fork steerer, so you can test a handlebar stem by inserting a fork steerer into it! That is much faster than threading a stem onto a drop handlebar. You could also use a piece cut out of the top tube of a trashed steel frame.
The obsolete French handlebar center size is very slightly smaller, 25.0 mm, and won't fit easily over the fork steerer. There are three different Italian sizes larger than 1 inch, which fit loosely. The Italian sizes can be matched by matching the brand of handlebar and stem. The stem should be an easy slip fit over the handlebar center, until tightened.
Common handlebar-end diameters are 7/8" (22.2 mm) for flat bars and 15/16" (23.8 mm) for drop bars including all of the Italian ones. Most shifters for internal-gear hubs, and twist-grip shifters, fit only flat bars. Trying a shifter is a quick way to identify the handlebar-end diameter, but also the 22.2mm flat-bar diameter is the same as the diameter of the part of a standard quill stem which inserts into the fork steerer. You can test for handlebar-end diameter by trying to insert the end of a handlebar into the steerer tube of a standard 1" front fork!.
There are fewer options for internal measurements and comparisons than for external ones. Needle-nosed pliers can substitute for a caliper to do comparisons, but only if the pliers' joint is tight so it will hold its position. There are other useful tricks.
Bicycle headset fork-crown races come in several internal diameters from 26.4 mm on up, and some sizes are close enough to one another that mistakes are possible even during installation. If you do have Stein seatpost-diameter measuring tools, you can use these also to measure and compare all but the largest fork crown races. If you don't have these tools, a selection of seatposts with readable markings can substitute. See <"https://www.sheldonbrown.com/cribsheet-headsets.html>our headset cribsheet for a table of dimensions.
Seatposts are made in sizes with 0.2 mm increments. You don't need them all to run the test. A seatpost 0.2 mm too small will be loose, and one 0.2 mm too large can't be inserted, so then you'll know the right size. The only problem remaining then is that you don't have a seatpost of the right size to use.
Head-tube bearing races for bicycles with 1" steerers have two common outside diameters, 30.0 mm and 30.2 mm. These are so close to one another that they can't be distinguished by eye, and are hard to tell apart with a ruler. It is helpful to keep an old 30.0 mm headset race for measurement purposes. It will be loose in a head tube made for a 30.2 mm race, and can't be installed by hand in a head tube made to fit it.
If you don't have the Stein tool or a caliper, the best bet is to read the markings on the original seatpost, or take it to the bike shop when buying a replacement. We have a seatpost size database on this site, but manufacturers haven't always been consistent with their sizes, and we can't cover all of the possibilities. We have quit updating it.
Certain seat-tube sizes are the same as those for other bicycle parts. 25.4 mm (1 inch) is the same as the standard bicycle front fork steerer tube -- but there are so many variations in seat-tube diameter that this comparison is only occasionally useful.
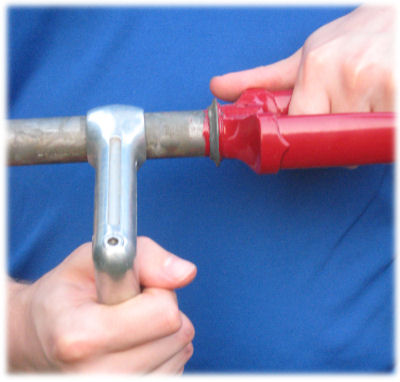
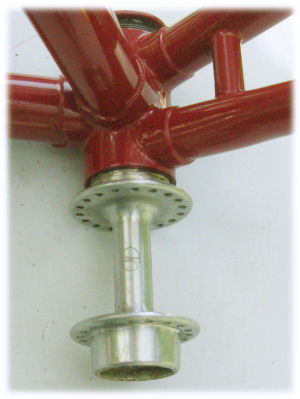
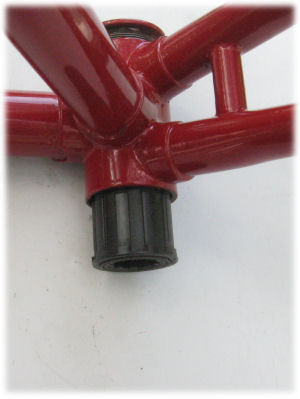
The standard British/Italian/ISO hub external threading for a freewheel or fixed sprocket matches the internal British and ISO left bottom-bracket cup threading. The threading on older Uniglide-compatible Shimano cassette bodies is the same. So, I know this sounds a bit weird, but you can actually thread a hub or cassette body into a bottom-bracket shell. This trick is useful because many bottom-bracket cups have obscure markings, or no markings. It is also easier to thread in a hub shell or cassette body than a bottom bracket cup, and so the test runs quicker. Our "mix and match" table in the bottom-bracket cribsheet shows what happens if you try this trick with a shell with a different threading, allowing you to identify the other threadings based on the British/ISO threading. Note also that British/ISO, Raleigh and Swiss right-hand bottom-brackets are left-threaded, while French and Italian ones are right-threaded, another important point of identification.

There are many different dimensions. Most unthreaded bottom brackets have cartridge bearings, and so you need either to measure with a caliper, identify the bottom-bracket manufacturer and model, or identify the cartridge bearing. Many cartridge bearings are imprinted with a model number which can be looked up in a manual or on the Internet to identify the dimensions. Our unthreaded bottom-bracket cribsheet can help you make comparisons.
The extractor-thread diameter for an old TA crank is larger than for other cranks, 23.0 mm, and for an old (pre-1982) Stronglight crank, larger yet, 23.35 mm. A standard extractor will be loose in either of these cranks. A TA extractor will thread into a Stronglight crank, but it will be noticeably loose as you thread it in, and can strip the threads if you try to pull the crank. Early Lambert cranks had a 7/8" x 24 TPI extractor thread, and so the standard extractor with a 1 mm (25.4 TPI) thread will not thread in.
Some Campagnolo left cranks had left-threaded extractor holes, but most of these had built-in extractor bolts. (Why left-threaded? The right-threaded crank-fixing bolt can't unscrew a left-threaded extractor dustcap -- not that this has proven to be a problem with other extractor dustcaps that are right-threaded.) If the crank no longer is equipped with this bolt and dustcap, you must use the special left-threaded Campagnolo extractor or (gasp!) a gear puller, which will leave marks on the back of the precious Italian crank. Heat the crank before pulling it, as aluminum expands more than steel when heated.
You are unlikely to find an extractor for a Lambert crank. Your best bet is a gear puller. Also be sure to replace the hazardous cast aluminum front fork when working on a Lambert!
Comparing one item with another by measuring them requires two measurements, and so, has greater potential for error than comparing them directly to each other. You may check the wear of a chain by holding up the new chain next to the one that is installed on the bicycle, with both stretched taut. This trick works best with the bicycle in a workstand so its chain is vertical. Then you need only hang a new chain next to it. With chains off the bicycle, as shown in the photo here, you can cut a new chain to match the old one, and get a more precise evaluation of wear than the usual measurement using a foot-long ruler.
![]()
![]()
The usual tool to measure thread pitch is, as already mentioned, the thread-pitch gauge, with a different saw-toothed feeler for each common thread pitch. But only a few thread pitches are commonly used on bicycles, and so you can use bicycle parts themselves to check each other.
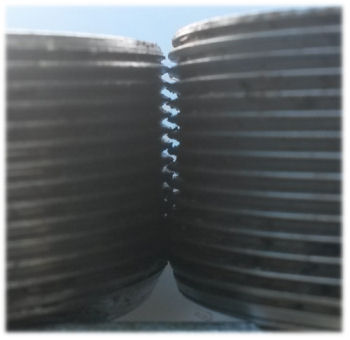 Threaded bottom brackets of today's frames all have 24 threads per inch, but 26 TPI (Raleigh threading) and 1 mm (25.4 TPI) French threading are common on older frames. Not all bottom-bracket cups are labeled to indicate the threading.
It is easy to compare the threading of bottom-bracket cups simply by holding them against each other so the threads mesh. If they mesh continuously, the threads have the same pitch. If one part rocks across the other, the pitch is different. Even the small difference between Raleigh 26 TPI and French 25.4 TPI will be obvious, as in the photo at the right. Note how the threads mesh at the bottom but go farther and farther out of mesh near the top. Can you see which cup has the finer threading?
24 TPI is also the standard freewheel and fork-steerer threading You can use either of these to check the other, or a bottom-bracket cup.
1 mm, 24 TPI and 26 TPI threading are common on hub axles You can check them the same way.
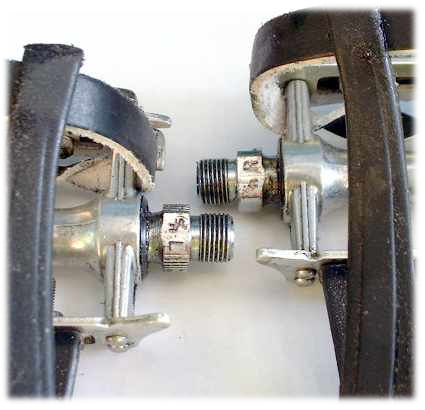
Most cranks and pedals have 9/16 x 20 TPI threading, but the older French standard was 14 x 1.25 mm. 1.25mm is 20.32 TPI and so pedals can be compared by trying to thread in a pedal.
For external threads, spin or roll the part away from you, same way the wheels of the bicycle roll. The threads migrate to the right if the part is right-threaded (Think of turning a to thread onto a nut at the left). If you can see the slant of the threads, then if they slant to the right toward the bottom, they are right threaded, and vice versa.
OK, do you notice anything odd about the pedals in the photo below?
For internal threads, remember that you are looking at the back of the threading, and so the slant is opposite.
For a quill stem, the only sizes that are anywhere near each other are 21.15 mm -- mostly on BMX bikes; 22 mm (French, no longer made), or 22.2 mm (7/8 inch) -- the usual size. These can all be tested with a 7/8 inch open-end wrench or a fork which you know to have the usual 22.2 mm dimension. Any fork with a steerer tube about an inch across and 24 TPI threading will do. The usual 22.2 mm stem will be a nice slip fit, the French stem will be slightly loose, and the BMX stem, very loose. A French fork will usually not fit the 22.2 mm stem, but the French fork steerer will be only very slightly too small. The only other common quill-stem diameter is the 25.4 mm (1 inch) size used in 1 1/8" head tubes.
For clamp-on stems, the fork steerer is 1", 1 1/8", 1 1/4" or 1 1/2 inches, all different enough that they can easily be identified with a ruler, and confusion is hardly possible.
 Of course, first check whether the tooth count is marked on the part, but often it is not.
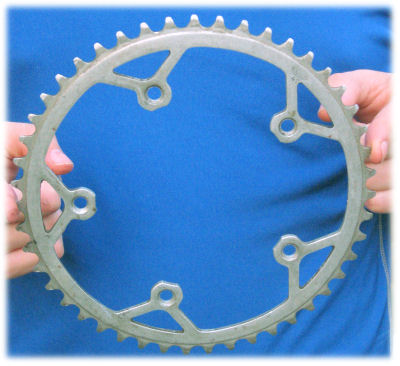
If you hold a sprocket or chainwheel horizontal between the tips of the index fingers of your two hands and you can find two teeth directly opposite each other, it will balance. (If a chainwheel has a pin to prevent the chain from derailing, place it directly next to a fingertip so it doesn't upset the balance.) Get the chainwheel to balance, or as close as possible to balancing. If it has an odd number of teeth, it will tip. Then count the teeth halfway around, from the tooth under the fingertip of one hand to the one just before the fingertip of the other -- on the high (short) side of the sprocket or chainwheel if it tipped. Multiply by two and if it tipped, add one tooth.
This technique is especially useful with cassettes, to count the teeth of their 7, 8, 9, 10 sprockets (more and more, every year...).
Count all the teeth on the smallest sprocket. That's easy, because it has the fewest teeth.
For the remaining sprockets, count how many teeth have been added, by checking how many places the teeth of the next larger sprocket line up with those of the sprocket whose teeth you have just counted. There will be one place for a one-tooth jump, two places directly opposite each other for a two-tooth jump, and so on, in places equally spaced around the sprockets for bigger jumps. This technique works well with differences up to about six teeth, the largest difference to be found on most cassettes.
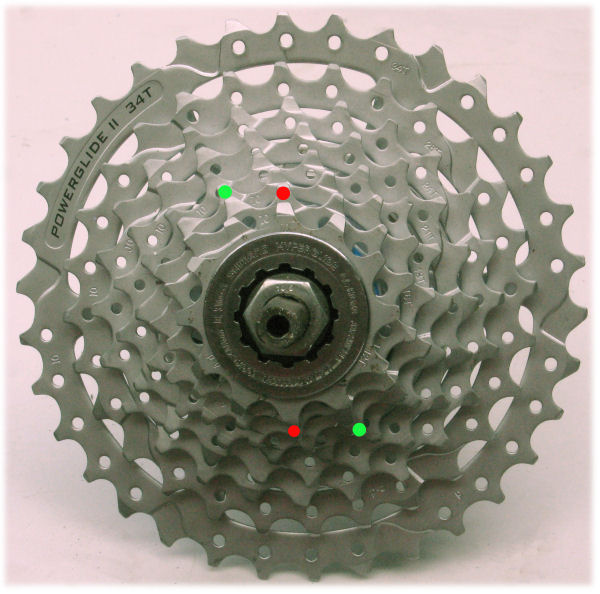
In the image, the smallest sprocket has 12 teeth. The two red marks indicate the two places where teeth of this sprocket line up with teeth of the next sprocket, and so that sprocket has 14 teeth. 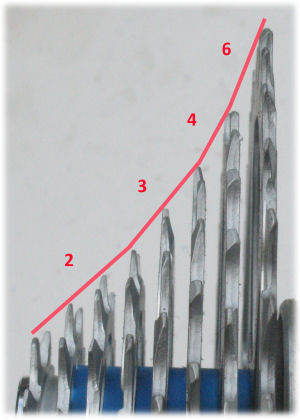 The two green marks indicate where the teeth of the second sprocket line up with those of the third sprocket, and so it has 16 teeth.
And onward to the remaining sprockets of this cassette...SRAM has given you an easy way to check whether the counts came out right, marking the size of the largest sprocket in large print. It's easier, by the way, to count teeth on a real cassette than in this picture, because you can view a real cassette from different angles and place your finger or a tool on a tooth to keep track of it. I can usually count off the teeth of all the sprockets in 60 seconds or less.
If the largest sprocket isn't marked, and if a cassette or freewheel isn't installed on a wheel, you can also hold it between two fingertips by the largest sprocket as already described to check whether the largest sprocket has an odd or even number of teeth..
You can also do a quick check by looking at the sprockets edge-on and noticing how much larger each sprocket is than the next smaller one. The change in sprocket size will be the same for all one-tooth differences, for all two-tooth differences, and so on. In the image at the right, the two, three, four and 6-tooth differences of the cassette correspond to different slopes of the red line which follows the outer ends of the teeth. Now, knowing that the smallest sprocket has 12 teeth, can you give the tooth counts of all the others?

How can you measure an inner tube to check whether it will fit a tire? To give an example,: the ISO 520 mm size, commonly used on bicycles, and the 540 mm size, more commonly used on wheelchairs, may both be marked 24 x 1 1/8".
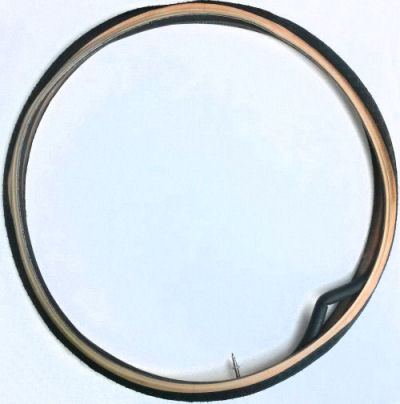
The photo at the right shows a quick way to determine whether the diameter of two inner tubes matches. The longer tube is for a 540 mm tire, and the shorter tube, 520 mm. If you need to measure a tube by itself, its length when held out straight should be half that of the bead-seat circumference of the rim, plus no more than half the tire's width. The circumference is given in a table in the rim-sizing article on this site.
Putting an inner tube inside a tire without installing the tire on the rim makes a quick check possible. Inflate the tube only enough so it barely holds its shape. It should fit en-tire-ly (sorry) inside the tire. The tube in the photo below is made for an ISO 540 mm tire, and does not fit the 520 mm tire. The tube should also just barely fit the rim.
The inner tube, when inflated so it just holds its shape, should also have a slightly thinner cross section than the tire -- but not too much, or else it will stretch excessively and be prone to failure.
Rims are not always labeled. If you have a rim (not spoked into a wheel) you know to be of one size, and another rim, or a wheel with no tire mounted yet, rest them both standing vertically on the floor, side by side and immediately next to one another. If they are the same size, they will come up to the same height. A 27" (630 mm) rim will stand about 8mm, or 5/16 inch, taller that a 700C (622 mm) rim. The method can be used to compare other rims that are similar in size -- 584, 590 and 597, 547 and 540, etc.
Tires are usually labeled too, and if you have a wheel with the tire installed, the the rim is the right size for it.
You do not have to uncoil a cable or cable housing to measure its length with reasonable accuracy. When it is coiled, its length is π (pi, about 3.14) times the diameter of the coil, times the number of turns. Count the full turns (on the right in the image below), add the fractional turn (on the left), and any excess that is uncoiled. Measure the diameter and do the math (easy enough with a calculator), or adjust the coil's diameter to match an entry in the table below and read off the length. The larger sizes in the table are for stiff index-compatible cable housing. Results are good enough unless the cable is possibly just short of the needed length.
The photo below gives an example: 3.2 inch diameter coil, 4 1/2 turns, so 45 inches. 3.5 inches are free on one end, 4 inches on the other. Total, 52.5 inches. Subtract a couple of inches to be safe.
Or, metric measurement, and doing the math: the coil is 8.2cm across, 4 1/2 turns, times π makes 116cm, plus 10cm free on one end and 8.7cm on the other makes 134.6cm, which converts to 53 inches. Actual length of this cable when laid out straight was 52 inches, 132cm. Again, allow a bit of slack with this method!
Here are some useful diameters and corresponding lengths, in feet and inches. The larger diameters will work with stiff index-compatible housing.
Here are some useful numbers, in inches
| Diameter of coil | Length per turn |
|---|---|
| 3.2 in | 10 in |
| 3.8 in | 1 foot |
| 4.8 in | 15 in |
| 6.4 in | 20 in |
| 7.6 in | 2 feet |
| 9.5 in | 3 feet |
And here are some useful numbers, in centimeters.
| Diameter of coil | Length per turn |
|---|---|
| 8 cm | 25 cm |
| 9.6 cm | 30 cm |
| 12.8 cm | 40 cm |
| 15.9 cm | 50 cm |
| 25 cm | 75 cm |
| 32 cm | 1 m |
![]()
![]()
There are other pages about measurement on the site. See also:
![]()
![]()
Last Updated: by John Allen