Creaks, Clicks & Clunks...
...and things that go "bump" on your bike.
...and things that go "bump" on your bike.

|

revised by John "Shake, Rattle and Roll" Allen
|
|
Aside from the whoosh of the tires on the road, and the clicking of the freewheel, a bicycle should be silent.
If your bike makes other noises, or clunks or lurches, it is a sign of a problem. Many of these problems can be cured easily at an early stage, just by tightening up a nut or bolt...but if you ignore the warning, serious damage to parts of your bike may result, and you may find yourself stranded or even injured when the problem gets more serious! Most bicycle noises have some sort of regular repeating pattern. Identifying this pattern is the first step toward locating the source of the problem. If the noise occurs:
![]()
![]()
See the section of this article on brake-related noises.
If you have a regular rubbing sound when coasting, do not ride the bike until you have checked it out and at least determined the cause of the problem; some of these problems may only rob efficiency, but if your tire is rubbing, you can destroy the tire surprisingly quickly!
Lift up each end of the bike in turn, and spin each wheel forward, looking, listening and feeling to find where it is rubbing.
If the tire is rubbing, it indicates that:
Check the tire for a scrape mark just outside the rim. Brake shoe rubbing on the tire may occur only when the brake is applied. As rim brakes can normally make a slight rubbing noise, you may not notice anything unusual until the tire blows out while you are braking.
Never ride a bike while the tire is rubbing!
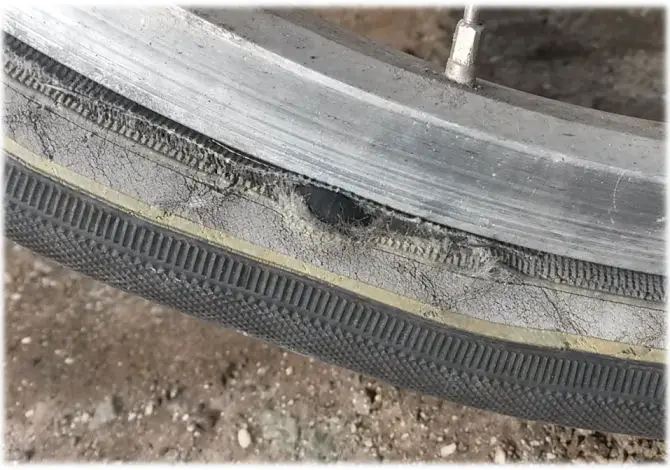
Inner tube about to pop, noticed just in time!
Notice the "double hump" appearance of the tire tread.
That is due to the loosening of the crossed diagonal (bias-ply) threads
of the tire fabric where it has torn..
If the brake is rubbing when the brake is not in use, it indicates that a brake shoe is misaligned, as already mentioned, or
This problem is easy to diganose, by lifting the wheel and spinning it to see how quickly it slows down.
It is common for this problem to develop after removal/re-installation of a wheel, if the wheel is not properly aligned in the frame/fork. Sometimes people install the wheel crookedly, then try to compensate by misadjusting the brake to match the off-center rim. Don't do this!
The weight of the bicycle, or the wheel, should center the wheel in the frame, so, tighten the quick release or hub nuts with the wheels on the ground, or with the bicycle upside down in a workstand.
To check that the front wheel is installed correctly, place a finger of each hand between the tire and the fork blade. If you use the same finger of each hand, (and don't have mismatched hands) you can tell by the feel if the tire is closer to one fork blade than to the other. If it is off center, loosen the quick-release or axle nuts, re-center the wheel, and re-secure it.
An off-center rim may be the result of poor installation, or may result from a bent axle, a bent fork, or an improperly dished wheel. Once you're sure that the wheel is properly centered, then you can adjust the centering of the brakes, if it is needed.
If the wheel is slightly out of true, it may be possible to do a temporary fix by changing the wheel alignment slightly, but the real solution is to true or replace the wheel.
In some cases, the spokes of an under-tensioned wheel will audibly rub against one another where they cross. If there is a rubbing/clicking sound when you are riding, but you can't get it to happen when you lift the bike and spin the wheels off the ground, your problem is most likely related to loose spokes. This will only happen when the bike is carrying the weight of a rider. If you tilt the bicycle to one side and the other underneath you as you coast, or lean forward and back, the tension on the spokes will change and the noise may change. At low speeds, you may feel the bicycle lurch slightly to the side as the loose spokes get to the bottom of the wheel and lose control of the rim. Try squeezing pairs of spokes together to see whether they are loose, and make the same sound you hear when riding. Loose spokes are prone to break, and also often result from rim damage.
Also see the articles about wheel truing and emergency on-road wheel repairs.
A tire with torn or cut fibers due to brake rub (see above) or other damage may cause the bicycle to lurch slightly, sideways, noiselessly, every time a wheel comes around. This is most noticeable at low speeds and on a smooth surface. If you spin the wheel, you will usually notice a slight bulge or shift of the centerline of the tire where the fibers are damaged.
A bicycle tire has two diagonal plies of fibers at right angles to one another. If only the outer ply is damaged, the tire may still hold air, but the condition is likely to get worse until the inner tube bulges out and pops. A temporary repair is usually possible by booting the tire, but the tire should be replaced at the first opportunity.
A perfectly good tire may bulge or dip due to poor seating on the rim, resulting in a "bump, bump, bump" feeling every time the wheel comes around and in extreme cases, risk of a blowout. Our information on installing tires addresses the causes of this problem, and how to cure it.
A tire may be just slightly too fat to fit under the fork crown of a bicycle with tight clearances, so it rubs on the underside of the fork crown only when the bicycle is carrying the rider -- sometimes if the rider leans forward or is braking.
If the wheel-related rubbing sound only occurs when the bike is in low gear while coasting, it is most likely caused by the chain rubbing on the spoke protector. This usually indicates that the spoke protector is broken or bent.
Noises once-per-wheel-revolution that only occur when you are pedaling are most often related to the freewheel or Freehub. The freewheel or Freehub bearings may be loose, or the cassette may be loose on the Freehub body.
See if you can wiggle the sprockets back and forth. There should be little or no lateral play.
If the freewheel/Freehub bearings are loose, it is sometimes possible to tighten them, see my Freewheels Article.
If the sprocket cassette is loose on the Freehub body, you may be missing a spacer, or you may be trying to use a cassette that includes an 11 tooth sprocket on a Freehub body that was not intended to accommodate an 11 tooth sprocket. See my Shimano Cassettes article for details on this.
If the chain in a derailer system is too wide for the spacing between sprockets, it may produce a light rubbing sound with the same rhythm as the wheel rotation -- usually only in some sprocket combinations and most often when using an inner chainwheel, which pulls the chain closer to the next larger rear sprocket.
Most wheelbuilders lace the trailing spokes on the inside of the hub flange. In some very rare cases, wheels laced the opposite direction may lead to mysterious derailer/spoke rub only in the lowest gear and only when pedaling hard. This is due to the trailing spokes' being tightened by the drive torque, and pulling the laced crossing point outward.
This is quite rare, and mostly only occurs with wheels that have insufficient tension to start with, and misaligned derailers/derailer hangers.
Derailer rub can also occur if the derailer is bent because the bicycle fell on its side, or because of tight clearances and poor adjustment of the derailer's inner limit screw. The problem may occur or not depending on which chainwheel is in use.
There is a risk that the derailer may snag in the spokes, and that can result in mayhem: broken derailer, bent or broken derailer hanger or dropout, broken spokes. Take care to avoid riding in the low gear until you can fix this.
![]()
![]()
Clicks, creaks and clunks that happen once or twice per pedal revolution may result from quite a number of different sources, so there are a lot of things to check:
Check this first, the pedals should be snugly screwed into the cranks. The left pedal has a left ("reverse") thread. The threads of the pedals should be lubricated with grease.
For typical cotterless 3-piece cranks, it is very important that the fixing bolts (which hold the crank to the bottom bracket spindle) be properly tightened.They will loosen after cranks are first isntalled. A slightly-loose crank will creak loudly. You may think that the creak is from the saddle, as it comes from the same direction, but you can check by standing whilel pedaling.
A loose crank will quickly distort the hole where the crank attaches to the axle. By the time it moves noticeably,the crankit will probably require replacement.
Cranks can easily come loose and creaking can develop within a few tens of miles. Crank bolts that tighten with an Allen wrench are preferable, do you son't have to carry a special tool to tighten them, or to remove/reinstall dustcaps. A minor reajustment of the front derailer may be necessary after retighteneing the cranks.
The threads of the bolt (or nut), and the underside of the bolt (or nut) head (where it presses against the crank) should be lubricated with grease.
A newer, pinch-bolt left crank will rotate on the axle and also can be ruined.
Some Campagnolo cranks have mating splines in the middle of a two-part bottom-bracket eaxle, and this may be loose.
An older, steel cottered crank will clunk noticeably when the cotter is loose. The cotter then needs to be replaced, but the crank is usually fine.
Looseness will be felt with the left foot, no matter which crank is loose -- because only the left crank transmits power through the bottom bracket. Standing on the pedals with one foot forward, then the other, will reveal looseness.
The stack bolts are the 4 or 5 bolts that hold the chainrings to the crank spider. They should be good and tight. The threads and the Allen bolt head should be lubricated with grease or oil, but try to avoid getting lubricant on the outside of the nuts. The nuts for typical stack bolts have only two small notches to permit a tool to keep them from turning as the bolt is tightened, but if you leave the outsides of the nuts dry, there is usually enough friction between the nut and the inner/middle chainring to keep it from rotating.
A worn-out bottom bracket will have looseness, experienced as a clunk-clunk-clunk-clunk as one foot, then the other applies power. A cup-and-cone bottom bracket may only need adjustment. Or the retaining rings or cups may be loose in the frame -- see next item.
Because of the threading of most bottom brackets, the cups are self-tightening to a point. This sometimes leads to careless installation, particularly on the right (fixed cup) side. If the right cup is slightly loose, it won't necessarily unscrew itself, but it won't really tighten itself up fully either. The symptom of this is an occasional creak or clunk usually as the left crank goes "over the top" when pedaling hard.
This is a surprisingly common, and frequently missed, cause of unwanted noises. Generally you should check the items above first, because they're easier to deal with. You can't reliably check the tightness of the bottom bracket mounting without removing the cranks, but sometimes you can diagnose it this way:
Then turn the cranks so that the right crank is alongside the seat tube and repeat this. Listen for a creak/click.
Check for looseness or bad bearings in the pedals. A click may also be in the mechanism which attaches a clip-in pedal to the shoe, or due to a worn cleat. Test for this by pedaling when the shoe is not clipped in.
If the chainwheel is bent, it may cause rubbing on the front derailer, especially when pedaling hard.
See my Article on Straightening Chainwheels.
If your front derailer's high-gear limit stop is too loose, or the derailer is not mounted straight on the seat tube, the cage may rub against the inside of the right crank as it passes. This might also be a symptom of a bent crank, perhaps as a result of a fall. Many newer cranks are "bowlegged." An older crank may not clear a modern front derailer with a wide, shaped chain cage.
See my Derailer Adjustment Article.
A chain rubbing on a front derailer makes a rattling noise which usually rises and falls at different parts of the crank rotation. This noise may occur only in some chainwheel-sprocket combinations. Adjusting derailer position with the shift lever will eliminate this noise if the derailer is properly adjusted, but also if not, the noise will change as you move the lever. Adjusting the derailer limit stops and cable length will cure this problem, unless the derailer needs to be repositioned, or replaced because it is bent, or is mismatched to the chainwheels. As a chain wears, and when under tension, it rides higher on the chainwheel teeth and may rub on the top of the front derailer cage, requiring the derailer to be raised slightly,
See my Derailer Adjustment Article.
Sometimes a noise that appears to be coming from the bottom bracket is actually coming from the saddle, perhaps where the undercarriage attaches to the seatpost, or where the saddle top attaches to the undercarriage. This noise will go away if you stand up to pedal. A drop of oil at these points will often stop the noise.
If you have a pedal-synchronized noise that only happens when you pedal hard, see also handlebar-related noises.
A frame which is developing a crack may sometimes creak. You may test for this by standing next to the bicycle, grasping the handlebar in one hand and the saddle in the other, and pushing on the bottom bracket area with one foot. Do this from both sides. The test for a loose headset described below may also reveal that the frame or fork is failing.
If you have a regular, repeating skip or hitch every 3 or 4 turns of the pedals, you may have a stiff chain link. This is commonly the link where the chain was joined when it was installed. When the chain tool presses the pin through the chain, the head of the pin tends to pull the uppermost chain plate along with it, so that the two outer plates are squeezing together against the inner plates.
The easiest way to fix this is to bend the problem area of the chain into a "Z" shape, with the bad joint on the diagonal part, then flex the chain back and forth. This will slightly spread the tight plates, and free up the link.
If your chain has a link that has been bent in a chain-jamming incident, it can cause similar symptoms. An emergency repair can sometimes be effected by bending the link straight, with a chain tool to one side of the bent link and an adjustable wrench to the other, but even if this succeeds, the bent link (or the whole chain) should be replaced.
The easiest way to spot stiff/damaged links is to shift the bike into the small/small gear (the gear you should never actually ride in.) This gear has the chain at its slackest, and flexes it farther than any other gear as it goes around the small rear sprocket and the derailer pulleys. Slowly backpedal while watching the chain as it feeds through the rear derailer, and you will usually be able to see the bad link jump.
If new links are added to a worn chain, there will be a light clunk when the transitions between the shorter (new) and longer (old) links pass over a sprocket. This can occur even when only installing a new link pin or master link. When a longer chain is needed, use a new chain.
![]()
![]()
It is common for rim brakes and disc brakes to squeal when the brake shoes are new. A poorly installed or cheap brake also may chatter. A coaster brake that squeals or chatters needs to be rebuilt and relubricated. Grease, oil or deposits of brake-shoe rubber on the rim may cause chattering and grabbing with a rim brake. Grease or oil does not make a rim brake slip: instead, it softens the rubber of the brake shoes, leaving gummy deposits on the rim which make the brake grab and chatter! Scrub the rim with clean solvent to wash off the deposits, then with dishwashing detergent and rinse with clean water.
Could be that the brake shoe is worn right down to the metal backing plate. Replace it before it damages the rim, brake drum or disk. A Shimano Rollerbrake needs to be relubricated before it dries out and begins to scrape, or the entire brake will have to be replaced -- see our Rollerbrake page. A light scraping sound is normal with some shoes for rim brakes, but scraping can also result from sand embedded in the brake shoes. Usually, releasing and applying the brake lightly a couple of times will clean the sand off and prevent excess rim wear. You could also dig embedded grains of sand out of the brake shoe, if that doesn't work.
A repeating noise or vibration when you apply rim brakes is most likely due to an imperfection in the braking surfaces on the sides of the rim.
A width irregularity will cause the brake to grab a bit harder (or a bit less) as the irregular part of the rim passes between the brake shoes while you are trying to slow down.
With new bicycles, (or new wheels) a very slight amount of irregularity is sometimes the result of unevenness of the braking surface at the seam where the rim is connected after it is rolled into a hoop. In minor cases, this problem should go away after a couple of hundred miles/km of riding, as part of the normal breaking-in process. More severe cases indicate a defective rim, and warranty replacement of the wheel may be indicated.
This sort of pulsation in an existing bike that had been OK often indicates a rim that has been damaged by impact with a pothole, stone or other road hazard. Sometimes this sort of "blip" can be repaired by the judicious use of a hammer, adjustable wrench or special pair of pliers made for the purpose. In most cases, unfortunately, a new rim/wheel is the only real solution, but also see the article about emergency on-road wheel repairs.
The tire is supposed to protect the rim from this sort of damage. Rim damage is usually caused by neglecting to keep tires properly inflated, or by riding too narrow a tire for the conditions. With more experience, a cyclist becomes more alert to road-surface hazards and can safely ride narrower tires.
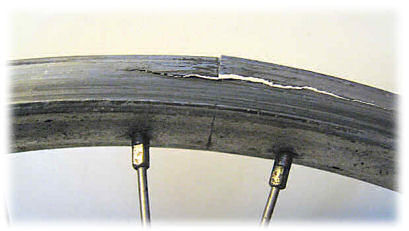
Note, blips like this typically only affect a very short section of rim. If you have a longer "wide" part of the rim, it may be an indication that an old rim's braking surface is wearing thin from many miles of brake usage. Don't ride rims like this, they sometimes cause rapid, dangerous blowouts!
Worn out rim that split
If the caliper is loose in the frame, or the caliper arms are loose on the center bolt, the initial application of the brake will wiggle the arms forward, causing a mild clunk. This may also cause vertical misalignment of the brake pads as the arms shift forward, and rubbing on the tire, evn though the brake appears properaly aligned when not in use.
Brake noises and cures for them are described in more detail in the article about rim brakes.
A loose headset will sit in the frame with the fork forward unless you apply the front brake. Then the braking force will pull the fork backward with a noticeable clunk. With light braking, the headset will rattle back and forth. You can probably feel this through the handlebars.
The headset should be adjusted so as to prevent this sort of play. It is easiest to check this with the bike stationary: Lock the front brake and push the bike forward and backward, observing to see whether the headset is wiggling. Sometimes it helps to rest a finger lightly against the upper and lower headset races in turn to see whether you can feel one part moving against another.
For a tougher test, stand next to the bicycle, lean over the saddle so you are pressing your weight on it with your belly, and rock the bicycle forcibly backwards and forwards with your body weight and momentum while holding the front brake lever. Just grip the brake lever -- don't push or pull the handlebar. Try turning the front wheel slightly to one side or another, but not too far or you could bend it. If you hear the creak, it isn't in the handlebar or stem, so it's probably in the headset.
See my Article on Servicing Headsets.
Parts of a suspension front fork slide together as the bicycle "nosedives" slightly when the brake is applied. A front brake also tries to bend the fork blades backwards, and if the parts of a suspension fork are worn, this can cause a squeak or clunk. Test the same way as for a loose headset.
Handlebar-related noises are most common when you are pedaling hard and pull on alternate sides of the handlebar to counterbalance the downward force on the pedals. This sort of noise should not be ignored, because, in some cases, it may be related to growing cracks in the handlebar or stem. Such cracks can lead to breakage, with resulting loss of control. Avoid stems which have the clamp bolt behind the handlebar -- see John Allen's Web page for examples.
Running the front-brake clunk test, described above, but while pushing and pulling the handlebars in different directions, can reveal creaks too.
The first thing to check is that the handlebar binder bolt is tight enough. The threads, and the underside of the head of this bolt, should be lubricated with grease or oil; if they aren't, friction in the threads may prevent developing sufficient clamping force.
Some handlebars have a reinforcing sleeve on the central section, which also acts as a built-in shim to fit the bars to the stem clamp diameter. The main part of the handlebar may occasionally move within this sleeve. I've had some success using Loctite ® for this: drip some on the bar where it disappears into the sleeve, then use a compressed-air blast to force it into the gap. Let it cure overnight before riding.
It is also a good idea to remove the stem from the steerer from time to time, and apply a liberal coat of grease to the inside of the steerer. The expander/wedge and its bolt should also be greased. Avoid overtightening the expander/wedge bolt, as this can deform the steerer. If you have a threadless headset, this is not usually necessary.
It can be normal for a quill stem to creak somewhat. If it stops creaking, that could actually indicate that the stem is corroded to the fork steerer. See Jobst Brandt's comments about stuck handlebar stems.
![]()
![]()
A loose nut or bolt? Rattles typically occur as the bike shakes in response to bumps in the road.Try lifting each wheel a few inches off the ground, than dropping it to reveal the location of the noise.
Shift cables crepitating when the bars are turned?
Dry derailer pulley bearing? (squeals even after you have lubricated the chain and will probably be warm to the touch after riding). Disassemble and grease.
Suspension wear or misadjustment?
Something in your pocket?
I once did a lot of searching to find the source of a riding companion's mystery squeak, only to find it wasn't his bike at all, it was the knee brace he was wearing on one leg!
When you tighten a threaded fastener, you are working against two sorts of resistance:
If you lubricate the threads, and the pushing face of the nut or bolt head, more of your applied wrench torque goes toward actually tightening the fastener.
Lubricating the threads also reduces the risk of stripping the threads.
![]()
![]()
Last Updated: by Harriet Fell