

This is a very obsolete article, which originally appeared in the March 1978 issue of Bike World magazine, the first magazine I ever wrote for. I had forgotten it entirely, until Clark Stanley sent me an email after reading it in a musty old magazine. He was kind enough to send me a photocopy.
It is reproduced here more as a curiosity than anything else. This dates back to before I learned how to spell "derailer."
At the time this article was written, most bikes being sold in the U.S. were 10-speeds, with French "dérailleurs", either Simplex or Huret...but Japanese Sun Tour (and, to a lesser extent, Shimano) derailers were starting to make serious inroads into the market. The Japanese units were so vastly superior to the French ones that many cyclists were upgrading existing bikes. This article was directed to this market segment.
While the specific hardware referred to is obsolete, I generally stand by what I had to say twenty years ago, and some of it may still be of use to some readers.
I find it hard, however, to believe that the title was mine; I can't imagine using the word "Art" in this context. Surely this was my editor's idea...?
[The article is also online as it originally appeared in Bike World. Both versions include some off-topic material about crankset types. Indeed, that material would have fit better with a different title, such as "Upgrade Your Drivetrain with Japanese Components ".
Minor revisions as of 2010 include correction of typos, most of which occurred during optical character recognition, and adding the accent over the first "e" in, the word "dérailleur". Without the accent, that word is Frenglish!
Since Sun Tour's patent on the slant parallelgram expired, most rear derailers have incorporated both the slant parallelgram and the sprung upper pivot (described below), for better tracking of the sprockets. The increasing popularity of MTBs, with wide-step triple cranksets andl limitaitons on cable routing, has led to important developments in front derailers; see Sheldon's article about them -- John Allen].
![]()
In selecting a rear dérailleur, the first consideration is how wide of a gear range it will be required to shift. Most 10-speeds have the same high gear (52 teeth on the front with 14 on the rear). The major difference between types of gearing is in how low the lowest gear is and what kind of spacing is used in between.
Dérailleurs usually are rated in terms of "tooth-difference capacity," a number that represents the dérailleur's capacity to take up slack in the chain. To find the minimum tooth-difference capacity needed for the gearing you have selected, subtract the number of teeth on your smallest rear sprocket from the number of teeth on the largest. Do the same for the front sprockets, and add the two numbers. For example, if your rear sprockets run from 14 to 26 teeth, the rear difference is 12. If your chainwheels are 36-52, the front difference is 16. Adding the figures for front and rear, we get a total difference of 28 teeth. If you get a dérailleur with a 28-tooth capacity or more, it should handle the range. If you use a dérailleur with insufficient tooth difference capacity, the chain will be too slack in some gears or too tight in others and you probably will not be able to get it to shift properly.
A wide-range rear dérailleur will work with medium-range or even close-range gearing, but it will not shift nearly as well as the appropriate type. The main reason for this is that the jockey pulley (the upper one) is too far away from the freewheel sprockets. This means that the chain angle created by shifting your dérailleur is less pronounced. It is this angle that makes the chain move from one sprocket to another.
If the jockey pulley is too far from the freewheel sprocket, you have to shift your dérailleur farther to create an angle sharp enough to make the chain climb out of its comfortable bed. When it finally does, the chain probably will overshoot and shift two gears when you only meant to shift one. This is because the dérailleur cage has moved farther than the normal 5.5- to 6-millimeter distance from one sprocket plane to the next. Once the chain is derailed, it is just as easy for it to jump two gears as one.
The instruction sheet that came with my first dérailleur, an old Benelux Mark 7, recommended adjusting the angle stop screw so that there were 1 1/2 links (three half-links) of straight chain from the jockey pulley to the largest rear sprocket when the bicycle is in its lowest gear. In my experience, this distance (or just a little more) has given the best results with many different types of dérailleurs. This distance is measured along the center line of the chain from where the chain straightens out after being curved around the jockey pulley to where it is again curved as it goes around the large rear sprocket.
Unfortunately, only one modern dérailleur manufacturer (Sun Tour) provides an angle stop screw, and even it doesn't have this feature on all models. This does not mean that other dérailleurs cannot be adjusted for clearance, but it is not as easy.
There are three other methods of making this adjustment.
With all type "S" dérailleurs and some type "H" ones, you can get some adjustment by lengthening or shortening the chain. It is important not to make the chain so short that it can't fit around the largest rear sprocket and the large front sprocket simultaneously without bending the dérailleur.
If you have Campagnolo, Sun Tour or other similar dropouts on your frame for direct attachment of the dérailleur without the use of an adapter claw, you can get some adjustment by moving the rear axle forward or backward. If you do this, you should be aware that the farther forward the axle is set, the less chain will wrap around and engage the rear sprockets. This will cause your chain to wear out that much sooner and skip in the higher gears.
If you have plain dropouts and your rear dérailleur has been mounted with an adapter claw, you can adjust the clearance either by filing the stop on the claw that limits the forward travel of the dérailleur, or by putting on a different claw entirely. Different brands of claws (especially for type "H" dérailleurs) often are interchangeable as far as the attachment of the dérailleur, but they come in different lengths.
If you adjust your dérailleur for closer coupling to the freewheel, you may be able to shorten your chain a link or two. If so, you should do it, or the chain may be too loose. With Sun Tour dérailleurs especially, it may also be necessary to install a longer run of cable housing to keep a nice gentle curve for minimum cable friction and snappy shifting.
![]()
![]()
In selecting a front dérailleur (chainwheel shifter) for a wide-range gear system, the most important concern is whether the cage is long enough so that the chain will clear the bottom of the cage when the chain is on the smallest chainwheel in front and the smallest rear sprocket (for use with the small chainwheel).
For medium-range or wide-range gearing, look for a cage that is fairly wide at the bottom and somewhat narrower at the top. If it is too narrow, you will need to make finicky adjustments to your front dérailleur to keep your chain from rubbing it as you change rear sprockets.
In general, the more three-dimensional the side plates of the front dérailleur cage are, the better it is likely to shift. An old trick of bicycle mechanics is to bend out slightly the front edge of the inside plate with an adjustable wrench. This makes it easier to shift onto the large chainwheel in many cases.
When changing front dérailleurs, you may run into problems with incompatible cable hardware, which may be brazed onto your frame.
Most front dérailleurs are operated by the pull of the inner cable, but some are operated by the push of the cable housing, with the end of the inner cable immobilized to the body of the dérailleur.
If your frame has cable guides brazed to the bottom bracket for use without any cable housing, the guide for the front shifter is not compatible with a dérailleur that is operated by the outer housing. You can get around the problem by buying a fulcrum clamp, attaching it to the down tube and anchoring it to the end of the cable housing.
On the other hand, many frames have a cable stop brazed to the downtube as a fulcrum. These can be used with dérailleurs that operate by the housing and also with any other type that provides a cable housing stop on the dérailleur itself. Some fancy front dérailleurs such as the Campagnolo Nuovo Record do not provide such a stop (and cannot be used with cable housing in the normal manner) so a downtube cable stop is useless.
One way around this problem is to buy a bolt-on guide clip. These usually come with guides for both front and rear dérailleur cables, so you may wind up with two unused fittings. If you don't want to do that, the cable can be run under the entire bottom bracket, with a short length of cable housing to protect your paint job and hold grease. In this case, the housing is not secured at either end, but is held in place just by the tension on the cable.
![]()
![]()
There are two basic types of rear dérailleurs in common use today. The major difference is in the upper pivot, where the body of the dérailleur is attached to either the rear dropout or to the adapter claw.
In one type (I'll call it `type "H") the upper pivot is simply that -- a free-moving pivot. The only reason it pivots is so that you can swing the dérailleur back out of the way when changing wheels. In normal operation, the tension of the chain pulls the lower part of the body forward until a projection on the body of the dérailleur hits a projection on the underside of the dropout or adapter claw, and there it stays. Most Sun Tour models have an angle adjusting screw on the body. It is the end of this screw that hits the stop on the dropout or claw.
The other type of rear dérailleur (type "S") has a spring on the upper pivot that tends to swing the dérailleur back, in opposition to the chain pull (which is caused by the spring on the lower pivot with both dérailleur types). The advantage of this approach is that the extra spring gives extra capacity to take up chain slack. A type "S" dérailleur can take a wider gear range than a type "H," if they both have the same length cage. The major disadvantage of the type "S" is that as you shift to smaller sprockets, the cage moves back. This means you don't have the chain wrapped as far around the sprocket. The power of your legs is then shared by fewer sprocket teeth and chain rollers at any given time, leading to faster wear of the chain and sprockets.
The new Huret "Duopar" constitutes a new type in itself, and looks like an improvement over both of these traditional types, especially for wide-range applications. But at present they are too expensive for most people.
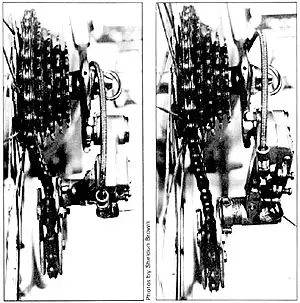
If the rider shifts his rear dérailleur cage six mllllmeters, a normal separation between sprocket planes, the chain angle will be 8.9 degrees if the jockey pulley is 1 1/2 links from the sprocket (above). If the jockey pulley is 2 1/2 links from the sprocket, the same six-millimeter movement sideways creates a 5.4-degree angle.
In another case (below), the jockey pulley is a little more than two links from the sprocket.

![]()
![]()
There are three types of cranksets in common use today -- one-piece"Ashtabula" cranks, cottered three-piece and cotterless three-piece.
The one-piece type is used on children's bikes and some American-made adult machines. This type is quite strong and easy to work on (you can do anything necessary with no more tools than a large adjustable wrench and perhaps a screwdriver). The disadvantages of the one-piece crankset are poor bearings, excessive weight, poor selection of chainwheels available and poor selection of pedals because of employment of a non-standard pedal thread. This type of crankset fits only on bicycles made for it. If your present bicycle is equipped with thIs type, it is possible to get a sealed-bearing unit that will allow conversion to the three-piece cotterless type (if you have a good enough frame to make the cost of the conversion worthwhile).
The cottered type of three-piece crankset is standard on lower-priced imported bicycles. They always are made of steel, so they tend to be heavy. They can be of high quality, especially on older bikes, but usually they are not so good. The bearings are better than those of one-piece cranks in most cases. They can be very frustrating to work on because the tapered cotter pins that hold the cranks to the spindle have to be installed and removed with a very well-aimed hammer (unless you have a very heavy and expensive special tool). In extreme cases, an electric drill may be needed to remove a damaged cotter pin.
These two older types of cranksets gradually are being replaced by modern aluminum-alloy cotterless cranksets. Ten years ago, cotterless cranks were only seen on racing machines and the very stylish custom touring bikes, but since the Japanese started making them, they have become standard equipment on almost all new bikes with any pretense to quality.
A special tool (called a crank puller) is needed to install and remove the cranks, but it is neither expensive nor heavy. Different brands of cranks often require different crank pullers, but there is a fair amount of interchangeability.
The use of aluminum for the cranks and chainwheels saves a very considerable amount of weight, and this is the greatest advantage of the cotterless type (the only crank that can be made of aluminum). There are a couple of disadvantages to the use of aluminum, however. The chainwheel teeth will wear out much sooner if you don't keep your chain reasonably clean and well-lubricated. If you pedal through turns that you should coast through, you may hit your pedal on the pavement. This can start hairline cracks that can extend in time until your pedal falls off with no warning (most likely when you are out of the saddle).
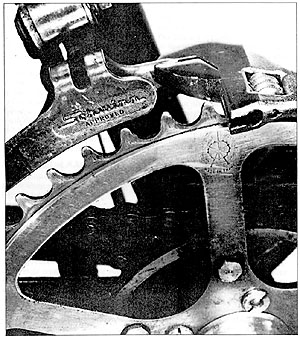
In shopping for a crankset, one important indication of quality is the attachment of the spider portion to the right crank. (The spider is the part with three, five or six arms that connects the right crank to the chainwheels.) On the cheapest type, the spider and the large chainwheel are one piece. This is pressed onto the right crank and the inner side of the crank is swaged or peened over to hold on the chainwheel. Medium-quality cranksets have a spider that is separate from the chainwheels, but it is attached to the crank the same way. With the very best type, the spider and the right crank are a single forging. This type is much stronger, and the chainwheels are likely to be much flatter and truer.
![]()
![]()
![]()
Last Updated: by John Allen

