
|


![]()
This article gives general information about inner tubes. Other articles on this site cover repair of flat tires, and tire/inner tube sizes. There are links at the end of this article to other information about inner tubes.
[This section by Sheldon Brown]
People usually think that tires are made of rubber. This is understandable, because rubber is all that you can see, but it's a serious oversimplification.
A tire is actually made up of three parts:
A bicycle tire is not airtight by itself, so it uses an inner tube, which is basically a doughnut-shaped rubber balloon, with a valve for inflation. The only requirement for an inner tube is that it not leak. Being of rubber, it has no rigid structure. If an inner tube is inflated outside of a tire, it will expand to 2 or 3 times its nominal size, if it doesn't pop first. Without being surrounded by a tire, an inner tube can't withstand any significant air pressure.
(Tubeless tires are beginning to appear on bicycles. They require the tire and rim to be air-tight, adding complications -- especially on a spoked wheel. We have an article about tubeless tires -- John Allen.)
[This section by John Allen]
Several dimensions of an inner tube are important.
Bicycle tires and inner tubes are sold in a variety of diameters. Because inner tubes stretch, exzact fit isn't necessary. For example, the same inner tubes are used with tires in the E.T.R.T.O. 630mm (English "27 inch") and 622mm (French, "700C") sizes.
There are limits, though! An inner tube with too large a diameter will fold over inside the tire. It will give a bumpy ride and can possibly be damaged. An inner tube with too small a diameter will stretch over the rim like a rubber band and make tire installation difficult.
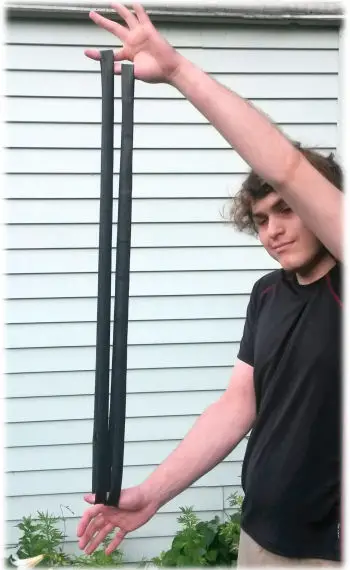
Sometimes, sizes of inner tubes are not close enough, even when they have the same markings. For example, there are two sizes called 24 x 1 1/8, but the rim sizes are 20mm different, 520mm and 540mm. The larger inner tube will fold over inside the smaller tire, but the smaller inner tube might be made to fit the larger tire with some coaxing. Diameters may be compared quickly by extending inner tubes between the two hands, as shown in the photo below.
Comparing inner-tube diameters
Inner tubes are made to fit different tire widths. Again because inner tubes stretch, many are marked for a range of widths.
You can check before installing the tire on the rim. Inflate the inner tube so it just holds its shape and place it inside the tire. It should fit inside the tire, leaving a gap about as wide as the inside of the rim. This test will also check that the diameters match.
Once the tire is installed, if the inner tube is too fat, it sticks out from under the tire, preventing the tire from seating on the rim, or it crumples inside. If the tube is too skinny, it has to stretch too much to fill the tire, and it may tear or split.
In an emergency, you could use a tube which is too long, folding it over, and live with the bumpy ride to the next bike shop. Avoid using a tube which is too skinny, especially on the front wheel. A sudden front-tire deflation often makes the bicycle impossible to control.
Most inner tubes have a wall thickness of about 1mm, enough so air won't quickly seep through the rubber, and so rough spots inside the tire and rim will not puncture it.
Lightweight inner tubes are thinner, more like medical gloves, and require more careful treatment. Some must be pumped up before every ride.
In some regions, notably the Southwestern U.S., "goat-head" (tribulus terrestris) thorns are so common that thorn-proof inner tubes are a desirable option. They are thickened under the tread to help prevent flat tires. These tubes are not only heavier but also increase rolling resistance. They make your wheels heavy and sluggish, and, if incorrectly installed, they can actually cause flats! They can make sense in areas with "goat-head" thorns. Sealant, a liquid inserted into the inner tube which closes small holes, and aftermarket tire liners, such as the well-known Mr. Tuffy, are other options.Jobst Brandt has information on this site about how to recognize and avoid goat heads.
-- will be covered in the next section.
![]()
![]()
[This section by Sheldon Brown and John Allen with assistance from Aaron Goss]
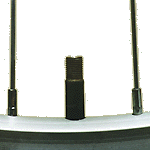
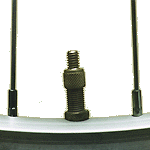
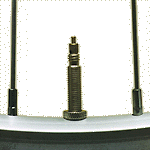
Three types of valves are in common use for bicycle tires:
 |
 |
|---|---|
| Schrader valve | Woods valve |
 |
 |
 |
|---|---|---|
| Presta valve closed |
Presta valve open |
Presta valve with Schrader adapter |
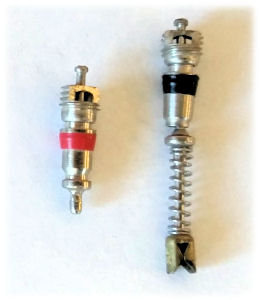
Schrader valves have a spring-loaded valve mechanism. A small pin in the center of the valve opening must be pushed down by a projection inside the pump head to let air in -- or with a fingernail, screwdriver blade or the like to let air out. Before the introduction of the Zéfal HP pump with its clamp-on head in the 1970's, no portable pump would do a decent job of inflating high-pressure tires with Schrader valves. Older pumps used a screw-on hose, and air would leak past the valve-stem threads as the hose was unscrewed, because the pin was still depressed.
Schrader value cores. The spring of
the short valve core is inside it.
Flats for a wrench are visible near the top.
The short type is preferable with narrow bicycle tires.
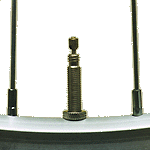
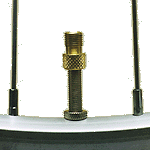
Presta valves don't use a spring, but they have a captive knurled nut to hold the core tight. Before you can pump up a Presta tube or let air out, you must loosen the knurled nut. It is also a good idea to tap the end of the pin to break the seal loose, because they are sometimes sticky. After inflating the tube, re-tighten the valve nut to keep air from escaping. Adapters are available to inflate a Presta inner tube with a Schrader pump. The best ones have a rubber O-ring seal to prevent leakage around the valve-cap threads. A convenient way to avoid losing an adapter is to leave it threaded onto a valve, and carry a Schrader pump. You will then be equipped to inflate anyone's tires.
Presta valve core
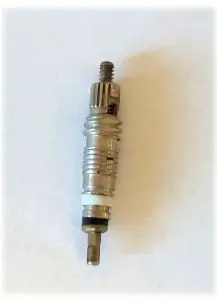
Some Presta valve cores are removable. These have wrench flats on the knurled nut, as in the photo, or on the valve-cap threads just below the knurled nut. The special wrench needed is a rarity, but you could also use a small adjustable wrench to loosen or tighten the valve core.
Take care when inflating a Presta valve not to bend the pin or break it off. If you bend it, you may not be able to tighten the nut. If you break off the pin, part of the valve mechanism will fall down inside the inner tube. You could then replace the tube or replace the valve with one held on by a nut, as described by Jobst Brandt.
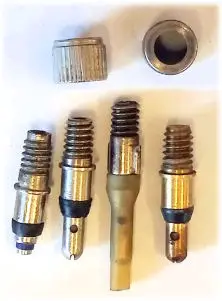
Woods (also called Dunlop) valves have a bottom similar to a Schrader, neck down to about the size of a Presta and are popular in the Netherlands and Asia. Woods valves can be pumped with a Presta pump. Unlike Schrader or Presta valves, most Woods valves are not rated for high-pressure use. A pressure reading is possible with many Woods valves only while pumping. To let air out or to remove the valve core, unscrew the flanged knurled nut (two of these nuts are at the top in the photo below). Unscrewing the nut partway lets you reduce pressure without letting all the air out or risking losing parts.
Woods valves may have an internal seal or use a tiny latex-rubber tube, as shown in the photo. The latex-tube type is slow to pump, because the pump must expand the latex tube to let air into the tire. Most patch kits sourced from Asia come with replacement latex tubes, and the internal-seal type can usually be repaired with a latex tube. Most Woods valve cores are interchangeable, but probably not the second one from the right in the photo, with anti-rotation splines and no flange near the top..
Woods valve cores and flanged nuts
![]()
![]()
Bicycle inner tubes usually come with plastic valve caps. These keep the valve clean, and that is all. A Presta valve cap will work on a Woods Valve, but a Woods valve cap is too short for a Presta valve. Metal Schrader valve caps, available at an auto-parts store or better bike shop, have a rubber seal to prevent leakage even if the valve itself is leaky. Some include a special wrench to unscrew the valve core.
Best kind of Schrader valve cap, with seal and wrench (larger than life-size!)
Presta valve stems of different lengths are available, for rims of different depths. It is best for a valve stem to be only just long enough, to reduce the risk of its being bent or broken. There are also valve-stem extenders, of three kinds:
Unless an extender has its own valve core, a pressure reading is possible only with a pump which has a built-in pressure gauge. Like a Presta to Schrader adapter, an extender which screws onto the valve-cap threads must have a rubber O-ring seal, or it must be sealed with silicone caulking compound or the like, else it will leak during pumping.
The Presta valve hole is 7mm in diameter, and the Schrader valve hole, 8.5 to 9mm. Presta inner tubes may be used in rims that are drilled for Schrader or Woods valves, though it is advisable to install a rubber grommet in the valve hole. Presta-drilled rims (except the very narrowest) may be reamed, or drilled to accommodate Schrader valves, using an 8.5mm (0.326 inch), 21/64" (0.328 inch) or Q (letter size designation, 0.332 inch) drill bit. Some rubber-coated Schrader valves may require a slightly larger hole.
Most inner tubes have the metal of the valve stem bonded to the rubber, with a thicker rubber patch for reinforcement. Some valves, mostly older Presta ones, clamp to the inner tube with a mushroomed bottom end of the valve stem, nut and washer. The washer may be too wide to fit in the bottom of the rim. In this case, you need to build up the area inside the rim either side of the valve hole so the inner tube doesn't sag and tear. Silicone rubber caulking compound works for this.
Some inner tubes have a valve stem threaded all the way down to the rim, and a knurled jam nut to clamp the valve stem to the rim. This nut makesmake installation of the pump head slightly easier when the tire is uninflated. The valve stem is more likely to bend, break or pull loose from the inner tube if clamped down. It is easy enough to pinch the tire between finger and thumb to keep the valve stem extended when installing the pump head.
However, some Presta jam nuts have a flange on one side to fit into a Schrader valve hole, and can serve as an adapter.
![]()
![]()
[This section by John Allen]
A blowout or sudden deflation can result in a serious crash. Inner tubes are not expensive, and it makes sense to use only high-quality ones. I have some inner tubes 30 or 40 years old that are still just fine, pliable and strong. I know their age, because they are the original ones from bicycles which people bought and used briefly, then set aside. On the other hand, in recent years I've had, or seen, inner tubes which never should have gotten out of the factory:
A pair of IRC inner tubes with Presta valves, made in Indonesia, where the rubber around the valve stem came apart within days after installation;
An inner tube (I'm not sure of the brand) where some little scrap of rubber got inside the mold during manufacture and thinned the wall of the inner tube at one spot, so that it eventually developed a leak there. I wasted a lot of time examining the tire before checking the inner tube and realizing that it had failed without being punctured;
An inner tube where rubber peeled away from the Schrader valve stem, deflating the tire and leaving me stranded. The inner tube had been installed only weeks earlier, by a conscientious bicycle manufacturer. I have a photo of this one.
Reports from the US Consumer Product Safety Commission of tubes which split (though in fairness, this can happen due to incorrect installation or use of a skinny tube in a fat tire);
A cyclist's post on Facebook about an inner tube which developed hundreds of tiny cracks and deflated. My next-door neighbor complained that the no-name inner tube he had recently bought for his wheelbarrow had the same problem. The wheelbarrow inner tube had an odd chemical smell, and bore evidence that the manufacturer knew of the problem: sealant was leaking out of the holes. I have a photo of the wheelbarrow inner tube.
All of these reports are of single instances. A large sample is needed to draw conclusions about reliability -- yet there is no systematic recording of inner-tube failures, except when they are reported back to manufacturers. Manufacturers usually don't release such data unless forced to by a court of law.
Here are some things you can do though to protect yourself:
The lesson for a cyclist or bike shop owner is that you need to look after your own safety, or the quality of the product you sell. Quality control in manufacture is a task for the industry and government. The task lamentably is not being addressed as it should be, even though with bicycle inner tubes, it is safety-critical.
[This section by John Allen]
Because a tire's outer diameter is greater than the rim's, a flat tire "creeps" forward (!) as the bicycle is rolled, and pulls the inner tube with it -- except the valve, caught in the valve hole. With a double-wall rim or a valve stem secured by a jam nut, the tube will only bunch up behind the valve. With a single-wall rim, the valve stem increasingly leans backward. You need only roll a bicycle a few feet for this to happen. Assuming that the inner tube is still intact (for example, if the bicycle has been sitting unused for months and the air has seeped out), you may be able to correct the problem by rolling the bicycle backward before inflating the tire. Once done, push the tire sidewalls in all around and look to check that the tube is intact and seated properly inside the tire.
So, after replacing an inner tube during a ride, you want to take it home to patch it (or maybe just to avoid being a litterbug). You need to flatten it completely and roll it up. Here's how.
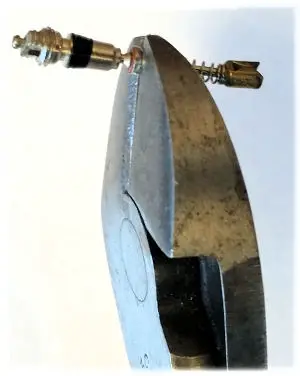
Suggested by Aaron Goss...It is possible to cut the spring off a long-type Schrader valve core as shown in the photo below, and to remove the pusher pin from the pump hose. Air pressure will then close the valve and prevent leakage as the hose is unscrewed. The seal inside the valve is not as good without the spring: a metal valve cap with a rubber seal should be used. Then to inflate tubes with modified and unmodified Schrader valves, you must carry two pump hoses, one with and another without the pusher pin. Is it worth all this trouble to make a retro pump work better? Decide for yourself!
Cutting a Schrader valve core
An old inner tube can be cut crosswise to make rubber bands, for example, to hold together a flattened, rolled-up inner tube. If you need the rubber band to be longer, cut the tube diagonally.
To make a rubber grip for a length of pipe: Cut an inner tube crosswise at one place near the valve. Place a length of metal pipe -- larger than the inner tube's uninflated cross-section -- inside a length of larger-diameter pipe which is closed at one end. Stretch one end of the straightened inner tube over the end of the larger pipe, and hold it in place with a hose clamp. Clamp the other end off. Pump in air, inflating the inner tube. Stand the assembly up so the smaller pipe slides down inside the inner tube, then let out the air. Trim off the ends of the inner tube, leaving the smaller pipe with a rubber, cushioned grip surface.
Old inner tubes may be used like bungee cords. MIT Professor Dr. David Gordon Wilson, author of the book Bicycling Science, could have afforded any kind of bike rack for his car, but he made one with a wooden frame, using numerous old bicycle inner tubes to secure the bicycles. The bike rack worked fine.
Inner tubes may be used as springs for trampolines, catapults, slingshots and the like. I leave the details up to your imagination.
Weaving: Intact inner tubes can be woven into a fabric and stretched inside a frame, looping over the rods at the four edges to make a resilient platform -- to return a thrown baseball, etc. There are even examples of clothing made by weaving together strips of old inner tubes, but I imagine that it is rather clammy!
![]()
![]()
![]()
![]()