|

![]()

| Traditional Threaded Freewheel |
Traditional Threaded Hub |
Cassette Freehub ® |
Cassette Cluster |
|---|
Older multi-speed bicycles have simple rear hubs with a set of threads on the right side of the hub shell. A traditional freewheel cluster has matching threads which screw onto the hub.
This is different from the more modern "Freehub ®" or "cassette hub" design, in which the freewheeling ratchet mechanism is a more-or-less integral part of the hub. See also my article on Cassette Hubs.
A standard freewheel attaches to a hub by screwing on to external threads that are part of the hub. Pedaling tightens the freewheel down on the threads, so no tools are required to install a freewheel.
Sheldon recommends against rebuilding a freewheel or Freehub body.
His advice:
Note: Except in urgent cases:
working on freewheel bodies is generally not worth the trouble. The freewheel bearing gets the least wear of any on a bicycle, since it only turns when it is not carrying any load. Some people will ignore my advice and try to service freewheels (or have no choice).
Sheldon's advice makes very good sense for Shimano Freehub bodies, because they are common, and easily replaced. But these days, more surviving freewheels are cherished antiques. Rebuilding them doesn't deserve to be a lost art. Here is how to rebuild one. I (John Allen) especially like old SunTour freewheels, and I use them as examples in this article. Freewheels of other brands are basically the same, but differ in detail.
Tools: you will need a chain whip (two if you are removing sprockets), a hammer and punch (or a 12-penny nail will do), and about 100 1/8"bearing balls for most freewheels. Re-using old bearing balls is a false economy. It is useful to have a magnet to remove bearing balls and tweezers to install them. A freewheel remover also is helpful, or you could use a bench vise. You need solvent and an old toothbrush to clean off old lubricant and dirt.
![]()
![]()
Leave the freewheel in place on the wheel, or screw it onto a wheel, so that you will have something to hold it with. Breaking the freewheel loose from the wheel now with a freewheel remover reduces the likelihood of damage to the inner body if you have to remove it for reassembly. (If you don't have the right freewheel remover, or the remover splines on the freewheel are munged up, it is useful last resort to grab the inner body in a vise to remove it, after disassembling the freewheel.)
Is there play in the bearings? Test by trying to rock the largest sprocket seesaw-style toward and away from the spokes. There should be little or no play, short of the bearings' binding.
Consider whether you need to remove the sprockets and spacers. You do not need to remove them to rebuild the freewheel's internal mechanism, but cleaning sprochets, and regrinding them if needed, is easiest if you remove them. Cleaning them while on the freewheel also may leak solvent and dirt into the mechanism.
To remove sprockets, use one chain whip to unscrew the smallest sprocket (counterclockwise), and another hold the freewheel so that it doesn't spin backward while you unscrew that sprocket. On most freewheels, two or three outer sprockets are threaded, and unscrew. The inner ones are splined and lift off once you have replaced the threaded sprockets. Keep track of the order of the sprockets and spacers as you remove them. The inner sprockets of older European freewheels are left-threaded and come off the back! For more details on these, see the instructions in our freewheels article.
Removing sprockets using chain whips
Partially disassembled sprocket cluster.
Threaded sprockets have been removed, splined sprockets remain.
Removing sprockets is optional.
At the outer end of the freewheel, you should see a ring with two holes in it for a pin spanner to fit into. This is usually the ring which has the brand name of the freewheel marked, and may also have an arrow pointing clockwise, and the word "remove" in one language or another. If you don't see such a ring, you may need to remove the smallest sprocket to gain access to it. This is common on freewheels with 13 tooth or smaller sprockets. If you don't have a pin spanner that fits the small holes in the freewheel's outer plate, you may use a hammer and punch -- or a 12-penny nail or even an old flat-blade screwdriver -- alternately in one hole, then the other, to drive the ring in a clockwise direction.
Removing outer bearing race using a hammer and 12-penny nail
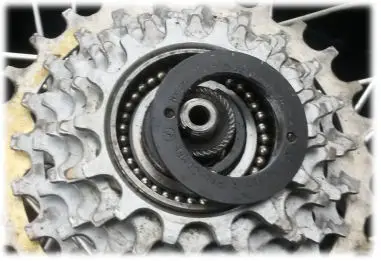
The ring is actually a bearing cone with a left ("reverse") thread, and once you have removed it you will see a ring of 1/8" bearing balls and a stack of shims (very thin washers) surrounding the threads that the cone threaded on to. You can remove one or more of the shim washers to make the bearing tighter, if the freewheel has too much play.
SunTour Pro-Compe freewheel with cover plate removed, revealing bearing balls and shims

Are the shims trapped underneath the bearing balls? If so, you will have to remove the bearing balls before you can remove a shim, and replace shims before installing bearing balls. You can remove the bearing balls with a magnet, or turn the freewheel over far enough to spill out the bearing balls, while holding the outer body so it doesn't fall off.
Usually, removing one shim will bring the bearings into good adjustment -- that is, just short of binding. Test the adjustment by replacing the bearing cone, and if you had to remove them, bearing balls, spinning the freewheel backward to check whether it binds, and trying to rock it. If you are only removing a shim rather than rebuilding the freewheel, you can skip down this page to the reassembly step where you add oil and reinstall the ring.
To disassemble further, just lift off the cluster of sprockets at this point and the innards will be revealed to you, including another row of 1/8" balls (which will probably fall out) at the base of the freewheel, and two or three spring-loaded pawls which make the ratchet work. In the photo below, the red arrow points to one of the pawls and the blue arrow points to the bearing race at the back of the inner body.
The next photo is of the inner body with the pawls removed. One of the pawl springs is visible.
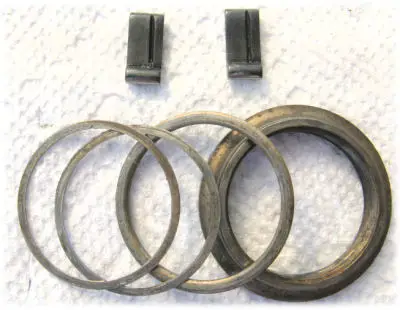
Here are the small parts: the outer bearing race (the ring which you removed in the first step of disassembly -- here looking at its back side), the shims, and the pawls. These pawls have grooves on the underside to engage the pawl springs. The pawl springs on this SunTour freewheel are attached to pins at their base, and stay in place. The pawl springs of some freewheels will come off too, while in others, the pawls and pawl springs are not removable..

You could now clamp the inner body in a vise by the pawl recesses, and unscrew the wheel. This is how to remove a freewheel when you can't use a freewheel remover. Removing the inner body makes reassembly of some freewheels easier, but there is some possibility of damage from the vise jaws.
Now you thoroughly clean all the parts of the freewheel mechanism. I (John Allen) use solvent followed by a strong solution of dishwashing detergent and a water rinse. I dry the parts afterward with paper towels to prevent rust.
![]()
![]()
The right side of the outer freewheel body looks like this when all cleaned up. A bearing race is visible.
The left side of the outer freewheel body looks like this. The steps of the rachet and a bearing race are visible.
For reassembly, you can use thickish grease to stick bearing balls in place while you reassemble the unit. With the outer part of the freewheel large-side-up, first insert balls into its bearing race. Don't fill the race completely -- leave room for two or three more balls. Again, use new bearing balls.
The tricky part is the pawls. Sometimes it is possible to seat the pawls by carefully rotating the inner and outer bodies against each other in the freewheeling direction. This so with the SunTour freewheels used in the illustrations here, because the pawl springs hold the pawls in place. You may also be able to get the pawls to seat by holding the freewheel large-side-up and moving the core from side to side as you rotate it clockwise.
With other freewheels, reassembly can be more difficult. In days of yore, there were special bobby-pin-like clips to hold the pawls compressed against their springs while you re-assembled the freewheel. These are no longer available.
Instead of the special clips, you can use a rubber band with a piece of thread looped though it. You need to have the freewheel removed from the wheel so you can get at its back when it is assembled. Assemble the pawls to the freewheel core, then wrap the rubber band around them to hold them against their springs. If you can't find a rubber band that is short enough, you might just wrap several turns of thread around. Once the outer part of the freewheel is more-or-less in place, pull the thread and rubber band out through the left side of the freewheel.
After seating the pawls, listen as you slowly rotate the outer body backwards. You should hear "tick, tock, tick, tock" if the ratchet in the outer body has an odd number of teeth and two pawls, so one engages at a time. If more than one pawl engages at the same time, as on many SunTour freewheels, you should hear ticktick, ticktick, ticktick.
At this time, you can drip oil down into the gap between the inner and outer bodies. Thin oil is easier to clean out without disassembling the freewheel. Phil Wood oil is thick enough to quiet the mechanism, though thin enough not to gum up the pawls. (Some newer off-brand Freehubs sound like a swarm of bees when riders are coasting!) Run the oil down the outside next to the bearing race. Avoid getting it onto the threads of the inner body.
Dripping oil into the freewheel
If you were only removing a shim, or oil went to the wrong place, you may need to clean the threads of the outer ring and the mating threads of the inner body so threadlock compound will work. This is possible with Q-Tips and solvent without further disassembly. Then reinstall the shims. The shims will prevent bearing balls from falling down inside the mechanism.
Freewheel ready for reinstallation of outer ring

After cleaning, pour the bearing balls in and distribute them. You may need to apply a light film of grease to hold them in place, but avoid getting it on the threads. Apply a couple drops of blue threadlock compound to the outer-ring threads before reinstalling it -- only a couple of drops, and only to the threads of the ring, so you don't gum up the bearings or the pawls. Apply more grease to the bearing race on the outside of the outer ring.
Using threadlock compound on the outer ring
The outer ring threads on counterclockwise, so tightening it will tend to loosen the freewheel from the wheel. Thread the outer ring on as far as it will go without tightening it. Tighten the freewheel onto the wheel using a sprocket and chain whip or a freewheel remover so you have enough purchase to tighten the lockring. Tighten the lockring with a pin spanner or with a hammer and punch, alternating between the two holes.
Replacing the outer ring -- it tightens counterclockwise
Done!
![]()
![]()

The New Winner body is cleverly designed to take 5 or 6 sprockets in 5.5mm spacing; 6 or 7 sprockets in 5mm spacing. The outer sprocket can be as small as 13 teeth with 6 sprockets, or 12 teeth with 7 sprockets. New Winner bodies have an adjustable lockring rather than shims and generally were supplied in correct adjustment. Two of the special tools shown below, now rare, are needed to disassemble or adjust the New Winner body, but this work is very rarely necessary.
Not easily obtainable but usually unnecessary: SunTour New Winner tool 

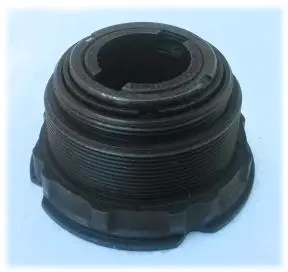
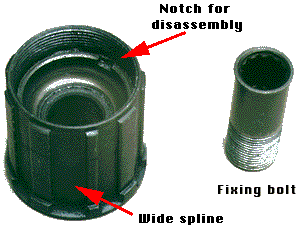
 Most Shimano Freehub dodies may be serviced in the same way as conventional freewheels, but as already said, it is hardly ever worth the trouble. You'll need a fairly hard-to-find old-style Shimano special tool (TL-FH 40) to unscrew the cup, which is also the cone for the main bearings.
Cassette bodies of other brands require different tools or may not be rebuildable.
![]()
![]()
Last Updated: by John Allen