|


This article gathers information about Shimano Rollerbrakes, a type of drum brake which may optionally be installed on many models of Shimano Nexus internal-gear hubs as well as some Freehubs and front hubs. There are also articles on this site covering
![]()
![]()
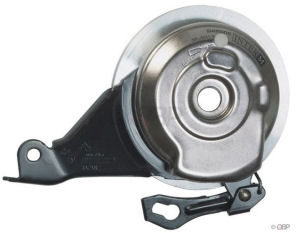
A Rollerbrake is a kind of drum brake.
The Rollebrake is cable-operated, but as with coaster (backpedaling) brakes, the braking surfaces are all metallic, and they are grease-lubricated.
The stationary part of a Rollerbrake is clamped between nuts on the axle of Nexus hubs. (Shimano Alfine hubs are very similar to Nexus hubs, but use disc brakes with Shimano's proprietary CenterLock brake disc, affixed with lockrings similar to those used for cassettes.)
Advantages are that a Rollerbrake is weatherproof and requires little maintenance. It also is replaceable as a unit -- unlike other drum brakes which are inside the hub, so the hub, and as a practical matter, usually the entire wheel -- is replaced if the drum is worn out. Several models of Rollerbrake of different sizes have been sold.
Disadvantages? Only Shimano Nexus (internal-gear) and Nexave (cassette) hubs and a few others have fittings for Rollerbrakes. Deceleration varies: some rollerbrakes are too weak even to skid a rear wheel. Only large Rollerbrakes with large cooling fins have enough heat dissipation for speed control on long downgrades. No Rollerbrake is suitable for use as a drag brake on a cargo bike or tandem. Serious overheating will require replacement of the brake. One more reason to carry a water bottle on your bicycle...
The images of several Rollerbrakes below are all at the same scale.
Entry-level Rollerbrake IM41

Rollerbrake IM55

Rollerbrake IM80

Rollerbrake IM70. Note heat-dissipating fins on back.

Because Rollerbrakes are grease-lubricated like coaster brakes, they add a bit of drag even when not applied. There are front Rollerbrakes available, but, in our opinion, a conventional cantilever brake is better for the front. We do not particularly recommend the Nexus front brake.
[Shimano has introduced improved Rollerbrakes since Sheldon first gave this advice; still, the demand on a front brake is greater than on a rear brake, and there is an issue with fork-blade loading, as with any front hub brake. An especially stout front fork should be used, and it must have a special brazed- or welded-on fitting. The Rollerbrake does not, however, tend to pull the wheel out of the fork as disc brakes do. The cable for a front Rollerbrake typically includes the infamous Shimano Power Modulator, which limits front braking. See Sheldon's article about braking and turning for advice on how to use a front brake for emergency stops-- John Allen]
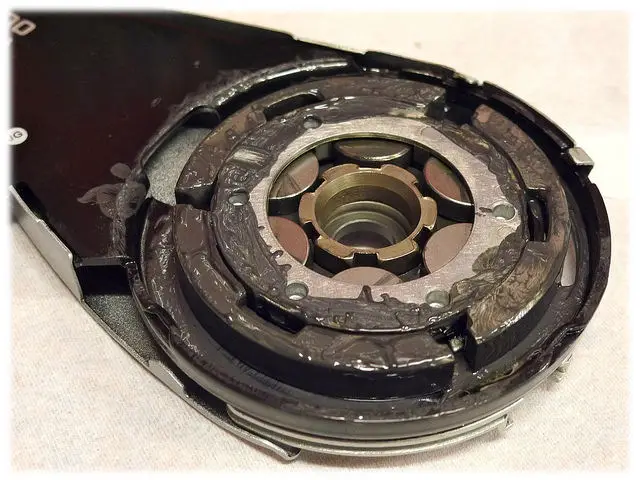
A Rollerbrake has cylindrical rollers around a central, multi-faceted cam. The rollers press three brake shoes outward against the brake drum.
Thanks go to Henry Cutler of Workcycles in Amsterdam for the photo below which shows the internals of a Rollerbrake -- from the middle outwards, the cam, six rollers (partially hidden under the retainer which positions them), three brake shoes and half of the external shell. The brake drum fits over the top of this assembly and around the brake shoes. The other half of the shell fits over the brake drum and holds the assembly together. A couple of tabs have been pried up to open the shell and allow the brake drum to be lifted off.
Waiter, please: Rollerbrake on the half shell!

![]()
![]()
A rear Rollerbrake's reaction arm attaches to the left chainstay using a clamp, or sometimes a brazed-on or welded-on fitting. The special fitting for a front Rollerbrake is shown in the photo below. It goes without saying that the cable to a front hub brake on a suspension fork must be run in housing, but the cable to a front hub brake with a rigid fork must also be run in housing, because flexing of the fork during braking can tighten the cable and lock the brake. We leave it to your imagination what will happen if you ignore this advice.
The image below shows the left side of a Shimano Nexus 8-speed internal-gear hub without Rollerbrake. There is a rubber cap, held in place by a nut and flanged washer:
Removing the nut, flanged washer and rubber cap reveals the Rollerbrake splines:
The Rollerbrake is installed in place of the rubber cap and flanged washer, and secured in position by the same nut. Splines on the brake drum engage the ones on the hub. Some Rollerbrake models require a spacing washer between the drum assembly and outer nut -- check which washer may apply to your combination of brake and axle. A link to technical documents is later in this article.
The reaction arm (at left in the photo below) must be securely attached to the left chainstay or fork blade. Leave the nut that holds the Rollerbrake only finger-tight, and leave the left axle end nut loose until you have installed the hub in the dropouts and secured the reaction arm to the chainstay. The nut which secures the Rollerbrake projects above the face of the shell, and can then be tightened with a 17 mm cone wrench. An easy mistake to make is to forget to tighten this nut, and only tighten the axle end nut (the one at the outside of the dropout) against this nut. Then the brake will be loose on the axle, and the shell can tilt and rub on the rotating brake drum assembly.
A locknut with a shoulder (red arrow in the photo below) holds the adjustment of the hub's left bearing cone and supports the Rollerbrake, or the flanged washer. If no Rollerbrake is installed, you can reduce the overlocknut dimension by leaving the cap and flanged washer off, but then you must replace the shoulder locknut with a nut which has a larger surface to press against the dropout. You could use the nut which held the cap and flanged washer in place, or a thinner locknut. The axle threading is 3/8 inch (9.5 mm) x 26 TPI. Some weather protection for the hub bearing is lost if the rubber cap or Rollerbrake is left off. Unscrewing the bearing cone to add grease is a good idea when making this modification. You might also install a different weather barrier, for example a rubber O-ring. Or you could drill out the rubber cover to 20 mm using a tapered drill bit and pack it with grease. (Thanks to a reader who did not leave a name for this advice.)
![]()
![]()
The Rollerbrake works with most common brake levers, other than levers intended for use with direct-pull brakes. The lever must be able to pull at least 14.5 mm of cable.
Attachment of the cable to a Rollerbrake varies, though there is usually a cable housing stop with an adjusting barrel on the reaction arm. With some front Rollerbrakes, the cable-housing stop attaches to a brazed-on fitting on the front fork. The inner cable may clamp directly under a nut on the brake, or to a fitting with an anchor bolt which attaches to the cable. Specifics are covered in the Shimano technical documents linked in the next section of this article.
Again: the cable to a front hub brake must run down the fork blade inside a cable housing. Flexing of a fork blade due to braking can tension an open cable, locking the wheel.
You may search for technical documents for numerous Rollerbrake models at
at Shimano's technical information site. Mouse over the links to show pop-up balloons which will identify more models than are shown in the list. Shimano technical documents are available in many languages: a language selector appears at the upper right corner of the screen. Shimano manuals include:
Rollerbrake dealer's manual (applies to many but not all models).
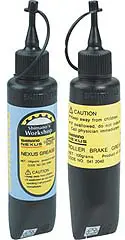
 A Rollerbrake should be relubricated periodically, using special Nexus brake grease -- there's a small rubber access plug on the side of the brake unit. You can just pop off the plug, put the nozzle of the grease tube up against it, and squeeze. This grease contains talc, bentonite (clay!)-- and quartz (sand!). It is abrasive and should not be used for bearings.
Mechanics who regularly service Rollerbrakes recommend adding grease before first use, and partially disassembling the brake during periodic service to clean out the old grease. Internal drag can increase markedly as the grease becomes contaminated. Mechanic Jeff Bertolet comments:
The life cycle of a brake goes something like this: add small amount of grease (pea size amount) in addition to factory grease when installing a new brake. After some months, the grease is washed away by rain [if the bike is left out in the rain]. The brake is now dry and has poor or nonexistent modulation which locks the wheel with the slightest pressure on the lever. A normal consumer would regrease the brake immediately at this point, but our bikes [bike-share fleet bikes] can go a few weeks between being checked by staff. If it is being ridden dry for weeks, the drum and/or shoes are damaged beyond repair. Regreasing at this point can bring the brake modulation back to normal levels temporarily, but the brake will lose all stopping power within a few weeks or months depending on how much it is ridden.
Rebuilding of some Rollerbrakes is not supported by Shimano, but mechanics have figured out for themselves how to do it, and so to extend the life of the brake.
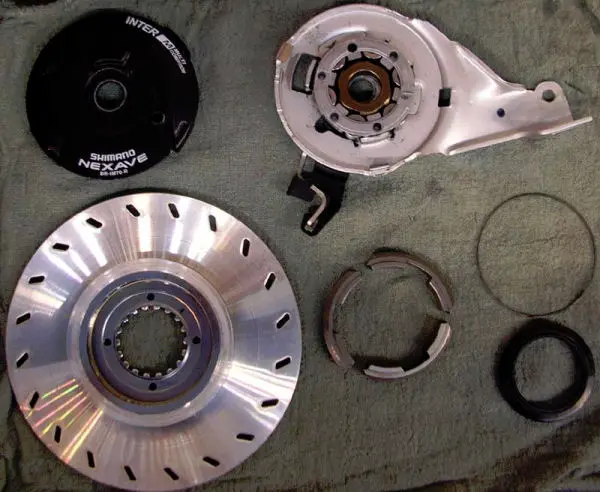
To disassemble a Rollerbrake, you may have to spread the tabs to separate the shell as shown in the photo above. Some Rollerbrakes, like the one in the photo below, are held together by a spring clip. Remove the circular spring clip which retracts the brake shoes, and remove the brake shoes. You may leave the rollers and roller retainer in place unless you are going to clean them..
Aaron Goss, of Aaron's Bicycle Repair in Seattle, has sent the two photos below of Rollerbrakes, fully disassembled and cleaned. These photos may be helpful when rebuilding a brake. The photo below is of a small, front Rollerbrake.

Some higher-end Rollerbrakes have brake shoes with peaked (roof-shaped) braking surfaces. The brake must be disassembled further to get these brake shoes out, and these brakes are also more difficult to reassemble. The photo below is of an BR-IM70R rear brake, as also shown in the image at the top of this page. This is a large Rollerbrake with peaked brake shoes.

There are links below to a Web page and videos about disassembly and reassembly of Rollerbrakes. One video's narration is in Russian but the procedure is clear enough from the images.
Clean out the old grease with solvent. Coat the inside with Phil Wood oil and pack it with Rollebrake grease before reassembling. People who are especially concerned for efficiency will leave the grease out, and use only the Phil Wood oil -- though it can drip out and make a mess, and must be replenished more frequently.
With some Rollerbrakes, the shoes must be held outward against the drum to keep the circular spring clip in place. A page linked below shows how this may be done.
As the shoes of a Rollerbrake wear, slack in the cable will increase, as with other brakes. Readjust the cable using the adjusting barrel, and as necessary, by pulling more cable through the anchor bolt. The brake is worn out when the cable cannot be adjusted to apply the brake fully, or will not retract. Shimano has a wear-measuring tool. See the maintenance manual in the list above for details.If a Rollerbrake is worn out, the entire main assembly must be replaced. Shimano doesn't offer spare parts. External parts -- nuts, bolts, adjusting barrels, clamps etc.-- are available for replacement.
![]()
![]()