Tools and Supplies to Work on Bicycle Tires

|

revised by John "well-prepared" Allen
![]()
This article describes tools and supplies for tire repair and maintenance, to carry on the bicycle, and for use at home. In connection with this article, please also see:
![]()
![]()
To repair a flat tire during a ride, you'll need as a bare minimum:
A pump which fits the valves on your bicycle's inner tubes. The most convenient to carry is a mini-pump, which will fit in a bag on the bicycle, or clip to the bicycle frame. The smaller ones which you can carry with you are less prone to theft. Larger ones pump faster.

Tire levers, which come in sets of 3, with a rounded business end, and a bent, hooked end for hooking onto a spoke. Newer ones are of fiber-reinforced plastic. For very tight-fitting tires, you need tire levers with thin ends. (Later in this article, there is a more detailed description of tire-lever options.)


These are enough to repair most flats -- and this is possible without removing the wheel, more convenient on some bicycles which do not have quick-release wheels.
If removing and replacing the wheel is easy, replacing the inner tube is faster than patching it., but you'll need a spare inner tube. (The one shown, like most, came with a small knurled nut screwed onto the valve stem, but I'm not in favor of bolting down the valve stem, so I removed the nut in protest!)

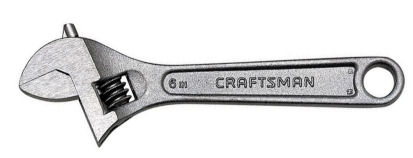
You'll need a small adjustable wrench to remove and replace the wheels if they are held on by nuts. See our Tool Tips article on Adjustable Wrenches.

Anti-theft wheel retention systems require a special wrench -- there are too many varieties to show here.
Adding a multi-tool with Allen wrenches and screwdriver blades will usually let you remove and replace an internal-gear hub or a brake with a reaction arm -- but take your bicycle into the bike shop to check on what tools you need.

Adding a tire boot -- a piece cut out of an old tire -- to the patch kit allows a temporary repair of a gashed tire.

Except for the larger mini-pumps, which clip to the bicycle frame, all of the tools mentioned up through here -- along with a few other tools, described in our article about on-road repairs, fit in a tool bag which straps to the underside of the saddle or can be carried in another piece of baggage on the bicycle.

Beyond this, carrying a spare folding Kevlar-bead tire or rolled-up tire will get you back onto the bicycle faster if a tire has been damaged, and allow replacement of an unrepairable tire. The Kevlar-bead tire is more compact, but the wire-bead will fit in a touring bag or pannier
![]()
![]()
We now move on to describe tools in more detail, also including ones for the home workshop.
 Valve Adaptors
![]()
![]()
 CO2 cartridges are small cylinders of carbon dioxide, originally made for seltzer siphons. With a suitable adaptor, they can be used to inflate bicycle tires. When everything goes well, this is the fastest way to inflate a tire. They're also the lightest and most portable inflation device available, so they're fairly popular among competitive cyclists.
The downsides of cartridges are that they are expensive and wasteful, and that each cartridge is normally only good for inflating one tire one time. Also, CO2 seeps out much faster than air: a tire which needs pumping up only weekly if inflated with air will go soft in a day or two if inflated with CO2. While a few cartridge systems do permit controlled release of CO2, most of them are "all or nothing" designs, so you can't use them for topping off a slightly soft tire. If you carry only one cartridge and get two flats on the same ride, you may be in for a long walk. We advise against relying on CO2 cartridges except in competition.
Compressors are a popular alternative, when available. Most gas stations will have a compressor available, either for free or coin-operated. While these are convenient, they can also be dangerous. If you use a gas-station compressor, you risk blowing the tire off the rim, so you need to be extra-careful, and use a separate, hand-held pressure gauge, too. The problem with using gas-station compressors for bicycle tires is that the volume of a bicycle tire is so much smaller than that of a car tire, so the bicycle tire inflates too quickly.
Many gas stations have a hose connected directly to the compressor, which is typically set at 120 PSI. You can only avoid overinflating your bicycle tire with this kind of hose by holding the head against the valve for a tiny fraction of a second at a time, then checking with your pressure gauge.
The head on the gas station hose may have a gauge and a handle. These make it somewhat easier to use, because you can press the handle down momentarily to add air to the tire, then check the gauge.
A gas-station compressor may have a head with a crank on it. You turn the crank to set the display to the desired pressure value in PSI. As air flows into the tire a bell rings. Each time the bell rings, the gauge checks to see if the pressure in the tire is more or less than the desired pressure. If it is more, the flow is stopped.
With a small-volume bicycle tire, the difference from one "ding" to the next can be 20 PSI or so. If you set the dial to 100, the air will go "ding...ding...ding..." then there's, say, 99 PSI in the tire. This is under 100, so it'll give it another blast and check again, and your tire could well be close to 120 PSI This assumes that the gauge is accurately calibrated for pressures in this range, which is a big assumption. The bottom line is that you really can't trust these gauges for bicycle tires. Instead, you should use a separate, hand-held gauge.
Gas-station compressors work only with Schrader valves or Schrader adapters.
The most effective human-powered inflation tool is the "floor" or "track" pump.  This has a long vertical cylinder, with a "T"-shaped handle that you raise and lower with both hands. This type of pump has some sort of footrest to keep the bottom held in place, and a hose that connects to the valve. Floor pumps get most of their action from the user's back, and with an assist from gravity, as the actual pumping occurs on the downstroke.
A floor pump for bicycle use should have a barrel about an inch in diameter: a thicker barrel will make pumping up a high-pressure tire too difficult. The better floor pumps have built-in gauges and holding tanks, so you can see just how much pressure you've got, while you're pumping. This makes them very fast and convenient to use. They also provide a bit of upper-body exercise to balance out all the leg exercise which bicyclists get!

"Frame" pumps are portable pumps designed to be carried on the bicycle's frame. They are typically about as long as one of the frame tubes, and have a spring-loaded handle that holds the pump in place along one of the frame tubes. Older bikes often had two brazed-on "pump pegs" to secure the ends of a frame pump. Many newer bikes have a single peg just below the top tube on the back of the head tube, for a pump running below the top tube.
Frame pumps are appropriate to carry on the bike for emergency, on-the-road use. They take a fair amount of work to get up to full pressure, but it beats walking! They pump fairly easily at first, but they can require a fair amount of strength as the pressure gets high.
Older frame pumps have a hose that screws onto the tire valve. This works poorly with a Schrader valve because air escapes when the hose is being unscrewed. Newer pumps have a clamp-on head that holds pressure better.
As you pump your tire up closer and closer to full inflation, the pump gets harder and harder to push. This is particularly an issue with narrow tires that need to be pumped up to high pressures.
Your arms may not be strong enough by themselves to get such a tire up to adequate pressure. Assuming you're right-handed, it can help to brace your left hand on the pump head. If there's a convenient tree, I'll often lean the pump head against the tree, so my left arm doesn't actually need to do any work. If there's no suitable tree or other solid object handy, or if I'm topping off a tire without removing the wheel from the bike, I'll kneel on my right knee and brace my left wrist against the inside of my left knee.
As I approach full inflation, and the pump gets harder to push full-stroke, I will start each stroke with my right arm free, then brace my right wrist against my chest for the final, hard part of the stroke, and use my back to complete the stroke.
It is very important that any type of pump be pushed all the way to the end of its travel on each stroke, otherwise you're wasting most of your effort. Air only goes into the tire once the pressure in the pump is higher than in the tire. You can feel the transition near the bottom of the pump stroke, when it stops getting harder to push. And to add the full amount of air with each stroke, you also have to extend the pump as far as possible.
Be careful that you do not bend or twist the valve stem when using a frame pump with an integral head. Bracing the pump against a tree, or a rock can help to hold the valve stem straight, so you don't risk breaking it off or tearing the inner tube. A pump with a hose avoids this problem.
A frame pump is not a substitute for a good floor pump: the well-equipped cyclist will own both. The floor pump is for routine pressure topping off at home, and the frame pump is for fixing flats that occur while you're out riding...it's too hard to use for non-emergencies.
The most popular type of pump to carry on the bicycle -- already mentioned in this article -- is the "mini" pump, a shorter version of a frame pump. A clip may attach a mini pump to water-bottle cage bosses or directly to a frame tube, or the pump may even be pocket-sized. Mini pumps are small and easy to carry, but they can take much longer to use than full-sized frame pumps. Some newer mini pumps engage the pressure chamber on both the push and pull stroke; these are faster than others. Topeak Morph ™ series pumps have some floor-pump features including a footpad and hose. As already described, minii pumps address the problem of theft, as they are small enough to be carried in a bike bag that you can remove when parking in high-risk locations. They also are lighter than than full-sized frame pumps..
![]()
![]()
Traditional tire levers, a.k.a. "tire irons" have already been mentioned. I have an assortment of them for different tires. For very tight-fitting tires, you need tire levers with thin ends, able to get underneath tight beads. For less difficult tires, a single tire lever with a rounded, grooved end can be faster. I particularly like the "Quick Stick."
A similar unit, the Crank Brothers "Speed Lever" incorporates a telescoping extension that snaps onto the axle. This works very much like the power tools used in garages for mounting/dismounting automobile tires. This doesn't work too well on very tight tires, but on average tires, it is quite fast and easy to use.
The Kool Stop "bead jack" is an articulated tool for installing really tight tires. It has a comfortable handle and two ends, one of which is on a hinge. The rigid end uses the edge of the rim as a fulcrum, while the hinged end lifts the bead up and over the opposite edge of the rim. This is a very nice tool for dealing with really difficult tires.
Make sure to follow the instructions.
Wrenches are divided into two families:
 Box wrenches have a complete loop that surrounds the fastener. They are substantially stronger than open-end wrenches, and are the best use for high torque applications, both because the wrench is stronger, and because it can contact more than two corners of the fastener.
Open-end wrenches don't get as good a grip as a box wrench, since they only engage two of the 6 corners of the nut. If you over-stress an open-end wrench, the jaws can spread, ruining the wrench.
Wrenches are sometimes confused with pliers, and naive users sometimes try to use pliers for jobs that really require a wrench. This usually results in damage to the nut or bolt so abused. It can also cause failure due to undertightening the part involved
![]()
![]()
![]()