|
|
Tweet |

Aluminum alloy cotterless cranks have replaced steel cottered cranks on all but the least expensive bicycles. The advantages of lighter weight, easier maintenance, and closer dimensional tolerances have made cotterless cranks very popular. By the mid-1980s, manufacturers had perfected cost-cutting ways of making cotterless cranksets, so that the cheaper models cost barely any more than the steel cottered cranks they replaced. Also, the joint between crank and spindle is stronger with cotterless cranks. Cotters often fail on a fixed-gear or tandem bicycle.
Unlike cottered cranks, cotterless cranks may require special tools to install and especially to remove the cranks from the spindle. The need for special tools is an inconvenience, but this is more than made up for by the great ease of using them. By contrast, the un-special tools used to remove cottered cranks-a hammer, a drift pin, and a cinder block (article from Bicycling, January/February 1983 now online here) -- require more skill (and luck) on the part of the user.
Another benefit of cotterless cranks is that the needed tools weigh only a few ounces. You can carry them with you on the road. You wouldn't want to do that with the tools for cottered cranks!
To install or tighten most cotterless cranks, you need a socket wrench, and to remove a crank from its spindle, you need a cotterless crank puller to fit your brand of crank. The socket wrench and crank puller are often sold together in a small tool kit. Some cranks require only an Allen key for removal and replacement.
![]()
![]()
Let's look at the way that a cotterless crank is secured to its spindle. The ends of the spindle are square in cross section, and tapered so that they are slightly thinner toward the ends of the spindle. There is a corresponding tapered square hole in the crank, so the crank fits onto the end of the spindle.
The crank has been cross-sectioned in this photo to show how it is attached to the spindle,
and how the dustcap is threaded in.

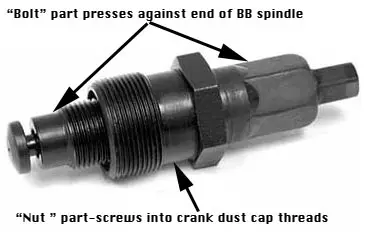
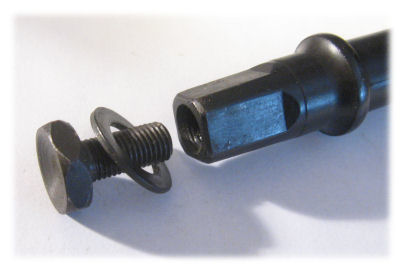
Depending on the brand and model, the crank is secured onto the spindle by either a bolt or a nut. The older, more traditional crank design uses a hollow, threaded spindle. A bolt, properly called the fixing bolt, threads into the spindle. A flat washer under the bolt head is essential. Sutherland's Handbook for Bicycle Mechanics calls this crank spindle design "Type I", (Roman numeral, pronounced "type one") or in later editions, "bolt type".
End of bolt-type spindle, with bolt and washer
The alternate design uses a spindle with a small threaded boss protruding past the ends of the square tapered section. A nut threads onto this boss to secure the crank onto the spindle. Usually, the nut is a special nut with a built-in serrated lock washer, so that no separate washer is required. Sutherland calls this crank spindle design "Type II" (type two) or "nut type".
End of nut-type spindle. The serrated face of the nut presses against the crank.

Some newer cranksets use a splined connection between the spindle and the crank. Except for a few details, crank removal and replacement are as with any bolt-type spindle. However, the bolts are different. ISIS documentation includes information about gauges to test for correct fit. Splined spindles are more troublesome than square-taper ones, because light wear results in looseness that cannot be corrected, rather than only a slight decrease in chainline. The even more recent pinch-bolt cranks -- notably Shimano Hollowtech -- avoid this problem. Square-taper spindles and cranks are still (as of 2025) usual except on high-end bicycles.

Crank fixing bolt and nut dimensions differ from others used on bicycles. Reader Richard Paulos writes: "I've seen inner-city bikes with axle nuts substituted for the nut style. Axle nuts may be 24tpi, 26tpi or 1.00mm pitch, none of which match the 1.25mm [of nut-type spindles] so don't hold well. And they stick out to catch anklebones." These dimensions are useful to know which size tap/die to use to clean up damaged threads.
| Spindle | Threading |
|---|---|
| Bolt type | 8 x 1mm |
| Nut type | 10 x 1.25mm |
| Shimano Octalink | 15 x 1mm |
| ISIS | 12 x 1mm or 15 x 1mm |
| Shimano Hollowtech pinch bolt | 6 x 1mm,19mm long |
There may be others: FSA, Cannondale etc. -- measure. if in doubt.
It is a good idea to mark the crank and spindle so you replace them in the same orientation, and they will seat on each other the same way.
If there is a 6, 7 or 8 mm hexagonal Allen-key fitting, the crank may be removable without using a crank puller -- or there may only be a dustcap integrated with the bolt. You can always test this by inserting an Allen wrench and unscrewing the bolt. If unscrewing the bolt pulls the crank off, you can skip several steps, to the discussion of one-key-release systems, below. If the dustcap is attached to the head of the bolt, skip to the section on using a crank puller.
Otherwise, remove the dustcap, if any. Many cranks use snap-in/pry-out dust caps, rather than threaded ones, or the dustcaps may be unscrewed with a five-millimeter Allen wrench or a wide-bladed screwdriver. (Don't use a small screwdriver, as you run the risk of damaging the slot--most dustcaps are soft aluminum or plastic.) If you don't have a large enough screwdriver, a cone wrench or a dime will often fit nicely. Some 1990-1996 Campagnolo dustcaps, usually with self-extracting crank bolts, unscrew clockwise, in which case, you may have to resort to using a gear puller on the precious Campagnolo cranks, or heating them with a torch (see below), because left-threaded crank pullers are rare!
Once the dustcap has been removed, the fixing bolt (or nut) is exposed.
Note that there is a washer under the bolt head.

Next, you remove the fixing bolt or nut that holds the crank to the spindle. Since the bolt or nut is recessed inside a cavity in the crank, you need a socket wrench to turn it. If a nut is used, it will be 14 millimeters. If a bolt is used, it will usually have a 15-millimeter head; Stronglight and Zeus used 16-millimeter bolts.
For shop use, many mechanics prefer to use an automotive-type socket wrench, usually with a ratchet handle. This works very well.
If you wish to use this type of wrench, you may have some difficulty finding sockets that are the right size for the bolt but have a small enough outside diameter to fit inside the dustcap threads. This will not be a problem for a 14-mm socket, but many 15- and 16-mm sockets are too thick to fit in. It's legendarily difficult to get the 16-mm bolt out of the smaller Campagnolo-sized dustcap hole on a Zeus crankset. Once you get the bolt out, your can replace it with a more-easily-removed 14- or 15 mm bolt.
Usually the better-quality sockets will have thinner walls-cheap sockets try to make up for poor quality steel by using more of it. Sockets come in six-point and 12-point types. Six-point sockets tend to have slightly thinner walls, so they are more likely to fit. For use with ratchets, six-point sockets are generally preferable anyway. 3/8-inch drive sockets tend to be thinner than 1/2-inch drive sockets.
Hold the crank to keep it from turning with the wrench. This is usually easy, as the bolt or nut isn't torqued very tight.
The fixing bolt is removed using a socket wrench.

Once you have removed the bolt or nut, be especially careful to remove any washers that may be under the bolt head or nut, or you may easily destroy the crank in trying to push the crank puller "bolt" against the washer!
The fixing bolt and washer have been removed. Ready for the crank puller...

Now you are ready to use the crank puller. This tool is a joy to use, and with reasonable care will work every time with no complications.
A cotterless crank puller is made up of two parts, one of which is basically a nut and the other a bolt. (The "nut" part is actually a bolt and a nut at the same time! It has both a male and a female thread, plus flats for a wrench.) The "nut's" large male thread fits into the same threads of the crank that the dustcap screws into.
Make sure that the "bolt" part will bear on the end of the spindle. Some crank pullers made for spindles with a protruding boss have a pushing surface with is too large to fit into the square hole in the crank. Using one of these vigorously with a bolt-type (hollow) spindle will only strip out the threads in the crank.
Before you screw the "nut" part of the crank puller into the dustcap threads, the "bolt" part must be screwed back out of the way (counterclockwise) so that it will not hit the end of the spindle while you are screwing the "nut" part into the crank. Otherwise, the "bolt" will keep you from screwing the "nut" all the way into the dustcap threads.
Be sure you screw the "nut" part of the tool all the way into the dustcap threads. These threads will be subjected to severe stress as the crank is removed, and aluminum threads are not noted for their durability!
But don't overtighten the "nut" of the puller. Most of the time you should not need to use a wrench on it. If you must use a wrench to fully seat the "nut," be gentle!
Using a crank puller.

Once the "nut" is securely screwed into the crank, tighten the "bolt." The "bolt" will press against the end of the spindle, the "nut" will pull on the crank. Usually, the crank will fall off in your hand with surprisingly little effort, because of the very high mechanical advantage of the tool. Consequently it is hard to realize how much force is being exerted. (On some cranks, most often the less expensive "melt-forged" models, you'll have to apply considerably more effort than this.)
![]()
![]()
Which tool to buy depends on what brand and model of crankset you have. All use the same one-thread-per-millimeter pitch, and most cranksets have a 22 mm diameter for the dustcap threads: Older T.A. had 23 mm; and Stronglight, 23.35 mm. (There are a couple of rare exceptions: Early Lambert cranksets were threaded 7/8-inch by 24 threads per inch. As mentioned earlier, some 1990-1996 Campagnolo cranks have left-hand dustcap threads -- but these were supplied with self-extracting crank bolts)
To service a T.A. crankset, you need a T.A. puller. For Stronglight, you should really use a Stronglight puller, but the T.A. is usable with care (although it fits a bit more loosely than it should. If the crank starts to get hard to pull off, quit before you strip the threads). For any other brand, you have a wider choice available. Here are some things to keep in mind as you shop among the alternatives:
Pullers made primarily for Type I [bolt type] cranksets usually have a rotating collar on the end of the "bolt." This collar is the part that actually pushes against the end of the spindle to pull the crank off. If you use this type of tool on a Type II [nut type] spindle, it will work, but the threaded end of the spindle may damage the pivot of the tool's collar. Also, some Type I pullers simply don't fit on Type II cranksets: the puller's "nut" may interfere with the threaded boss on the spindle, or it may not be possible to unscrew the puller's "bolt" far enough to allow the puller to be threaded into the crank
This crank puller will not retract farther, and
so it is usable only with bolt-type cranks.

When a tool made for a nut-type spindle is used with a bolt-type (female threaded) spindle, the sides of the "bolt" of the puller rub against the edges of the spindle threads that the crank bolts screw into. There is a slight possibility that the spindle threads could be damaged by this, but bottom bracket spindles are made of such very hard steel that the risk is small. You can solve this problem easily by inserting an undersized bolt into the end of the spindle -- the bolt's head should fit inside the square opening in the crank, but protrude beyond it, so the puller bears on the head of this bolt.
When removing a splined crank which attaches with a larger-diameter bolt, you will need either to use a special crank puller made for this purpose, or to place an undersized bolt on the end of the spindle. This must fit entirely inside the splines of the crank.
The closest thing to a universal crank puller is made by Park. This has a reversible, double-ended "nut," with a tip on one end for square-taper cranksets, and on the other end for splined cranksets. The wrench flats are in the middle. This tool will not fit older TA or pre-1982 Stronglight cranks, though.
If you want to be able to service the greatest variety of cranksets with the minimum of tools, the Park puller is the one to buy. If you are concerned only with being able to service the particular type on your own bicycle, the tool made by the crank manufacturer is probably better, and is lighter than the Park tool. The threads may also be a better fit.
There are several types of socket wrenches suitable for removing and re- installing the crank fixing bolt (or nut). The crank manufacturers all make small, easily carried single-size socket wrenches to fit their fixing bolts. A better solution is to us use bolts which takes an Allen wrench.
![]()
![]()
Some cranks need no puller. Shimano introduced the first such crankset with its One-Key-Release system. Other manufacturers offer similar units. All work the same way.
Instead of the customary 14, 15-mm or 16 bolt, these cranksets use a bolt with a 6, 7 or 8-mm Allen head. This has two advantages: the necessary tool is small and practically weightless, and the Allen head can be exposed through a small hole in the dustcap.
Crank which removes without a puller. Unscrewing the fixing bolt
presses it against the dustcap.

The steel dustcap functions as the "nut" in a standard crank puller, and when you're removing the crank, the fixing bolt functions as the crank puller's "bolt." As you loosen the fixing bolt, the head of the bolt pushes against the inside of the dustcap, pulling the crank from the spindle.
This system is particularly well-suited for touring and for air travel when you need to remove either the pedals or the cranks to put your bicycle into a box. You can adapt other brands of cranks to this system by replacing the dustcaps and fixing bolts. Retrofit kits will work with all Type I spindles (that use a bolt to hold the crank to the spindle) and cranks with 22 mm dustcap threads.
Crank bolts which have an Allen head but are not one-key release generally have a plastic dustcap which is attached to the bolt instead of the crank. Any self-extracting system has a dustcap with slots (as shown above) or holes for a pin spanner so the dustcap can be threaded into the crank.
Extractor threads can get stripped out -- see warnings about compatibility earlier in this article. Or, you may have to remove an older Stronglight, TA, Campagnolo or Lambert crank and not have the necessary crank puller.
#6 Jacobs chuck wedges -- designed to remove the chuck on a drill press or milling machine -- can remove a crank. The wedges are placed behind the crank, bear against the bottom bracket and are tapped into place till the crank breaks loose. This is a simple and reliable method, though it will probably mar surfaces. A similar mechanic's tool called a pickle fork may also work.

Jacobs #6 wedges
A small automotive gear puller can remove a crank. This tool works like a crank puller, except that instead of threading into the crank's extractor hole, it has three hinged arms that hook around the back of the crank. On a right crank, the arms should attach near the spindle so the pull doesn't tend to bend the spider. Getting a gear puller started, especially on a right crank with four or five arms, may require three or four hands to hold all the parts in place. You may need to remove the chainwheels first. Expect that the crank puller will blemish the rear of the crank.
You might also heat the crank. Aluminum has a higher expansion rate than steel, and you may be able to tap on the back side of the crank and loosen it using a hammer and wooden block. You might also use heat to ease removal with Jacobs wedges. Not recommended with a gear puller because you could burn your hands!
A crank with stripped threads can be reinstalled as easily as any other. If you are working on your own bicycle, you may decide to reinstall it, but removing it later is not a job you would want to pass off on someone else!
If nothing else works, you could hacksaw the crank off.
Before replacing a crank, check it for cracks starting to form. They could be at the corners of the square hole, at the pedal hole or in mid-crank. They lead to in sudden failure, and very likely, a crash.
The size of the square-tapered spindle ends varies among brands and models, and so, not all spindles are compatible with all cranks. If you are using a new crank or spindle, install the crank loosely and make sure that they mate well. The crank will pull in by about 2 mm when you tighten it, and so the end of the spindle should be recessed by at least 3 mm inside the square tapered hole in the crank. The back of the crank should easily clear the end of the spindle's tapers and the bottom-bracket. At this time, you may also check the chainline, remembering that it will be a couple of mm closer to the frame once the crank is tightened. See the article on bottom-bracket tapers for more detailed information and advice. Also see the articles on chainline.
Grease the threads of the fixing bolt or nut. Also grease the splines of a splined spindle. Much ink has been spilled about whether to grease square-tapered spindles. Jan Heine of Bicycle Quarterly magazine performed an experiment, voted for grease but indicated that some cranks will have problems, greased or not. The tide of opinion seems to be with light greasing.
A square-taper spindle will go on any of four ways, but if you have marked it as suggested earlier, then you can put it back on the same way, and it will not have to adapt itself to the spindle again. You need to make sure a splined spindle and crank match, as there are different kinds. A splined spindle has one spline different from the others. Align this with the corresponding notch in the crank, or you will ruin the crank.
If you are replacing a bolt-type spindle with a nut-type spindle, then at your next rebuild, you will need a crank puller which doesn't interfere with the nut. Also check that the boss on the end of the spindle doesn't prevent the dustcap from threading in all the way. It is best to avoid using a nut-type spindle entirely with an older Strong light, TA Lambert or (heresy!) Campagna crank that can't take a standard crank puller.
The shallow angle of the tapered square hole multiplies the force from the crank fixing bolt or nut by many times. The bolt or nut will continue to turn for half a rotation or so after it first snugs up, before it reaches full engagement and starts getting much harder to turn. Don't use all of your strength. Preferred torque wrench readings are in the range of 350 inch pounds, and a torque wrench is recommended if you don't have well-calibrated hands -- especially with splined cranks..
Cranks tend to loosen after first being installed. They should be retightened after the bicycle has been ridden a few miles. They may loosen again; an early warning of this is a loud "crack-crack" noise with each turn of the cranks. If the bicycle is ridden much at all with a loose crank, the spindle hole will become enlarged and misshapen, and the crank must be replaced.
It is a good idea to carry a wrench to fit the crank fixing bolts. However, loss of crank bolt preload is normal; repeated, routine re-tightening is not recommended. One role of dust caps is to capture the fixing bolts so they don't fall out and get lost. This can happen without the crank's coming loose. An alternative is to use blue Loctite or similar threadlock compound on the bolt threads.
For a more detailed discussion of crank loosening, see Jobst Brandt's comments. He, too, recommends greasing the square taper.
![]()
![]()
Last Updated: by John Allen