Fenders For Your Bicycle

|

revised by John "No Sweat" Allen
![]()
If you are a "fair weather" cyclist, you don't need fenders, but if you are a serious cyclist, and don't live in a desert climate, you really should have at least one bicycle with fenders.
Fenders make a tremendous difference when you are riding roads that are wet from drizzle, recent rain, or snowmelt.
In a hard rain, you may become wet with clean rain from above, but fenders will protect your body and bicycle from the mud and sand kicked up from dirty puddles and rivulets. The British use the word "mudguards". In the early days of bicycling when horses were common, that word only began to describe the advantage of fenders!
Rainproof clothing completes the picture of the well-equipped wet-weather cyclist. A rain cape -- and if you need to keep your hair dry, a helmet cover -- allow free ventilation and maximum comfort. A jacket of Gore-Tex™ or other breathable fabric also can do the job, though it can get sweaty and hot in a warm rain. A jacket with a hood, or a conventional poncho, is not recommended, because it will interfere with vision when turning the head.

Photo: cyclist and bicyclefixation blog author Richard Risemberg stays clean and dry with fenders, a rain cape and a helmet cover. Note that his headlamp is mounted below the hem of the rain cape. Photo by Gina Morey Risemberg.
The water kicked up by your wheels is much worse for your bicycle than the clean rain falling from the sky. If you ride in wet conditions without fenders, your chain, derailers and brakes will all get sprayed with sandy, muddy, scummy water, often mixed with gasoline residue. This is very bad for these parts.
Even more vulnerable is the lower section of your headset. Headsets are designed to shed water like the shingles of a roof, and are basically rainproof...but the gritty spray from below has easy entry to the bearing surfaces of the heavily-loaded lower races.
![]()
![]()
A pair of full-length fenders. These are available
in various sizes and colors.
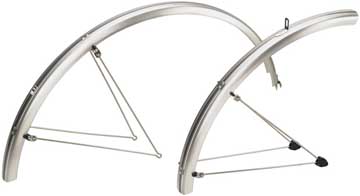
There is no substitute for full-length fenders, such as SKS (formerly ESGE), Planet Bike, or the better Zéfal or Delta models. The rear fender runs from the chainstays all around the rear tire until it is pointing almost straight down at the back. The good ones have two pairs of stays (wire struts) to hold the rear part in position, and also attach to the seatstay and chainstay bridges. The corresponding front fender extends from about 6 inches in front of the fork, rearward and down well below the "equator" of the front wheel, again with stays. Ideally, the front should also be equipped with a mudflap to protect your feet and the chainwheels from spray. If you ride in the rain with other cyclists, it also is good to have a mudflap on the rear fender.
My Rambouillet bicycle with full-length fenders and front mudflap

This traditional fender really works to protect you and your bicycle from spray kicked up by wet roads.
We prefer plastic fenders. They are available in several widths, are flexible and can be reshaped as needed after gentle heating. Metal fenders are popular with traditionalists, but they tend to be noisy, and many are still sold with old-style U-shaped stays can lock the wheel if an object gets entrained by the tire.
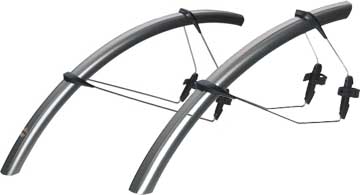
Shorter, clip-on fenders are slightly better than nothing, but very much worse than real fenders. Some rear racks have a flat plate on top which may prevent the "skunk stripe" on your back, but which do nothing to protect the bicycle.
Clip-on fenders
Unfortunately, many newer bicycles are poorly designed, following silly fads that make it difficult or impossible to install full-length fenders. These bikes are designed for fair-weather use, and are not intended for serious cyclists.
Tight clearance under the fork crown of a Raleigh Cadent road racing-style bicycle
prevents installation of a fender or a wider tire.
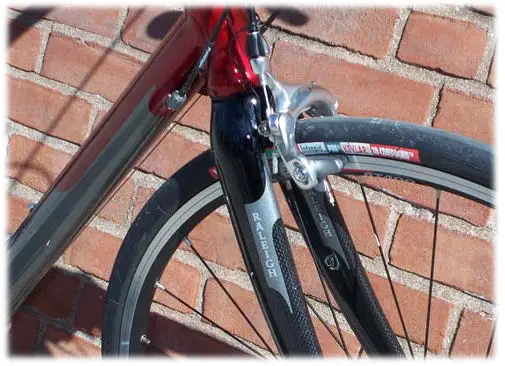
This is particularly true of racing or racing-style bikes, which often are made without frame eyelets to attach the fender stays to, and with insufficient clearance under the brake bridges and calipers to allow fenders to clear the tires. A narrower tire increases clearance, though narrow tires are going out of fashion as it has been shown that medium-width tires (up to 44mm) don’t slow the bicyclist (more air drag but less power lost to vibration — the effects cancel), and wider tires are more comfortable. Slightly smaller-diameter wheels can take a wider tire and also increase clearance — a win-win except for the cost.-- see the article 650b.html on this site.
CrudProducts Roadracer 3 fenders will work with a clearance as little as 4 mm, and clamp to the fork and stays, without the need for eyelets. Still, there is the limitation on tire cross-section, and the tight clearance can trap mud or snow entrained by the tire.
Some suspended MTBs also may not take well to fenders, because the fender should move with the wheel rather than the suspended part of the frame or fork.
My Raleigh M8000 dual-suspension bicycle with clip-on fenders
that move with the frame and fork -- not much protection.
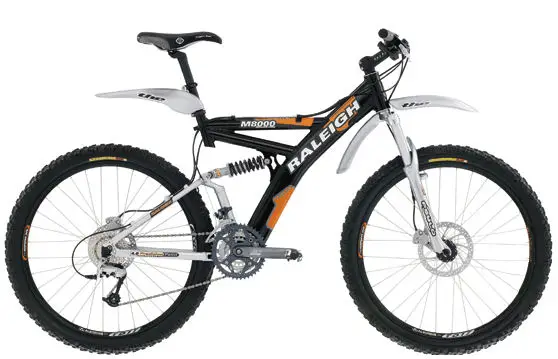
Crudproducts also makes fenders to fit some suspended MTBs, or clip-ons may be your only option, But, even if fenders can be installed to move with the wheels, the bicycle needs to be rugged, and avoid getting mud packed around the wheels. Rough, technical off-road riding is usually done without fenders. Willingness to get plastered with mud from head to toe identifies a true off-road fanatic.
![]()
![]()
Full-length fenders attach at the fork crown (front), chainstay and seatstay bridges (rear). On bikes without caliper brakes or other hardware such as a rack or reflector bracket attached at the brake bolt holes, you need extra 6 mm bolts to attach the fenders.
Hardware to attach full fenders.
The two longest bolts and associated hardware are needed
on a bicycle that does not have caliper brakes.
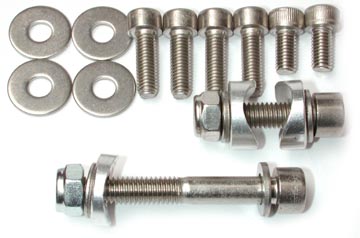
The stays attach to the forkends with (usually) 5 mm bolts. I recommend using stainless-steel Allen-head bolts. The threads should be lubricated with grease or oil so that you can get them nice and tight. Special large-diameter stainless-steel washers are available at better bike shops, to provide a good mating surface between the bolt head and the loop of the fender stay, so that the loop doesn't get deformed when you tighten the bolt.
Fender stays loop around bolt, with washer
Most front fenders attach at the fork crown with an angle bracket. On a bicycle with a protruding brake bolt, the fender attaches under the nut at the rear of the fork crown as shown in the photo below. The angle bracket is slotted. To avoid rattles, slide it down until the fender is clear of the fork crown and the brake. Test for clearance with the brake in both the open and the closed position.
Angle bracket on the front fender attaches under the front brake bolt.
On a bicycle with recessed brake mounting, the angle bracket would have to be attached ahead of the fork crown, unless it is attached using a Sheldon fender nut, which is extended clear of the fork or frame and threaded for an additional bolt.
|
Conventional fender nut |
Sheldon fender nut |
 |
 |
With the angle bracket ahead of the fork crown, you may have to bend the top of the angle bracket forward so it doesn't interfere with the headset. The brake must then be removed to remove the fender, and you have to re-center the brake.
Most rear fenders attach to the seatstay bridge with an angle bracket which has tabs that reach under the fender. The bracket can slide lengthwise along the fender to align it.
Tightening the nut or bolt that holds the bracket in place can twist the fender out of line. Use a washer under the nut or bolt head. Lubricate the threads and the washer, and hold the bracket in position as you tighten. If the brake also rotates, you may need to hold it instead and misalign the fender bracket so it rotates into place with the final tightening.
A slidable bracket attaches the fender to the seatstay bridge..

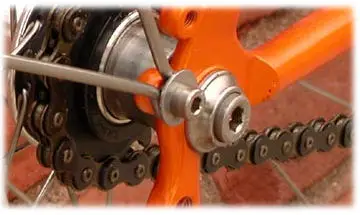
At the chainstay bridge, there is usually a clip to secure the fender, as shown in the photo below.
A clip attaches the rear fender to the chainstay bridge.
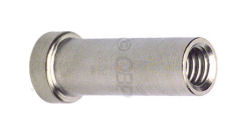
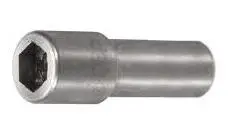
On a bicycle without a rear caliper brake, the seatstay bridge may be drilled with a hole facing directly toward the fender. A bolt through this hole and the fender makes a very secure attachment; use concave washers, if needed, as with a brake. The chainstay bridge may have the same kind of attachment. For the front fender, there may be an eyebolt to reach up inside the front fork and loop around the brake bolt. You must use spacer washers to adjust spacing from the wheel. Plastic, cylindrical spacers are common in electronics work. A disadvantage of this type of attachment is that you must remove the wheel, or brake, to remove or replace a fender.
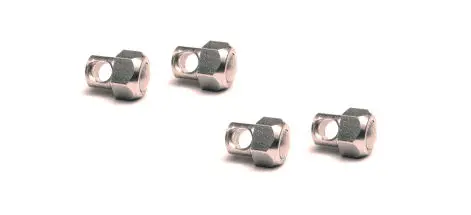
The stays of Esge/SKS fenders attach to the fenders with small eyebolts and nuts that use an 8-mm end wrench. The eyebolts allow you to adjust the spacing of the fenders from the wheel. Make sure to lubricate these threads and tighten the nuts REALLY tight. I use a 14-mm open-end wrench to hold the tab of the fender so that it won't rotate/bend while I am tightening these nuts.
Fenders should preferably be adjusted so that clearance increases slightly from rear to front. Then mud or snow which is entrained by the tire is ejected rather than becoming packed under the fender.
Fender eyebolts and nuts
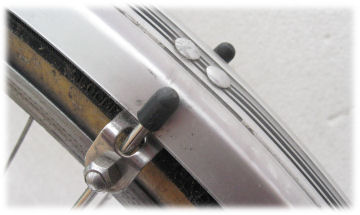
The stays, especially on the front fender, should be trimmed off so that they don't protrude far past the hardware of the fender, so you can't scratch your legs with them. ESGE/SKS provides plastic caps for the stays, but these tend to get lost sooner or later.
Fender stays attach to fender with eyebolts. Caps prevent minor injury or torn clothing.
Planet Bike fenders have clips that are screwed to the fenders and which attach to the stays with hand-tightened screw-on fittings. You must trim the stays to length before installing these.
Planet Bike clip. The stay slips into the barrel at the left,
which screws tight. The fitting at the right has a slot to slip onto
the edge of the fender and is secured with a small Phillips-head screw.
Planet Bike clip fully assembled. The arrowhead-shaped tab
seen in the photo above snaps into the fitting on the fender.
After installing a fender, spin the wheel to check that nothing is rubbing, operate a rim brake to make sure it clears the fender, and bounce the wheel on the floor to check for rattles,
The first time you install a set of full fenders on a bike, it is a fairly time-consuming task, but after that, it isn't that big a deal to take them on and off.
A bicycle with fenders cannot be made as compact by removing the wheels, unless the fenders are removed too. This is more often a problem with the rear fender and can prevent a bicycle from fitting inside a car or a closet.
Many small-wheel folding bicycles fold with both wheels in place, and so the wheels help to protect the fenders from being bent out of line. Quick-release fenders offer another solution. The tabs of Planet Bike fenders can be detached, and the fender stays rotated parallel with the fork or seatstays. ESGE/SKS makes a quick-release kit for bikes that don't have caliper brakes. It consists of a pair of special bolts that fit the fork crown/seatstay bridge. These bolts have heads that incorporate a snap fitting to permit quick-release. The kit also includes 4 "Securi Clips" (see below) so the stays can be snapped out, leaving the Securi Clips in place.
![]()
![]()
There is a potential severe hazard with a front fender: debris caught between the fender and the tire, or between the moving spokes and the fender stays, can cause the fender to crumple and lock the front wheel. Also, if the front fender comes loose at the fork crown, it will rotate forward and the stays can jam it against the wheel. Do not ride a bicycle with deteriorating fender hardware; consider installing safety releases if your bicycle's fenders do not already have them.
A fallen tree branch jammed in the spokes, crumpled this fender and
launched John Allen over the handlebars. He is glad that he was wearing a helmet.
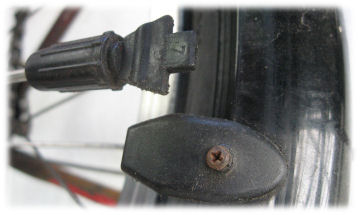
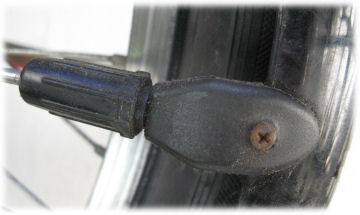
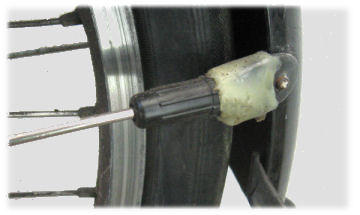
ESGE/SKS fenders come with special plastic "Securi-Clips,” snap-away fittings that connect the front fender stays to the forkends.
SKS Securi-clips provide a safety release.
This is a very worthwhile feature. With time, the Securi-Clips may loosen a bit and begin to squeak. Filling the cavity of each fitting with silicone caulk, then shoving the stays in and letting the caulk dry will put an end to the squeaking. The fenders can still easily be removed and replaced. The video below shows how Securi-clips work.
The Planet Bike fender clips, at the fender end of the stays, also serve as a safety release, but they tend to loosen over time, so they eventually come apart during rides. Gluing them together with hot-melt or epoxy glue will cure this problem. The safety feature isn't impaired much, because a strong pull can still slide the stays out of their screw-on fittings. Once you have glued the clips together, removing the fenders requires unscrewing the fittings, or removing the bolts near the dropouts.
Fender-stay eyelets are safer if partway up the fork blades, because the fender is then less likely to tangle with the tire if an object is entrained.
Planet Bike clips glued together to prevent unwanted release.
If you use your bicycle regularly for transportation, and ride in wet weather, you probably also ride after dark.
A rear fender provides an excellent location for a rear reflector. Nothing blocks its line of sight unless you are pulling a trailer. Fenders don't provide much width to install reflectors, though. You can address this issue by using stick-on, reflective tape.
Auto-parts stores sell reflectors with a stadium shape, (also discorectangle, obround, sausage body --lots of names for these!) rectangles with rounded ends. These are very bright. When mounted vertically, they are narrow enough not to overhang a medium-width bicycle fender. To work properly, this type of reflector (or any reflector) must be truly vertical, not tilted upward, and you may have to make a bracket to hold its top end away from the fender. The stadium-shape reflector is meant to be oriented horizontally to work over the widest range of angles -- so preferably also use reflective tape on the rear fender, facing toward the sides at the rear. Reflective tape on a front fender also helps make your bicycle visible from the sides, and without unbalancing the wheels like wheel reflectors.
The most stable location for a taillight on a fender is where the stays attach. Esge/SKS "Chromoplast" fenders have embedded strips of metal foil to carry power to a taillight -- clever, but unreliable. If the bicycle also has a rear rack, placing the taillight under the rack will protect it from damage..
A rain cape hides a headlight mounted on the handlebar or front brake bolt. The headlight needs to be mounted on the helmet, front fork blade, front baggage rack or fork crown..
Pay special attention to cleaning lights and reflectors if they are in the "rooster tail" of dirty water that a wheel throws up.
Fenders don't extend down as far as they might for maximum protection, because the ends would be vulnerable to damage from curbs and the like. Flexible extensions called "mudflaps" are a valuable addition. Spray comes off the wheel as a "rooster tail", and is ejected almost directly upward at the rear of the wheel if a fender extends down only as far as the "equator" of the tire. A suitable front mudflap which extends almost to the ground will keep spray off your feet and the bicycle's bottom-bracket area. It needs to be flexible, because it will strike the ground if you ride down over a curb or the like. A mudflap on the rear fender is a welcome courtesy to other cyclists.
Triangular rubber mudflaps were formerly a standard accessory item, but they have become hard/impossible to find. These flaps are a bit heavy and stiff for mounting on modern plastic fenders anyway. Nice leather mudflaps are available commercially.
Many rain-savvy cyclists make their own mudflaps for plastic fenders out of plastic milk/cider jugs, commonly secured by "pop" rivets or small screws and nuts.
It doesn't have to be fancy. This mudflap was cut from a plastic honey bottle.
![]()
![]()
![]()