Adjusting Direct-pull Cantilever Bicycle Brakes ("V-Brakes ®")

|

revised by John "Leverage" Allen
Direct-pull brakes are a type of cantilever rim brake. In connection with this article, please read the lead article about rim brakes. It covers, among other things,
Most brake problems result from excessive friction or poor installation of the cables, not poor setup, or poor quality brakes. Also see the article on cables for information on cable selection and adjustment of brake cables and brake levers.
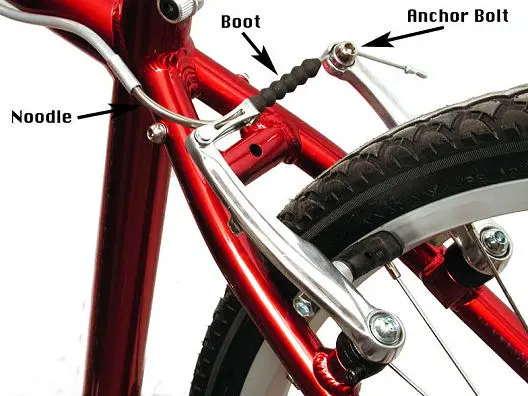
Traditional cantilever brakes used two cables, a main cable running down the centerline of the bike, and a second, "transverse" cable connecting the cantilever units on each side of the wheel. The main cable would pull upward on the middle of the transverse cable, causing the cantilever units to rotate inward.
The "direct pull" cantilever, also commonly known under its Shimano trademark name "V-Brake" is a simpler design, using only a single cable. The cable housing connects to one arm, and the inner cable runs across the top of the tire to the opposite arm. When the brake is applied, the housing pushes on one cantilever while the inner cable pulls the other.
Since the cable runs straight across the top of the tire, direct pull cantis need longer arms to get the cable high enough to clear the tire. This increases the mechanical advantage of the system, requiring the use of special matching brake levers.
Direct-pull brakes avoid the need for a cable hanger. Traditionally, this has been part of the upper headset stack, but with a threadless headset, the cable hanger is clamped around the fork steerer. In either case the cable hanger takes up space on the steerer Unless it replaces a spacer washer, it requires a longer steerer tube. A cable hanger may attach instead at the front brake bolt hole.
With a suspension fork, the cable hanger cannot be in any of these locations, because the cable would loosen and tighten with suspension travel. The cable hanger must in this case attach to the fork.
Direct-pull brakes also avoid a serious risk. If the main cable of a traditional cantilever brake fails, the transverse cable can snag on a knobby tire and lock the wheel. If the front wheel, the rider will pitch forward. A direct-pull brake only stops working if the cable parts. Your bicycle has two brakes -- right?
![]()
![]()
 |
|---|
| Normal Position |
 |
| Boot Pulled Away |
 |
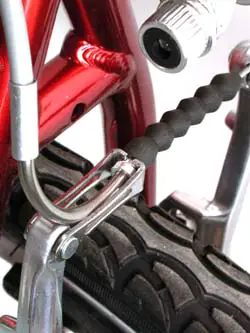
| Noodle Unhooked |
For wheel removal, the noodle may be unhooked from the arm link. This will allow the brake shoes to open up wide enough to clear even a fat tire. First, pull the boot away from the end of the noodle. Then squeeze the brake arms together with one hand while unhooking the lower end of the noodle from the keyhole-shaped slot in the arm link.
Make sure to hook the brake back up immediately after you re-install the wheel!
![]()
![]()
First, remove the arms from the studs, and make sure the studs are free of rust. Coat the studs liberally with grease (this is VERY important!)
Install the arms with them at their maximum spread and tighten the bolts that hold them to the frame. This is how you set the springs.
Shoe adjustment is covered in the article about rim brakes, but there are a few special things about direct-pull brakes:
![]()
![]()
If a brake appears off-center, check first that the wheel is installed straight in the frame/fork. If the wheel is crooked, and you maladjust the brake to compensate, you are creating two problems where there was only one before.
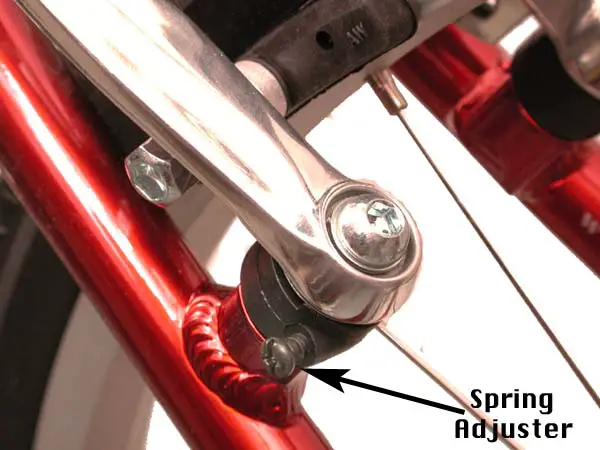
If your wheels are centered, and your brakes are not, and, if the pivots are properly lubricated and free-moving, the brake shoes should be centered. If they are not, you probably need to adjust the spring tension on one or both of the cantilevers.
Some brake bosses have more than one hole for the end of the spring, to allow a rough adjustment of spring tension. Generally, the hole which provides more tension should be used with a narrower rim. Make sure that both brake arms use matching holes.
Most direct-pull cantilevers have a fine adjustment for spring tension. The adjustment will be a small screw with the head facing outward to the side of the bike. The screw is generally located near the bottom of the cantilever, below the pivot point. Sometimes it works with a Phillips screwdriver; other times, a small Allen wrench may be needed.
![]()
![]()
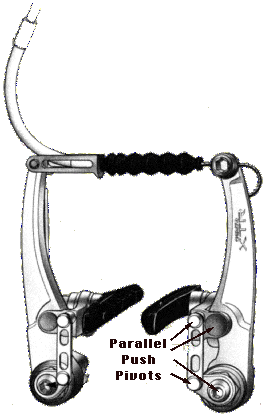
Unfortunately, the extra pivots considerably complicate the mechanism, and this has caused maintenance problems and excessive squeal in practice.
Reader Paul Rintoule has sent in some advice on maintenance of parallel-push brakes:
Shimano parallel-push V-brake tune-up kits have all but dried up so I fixed my squealing XT parallel-push V-brakes by adding disc brake rotor washers to tighten up the parallel-push pivot cage. This works the same as the tune-up kit did.
You have now removed the slack that causes severe squealing.
Most newer drop bar bikes are have Ergo or STI brake/shifter units as original equipment. Direct-pull cantis are not compatible with these. Other types of shifters may of course be used, along with the special brake levers. In any case many cyclists prefer bar-end shifters. These are simpler and less expensive than brake-lever shifters, and give an indication of what sprocket is in use: brake-lever shifters return to the same position after every shift.

Neither of these systems is ideal, and neither is really any better than traditional center-pull cantilevers.
![]()
![]()
Note the differing levers and pivot stud positions.
| Cantilever Brake Compatibility/Interchangeability | |||
|---|---|---|---|
| Cantilever Type |
Frame Pivot Studs |
Levers | Cable Routing |
| Direct Pull V-Brake ® |
Below the Rim | Long Pull Low Tension |
Cable comes in from the side.
Lower housing stop is part of the cantilever |
| Traditional Center Pull |
Standard Short Pull High Tension |
Cable runs down the bicycle's center line.
Lower rear housing stop on frame, |
|
| U-Brake Cantilever |
Above the Rim | ||
| Roller-Cam Cantilever |
|||
![]()
Last Updated: by John Allen