Adjusting "U-Brake" Bicycle Brakes

|

|
|
U Brakes are a type of rim brake with pivots mounted to the frame or fork. In connection with this article, please read the lead article about rim brakes. It covers, among other things,
Most brake problems result from excessive friction or poor installation of the cables, not poor setup, or poor quality brakes. Also see the article on cables for information on cable selection and adjustment of brake cables and brake levers.
![]()
![]()
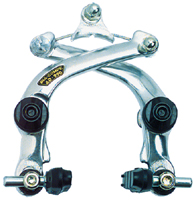
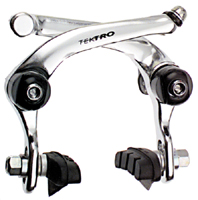
A U brake is a brake that works like a centerpull caliper, only with the pivots mounted directly to the frame or fork. The "L"-shaped arms cross over above the tire, so the left brake shoe is operated by the right side of the transverse cable. A U brake uses studs (bosses) attached to the front fork or frame above the rim, rather than below it, as with conventional cantilevers. U brakes use the same type and placement of studs as roller-cam brakes do.
In 1986-88 there was a fad for equipping mountain bikes with U brakes mounted underneath the chainstays. This provided a nice clean look to the seatstay area of the bicycle, and provided a somewhat simpler cable routing. In addition, as the chainstays are larger and more rigid than typical seatstays, the "problem" of flexing of the studs under load was reduced. Conventional cantilever brakes cannot be mounted on the chainstays, because they would get in the way of the cranks.
Although U brakes were cool-looking and powerful, the fad died quite abruptly when people actually started using the bikes that were sold with chainstay-mounted U brakes. They had several serious drawbacks:
In recent years U brakes have been making a bit of a comeback on freestyle bikes.
Reader Peter Stock has sent a description and photos of Dia Compe AD 990 U brakes with helical springs like those of many cantilever brakes. But U brake studs do not have holes next to them for return springs. The springs are instead at the outer end of the studs. The brakes shown at the top of this article use the same arrangement.
One end of each spring connects to the outer face of the brake arm, fitting into the small hole at the 5 o-clock position below the stud in the image below.
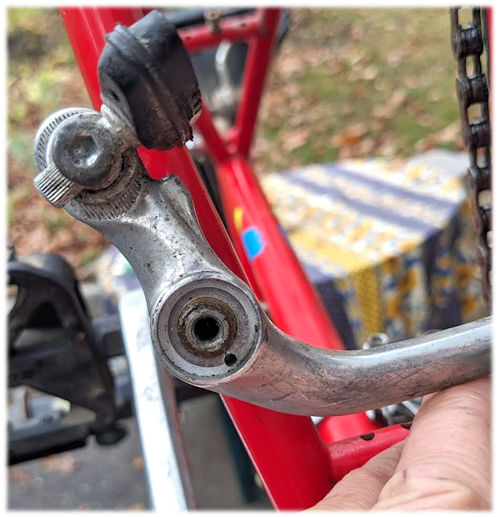
But the other end of the spring also needs something to connect to. So, there is a sleeve with wrench flats and a hole for the return spring under the head of the bolt which holds each brake arm in place. The wrench flats make the sleeve look like a nut from the outside, but it is unthreaded inside. The bolt presses down on the sleeve, and the sleeve presses on the end of the stud -- so the sleeve is prevented from rotating. It sets the adjustment for the return spring, and secures the brake arm.
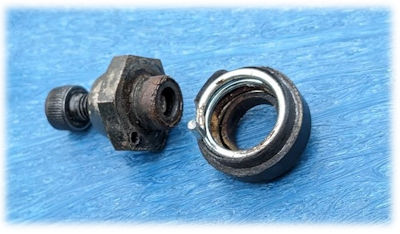
To relubricate the brake, you loosen the bolt that secures each brake arm, using an Allen wrench. The sleeve will suddenly rotate, releasing spring tension. Remove the sleeve, spring and arm from each stud, and make sure the studs are free of rust. Coat the studs liberally with grease (this is VERY important!). The springs are mirror images of each other and are not interchangeable. They should be installed so they contract -- increasing the turn count slightly -- rather than expand -- when tensioned. Disassembling and reassembling one side of the brake at a time when rebuilding it will prevent possible confusion.
Adjust the spring force by rotating the sleeve about 1/2 turn in the direction which pulls the brake shoe away from the rim. Still holding the sleeve, tighten the bolt with the Allen wrench to secure the brake arm and hold the spring adjustment. Only connect the transverse cable after this has been done. The return-spring force should be only great enough to pull the cable tight and open the brake. If the brake shoes do not center correctly over the rim, hold the sleeve on one side with an end wrench, loosen the bolt and rotate the sleeve slightly, then retighten the bolt while still holding the sleeve.
![]()
A U brake uses a conventional brake lever, not the special lever with longer cable pull used with direct-pull brakes (V brakes). Set the transverse cable as short as possible for best braking, and adjust the cable and lever. (See the article about cables). Adjust the brake shoes. (See information on brake shoes in the lead article on rim brakes.)
Check the brake shoe adjustment frequently due to the decrease in mechanical advantage as the brake shoes wear, and their migrating higher and higher up on the rims. If you don't keep on top of the adjustment, they will eventually start rubbing on the tire sidewall. Many thousands of tires have been ruined by this.
![]()
![]()
Last Updated: by Harriet Fell