Bicycle Pedals

|


Toe-clippable pedals (sometimes known as "rat-trap" or "quill" pedals) work with stirrup-like clips and adjustable straps to hold the foot in place. These were the near-universal choice of avid recreational cyclists and racers until the 1980's. Toe-clippable pedals, especially "platform" pedals, may be used either with normal street shoes or with special cleated shoes. Getting the foot into and out of the toe clip requires some practice. Double-sided toe-clippable pedals also can be used without toe clips. The pedal shown here is single-sided, The underside, being lighter, will come to the top when the foot is lifted off, and is not shaped to fit a shoe sole.

The use of cleated shoes with toe clips, however, was made largely obsolete by the development of:

A companion article goes into more detail about pedal, shoe and cleat choices and adjustment.
![]()
![]()
The reason for this is not obvious: Bearing friction would, in fact, tend to unscrew pedals threaded in this manner. It is not the bearing friction that makes pedals unscrew themselves, but a phenomenon called "precession".
You can demonstrate this to yourself by performing a simple experiment. Hold a pencil loosely in one fist, and move the end of it in a circle with the other hand. You will see that the pencil, as it contacts the inside of your fist, rotates in the opposite direction. This occurs because the pencil's diameter is smaller than that of the opening in your fist. The external threads of the pedal axle are slightly smaller than the internal threads of the crank -- or they wouldn't fit!
Ignorant people outside the bicycle industry sometimes make the astonishing discovery that the way it has been done for 120 years is "wrong." "Look at these fools, they go to the trouble of using a left thread on one pedal, then the bozos go and put the left thread on the wrong side! Shows that bicycle designers have no idea what they are doing..."
Another popular theory of armchair engineers is that the threads are done this way so that, if the pedal bearing locks up, the pedal will unscrew itself instead of breaking the rider's ankle.
The left-threaded left pedal was not the result of armchair theorizing, it was a solution to a real problem: people's left pedals kept unscrewing! We have read that the left threading was invented by the Wright brothers, but we are not sure of this.
| Type of cranks | Pedal threading, inches | Pedal threading, metric |
|---|---|---|
| One-piece (American) Cranks | 1/2" (0.50") x 20 tpi | 12.7 x 1.27 mm |
| Standard-3-piece cranks | 9/16" (0.56") x 20 tpi | 14.28 x 1.27 mm |
| Old French | 0.55" x 2032 tpi | 14 x 1.25 mm |
| Dyna Drive | 1" x 24 TPI | 25.4 x 1.06 mm |
![]()
![]()
Most pedals have wrench flats on the axle, some have an Allen-wrench fitting on the inner end of the axle, and some have both.
Because the right pedal has normal threads and the left pedal, reverse threads, turn the pedal axle in the direction of pedaling to install. With the rear brake engaged or the wheel resting on the ground, the chain prevents the cranks from turning.
Removing pedals is trickier (except on a fixed-gear bicycle) because the cranks freewheel backward. Snug an old toe strap, piece or rope or several turns of a fabric strap with a buckle around the opposite crank and chainstay, to keep the cranks from turning. Pointing the wrench back toward the bottom bracket axle reduces stress on the toe strap. If the pedal is really stubborn, you may secure the opposite crank to the seat tube or downtube (depending on the angle of the pedal's wrench flats) so you can push down on the wrench with your foot.
Note! The precession effect doesn't substitute for screwing your pedals in good and tight. It is very important to do so. The threads (like almost all threads on a bicycle) should be lubricated with grease, or at least with oil. This will help prevent them from seizing to the cranks.
On a travel bicycle where you will need to remove and replace pedals repeatedly, don't install pedals with a longer wrench than you will carry with you. Pedals are exposed to road dirt, road splash and winter salt, and can corrode in place, so remove them and relubricate the threading yearly.
For on-road pedal removal, you may have to use a short wrench and foot power. With an open-end wrench, turn the crank so it is facing forward and engage the wrench facing backward toward the crank axle. Hold the bicycle with one hand on the handlebar and the other hand pressing down on the saddle. Press down on the wrench with your foot. If the wrench doesn't reach all the way to the bottom bracket axle, the crank will try to turn forward and the chain will keep it from turning. Or, use a toe strap or piece of rope to hold the cranks from turning. If using an Allen wrench, raise or lower the crank so the frame doesn't get in the way. The Allen wrench won't be as long as the crank, so the chain will hold it from turning -- or, if necessary, you can lengthen an Allen wrench by holding it in the jaws of an adjustable wrench. Don't overstress a skinny Allen wrench, though.
And in case that doesn't work, see advice from Jobst Brandt on how to remove stuck pedals.
![]()
![]()
Pedal bearings get lower to the ground than any others on a bicycle. They should be serviced regularly, and especially if the bicycle is used in winter or in wet weather.
Pedals with screw-on dustcaps commonly fail because a dustcap has fallen off, allowing dirt into the outer bearing. Check tightness of dustcaps, and if one is missing, take the pedal out of service right away, before the bearing is damaged.
Many pedals are rebuildable; cheap ones often are not. Pedals may use special bearing parts which are available only through the manufacturer, if at all.
Before servicing a pedal, check whether the axle is bent. This is easiest when screwing the pedal into or out of the crank. If the outer end of the pedal describes a small circle, the axle is bent and must be replaced. With the pedal off the bicycle, you may notice the threaded end wobbling as you spin the axle. Also note whether the bearings run smoothly and without excess free play. If they don't, you already know that at the very least, they need to be readjusted.
The crank also may be bent. This is usually obvious but in case not, see our advice on how to test for a bent crank.
There are too many different types of clipless pedals to cover them all, but here are links to instructions for some common models.
Speedplay pedals (most models)
Shimano SPD (on Park Tool Web site) -- most models have an axle assembly which unscrews using a special tool that is supplied with the pedals. These pedals have splines inboard of the pedal body to fit the tool. Some Shimano SPD pedals, and SPD-compatible pedals of other brands, have plastic dustcaps which pry out with a jeweler's screwdriver or the tip of a pointed knife. The bearings of these pedals are serviced the same way as with toe-clippable and plain pedals, below.
Crank Brothers Eggbeater. Also see this.
Information on other brands and models may be found through a Web search -- or not. If not, buy those pedals only with the understanding that you may not be able to maintain them.
Most toe-clippable pedals, and better plain pedals, can be rebuilt and relubricated.
Pedals need adjustment, at the very least, if there is free play in the bearings -- the pedal body can be wiggled back and forth -- or if the bearings turn roughly.
A pedal with a metal body has an outer dustcap which unscrews counterclockwise with an open-end or Allen wrench, or there may be a toothed rim to fit a special wrench. Campagnolo and SR dustcaps look as though they would use the same wrench, but are different. Pliers may also work but could mar a precious Italian dustcap, che orrore! Some pedals have plastic dustcaps which can be pried out. On many rubber-block plain pedals, the dustcap is one piece with the outer end plate, and you expose the bearing parts by removing the through bolts which hold the rubber blocks in place.
Some steps in rebuilding these pedals are easiest if the axle is threaded into a crank or chucked in a vise.
To complete disassembly and rebuilding, you also need a socket wrench (or sometimes an open-end wrench or box wrench will do), a flat-blade screwdriver, cleaning supplies, grease, replacement bearing balls (usually 1/8 inch diameter), and possibly other replacement parts. Tweezers are useful to install bearing balls. Never re-use the old bearing balls. It's not worth the trouble trying to clean them, and it's hard to inspect them.
This pedal dustcap removes with a 6 mm Allen wrench.

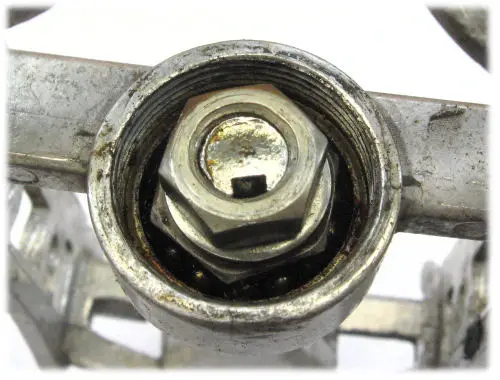
Some pedals have cartridge bearings -- or else you will find a locknut, a tabbed lockwasher, the outer bearing cone and bearing balls. The locknut may stick out far enough that you can grasp it with an open-end wrench. Otherwise, you'll need a socket wrench to turn it.
End of pedal axle with locknut, tabbed washer, bearing cone and bearing balls, revealed after removing the dustcap
![]()
The tabbed washer prevents the bearing cone from turning with the locknut.

![]()
Bearing balls, after removing the tabbed washer and bearing cone.

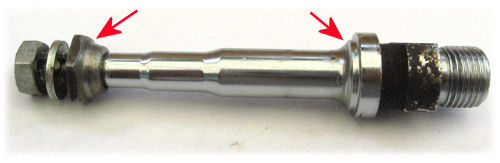
After removing the locknut, lockwasher and bearing cone, you can lift the pedal body off the axle. Bearing balls will fall out from the inner (crank side) bearing. Clean the parts and check for pitting of the bearing tracks -- on the axle and bearing cone, and inside both ends of the pedal body..
Axle, with bearing cone, tabbed washer and locknut (at left).
The red arrows point to the bearing tracks.
![]()
The red arrow points to pitting of the bearing track on the bearing cone.
This part must be replaced. Pitting will only get worse.

It's a good idea to keep a spare pair of pedals for parts (same make and model, then) or for a complete replacement. A bike shop may sell toe-clippable pedals at a low price because someone has replaced them with clipless pedals.
To rebuild, you essentially go backwards through the steps described above. If you check, clean and relubricate pedals yearly, they'll go for many thousands of miles.
Choosing and adjusting shoes and pedalsSheldon's article in Adventure Cycling about pedals for touring |
![]()
![]()
Last Updated: by John Allen