Choosing and Adjusting Bicycle Shoes and Pedals

|
I'll be making shoe recommendations in connection with different kinds of pedals, but first here's some quick advice.
Feet swell a bit as you stand and walk on them. If you ride your bicycle to go buy shoes, you may find them too small after you have been walking. Buy shoes a bit large, or go for a good, long walk before trying them on.
If you will be wearing the shoes for winter riding, you also might leave enough room inside for two layers of wool socks.
Now, as to pedals: what kind are best for you? Some bicycles restrict your choices:
A coaster brake (backpedaling brake) prevents you from backpedaling after a quarter turn or less. After stopping, you have to take a foot off the (rear) braking pedal before you can place the other foot on the (forward) power pedal -- so, a coaster brake is practical only with plain pedals, which don't secure your feet.
A bicycle with a one-piece crank uses a smaller pedal threading than other bicycles. Only a limited selection of pedals is available for one-piece cranks, unless you use an adaptor, and that will move the pedals outward, reducing cornering clearance.
A fixed gear doesn't let you coast. A secure connection between feet and pedals is important with a fixed gear, but spinning pedals make toe clips hard to enter, and the straps hard to adjust. Clipless pedals are the best choice if your bicycle has a fixed gear.
The companion article about pedals has detailed information on installing, removing and servicing pedals.
Most bicycles allow backpedaling and have three-piece cranks, so you can use any kind of pedal you like. You put one foot down when stopping, and prepare to restart by lifting the opposite pedal to the high-and-forward starting position. With toe clips or clipless pedals, the pedal rises with your foot. With plain pedals, you hook your foot under a pedal. To restart, you step down on the pedal as you let go of the brake levers. The first pedal stroke lifts you up onto the saddle as it gets you moving.
In the video below, Theresa James, aged 13, demonstrates the preferred technique for starting and stopping on a bicycle which allows backpedaling.
Many cyclists keep the saddle too low for efficient pedaling. Plain pedals reinforce this preference by allowing pedaling on the arches of the feet. Also see the article on this site about starting and stopping.
Some pedals have built-in front and rear reflectors, or reflectors can be bolted on. Always use lights at night -- but rear-facing pedal reflectors help increase visibility. They also show whether you are pedaling, so they serve more or less as brake lights. If your pedals can't take reflectors, reflective ankle bands are a practical substitute, and they also provide reflectivity to the sides. We like the wide, Velcro-backed Bike-a-Lite ankle bands -- but no ankle bands really protect trouser cuffs, so, wear socks that reach up over your ankles, and tuck trouser cuffs into the socks. Then only the right-hand (right-foot?) sock is at risk from chain dirt -- and nobody will see it when you get off the bicycle and put the cuffs back on the outside -- even less if the socks are black. Some bicycling shoes also are reflectorized.
![]()
![]()
Pedals are of three main types, as they affect the rider: plain pedals, pedals with toe clips and straps, and clip-in pedals used with shoes that have special cleats.
With plain pedals, no special motion is required to orient pedals or secure the feet. For this reason, people should learn on plain pedals before considering others. Children also usually go with plain pedals for easier starting and stopping. (On the other hand, children riding on the back of tandems should have toe clips and straps -- see the article on this site about tandeming with children.) Plain pedals can work with most shoes, and are practical when a cyclist wears non bicycle-specific shoes -- dress shoes, jogging shoes, basketball sneakers, hiking boots. Plain pedals are also more convenient for riding which requires frequent starts and stops. The feet are free to align themselves on plain pedals, though there is also no rotational "float" -- freedom of the foot to realign itself during the pedal stroke.
People who start and stop while sitting on the saddle with both feet on the ground ride with the saddle too low for efficient pedaling, and place the arches of the feet over the pedal spindles -- possible only with plain pedals. See our article on starting and stopping if this describes you! It is entirely possible to be efficient with plain pedals, with a higher saddle and good starting/stopping technique.
If the shoes have leather soles, plain pedals should have a rubber tread for traction. With rubber soles, a toothed metal traction surface also works. A smooth metal surface will be slippery when wet, whether the soles are of leather or rubber. Plain pedals should be double-sided, so it doesn't matter which side comes up.
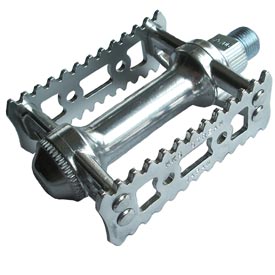
Plain pedals with a large platform for the foot can be used with soft-soled shoes, even moccasins or Crocs. Plain pedals which have only a metal cage, like the pedal at the left in the image below, should be used with stiff-soled shoes, but also are compatible with toe clips and straps.
| Metal pedal, usable plain or with toe clips and straps | Rubber-block pedal, for traction with leather soles |
Platform pedal, best with soft-soled shoes |
 |
 |
 |
It is a myth that cyclists with clipless pedals or toe clips and straps pull up on the upstroke -- except very briefly during sprints. Still, more attention is needed to keep the feet on plain pedals when riding on a bumpy surface. Toe clips and straps, or clipless pedals, promote a faster cadence. "Keep it simple" advocates nonetheless prefer plain pedals even for long rides, and point to the very real risk of knee injury when a pedal secures the foot at an incorrect angle. In winter, cyclists often switch over to plain pedals so they can wear warm, waterproof boots while riding.
Toe clips and straps have been used since the 1890s and are still quite popular despite the advent of clipless pedal systems.
By preventing a foot from slipping from a pedal, toe straps improve safety even when loose, once a cyclist has learned to get the feet in and out of them. So-called "mini" toe clips or pedal "baskets", though, used without straps, may look good to a beginner, but they make it harder to start without offering any advantage once you get going.
Toe clips and straps can scuff shoes, and require a relatively stiff toe box, so they aren't a great idea if you wear sandals, moccasins or Guccis. Most running shoes and bicycling shoes work well with toe clips and straps, though.
Pedals for use with toe clips and straps are available in a variety of widths and shapes. Single-sided pedals like the ones in the image below should always be used with toe clips and straps. Some quill pedals, like the one shown at the left, have a tall prong at the outer end, making them unsuitable for wide feet or wide-soled shoes. Platform pedals and track pedals, shown in the middle and right photos, avoid this problem.
| Quill pedal, AKA road pedal |
Pair of platform pedals for use with toe clips |
Single-sided pedal without quill, AKA track pedal |
 |
 |
 |
Leather toe straps are more durable than fabric ones, and stiffer -- less likely to tangle with the toe of the shoe as you put your foot in. Thread a strap starting from the outside of the pedal, with a 360 degree twist under the pedal to keep it from sliding out of position. Do not insert the end of the strap into the slot at the bottom of the buckle. Instead, leave it hanging out like a floppy dog ear. Then you can tighten the strap by pulling on the end, and loosen it by pushing the buckle outward with your thumb.

This correctly-threaded leather toe strap was started from the outside of the pedal;
and twisted 360° as it passes through the pedal. The end is loose, to tighten
by pulling, or to loosen by pushing outward on the buckle. The toe clip here is mounted
outboard of center, to accommodate the cyclist's splay-footedness. This is a rear pedal
on a tandem; a bungee cord connects to the front pedal and holds both pedals upright.
The knot in the bungee cord shortens it so it holds tension.
Most toe clips attach to the front of the pedal with two bolts, and can be placed under a pedal reflector. If your feet toe out, you may want to mount the toe clips farther toward the outside of the pedals than usual. If you use old-fashioned slotted cleats, align them accordingly. If you feel pain at the outside of the knees, you must make these adjustments. The pain warns of potential knee-joint damage.
Toe clips are sold in different lengths. It is very important for toe clips to be long enough to avoid strain to the Achilles tendon (at the back of the ankle). The ball of the foot should be over the pedal axle or slightly farther forward. Slightly oversize toe clips place the strap behind the widest part of the shoe, allowing you to pull back lightly at the bottom of the pedal stroke. There is confusion in toe-clip sizing: I've found Japanese ones to be one size smaller than European ones with the same markings (S, M, L, XL).
There is a bit of a learning curve with toe clips and straps. Many people worry about getting their shoes out of the clips, but really, you only have to exit a pedal while nearly at a stop. A bit of practice while leaning against a wall will probably get you comfortable.
To get your foot into the toe clip, place your toe of your shoe on the back of the pedal and push down. On a recumbent bicycle, pull the back end of the toe clip toward you with the toe of your shoe. Again, assuming correct starting technique, get one shoe into its toe clip before you start. As you start, slip the other foot into its toe clip. If you don't succeed on the first pedal stroke, ride with the pedal upside down until you have built up enough speed to try again. Except on a fixed-gear bicycle, you may stop pedaling momentarily to reach down and tighten the toe clip once you get going.
You  don't have to tighten up the straps if you don't want to, or, as you approach a stop, you may loosen the strap for the foot you put down. It is usually still possible to wiggle a foot out for an unanticipated stop. If you do fall, it's usually more about laughter than tears -- and especially if you wear cycling gloves so you can safely put a hand down to break the fall.
Power Grips -- wide straps that extend diagonally across each pedal from the outside front to the inside rear -- offer an alternative to toe clips and straps.
One widely-recognized problem with toe clips and straps, as well as Power Grips, is discomfort due to the pressure of the strap on the top of the foot. The strap also impairs circulation, resulting in even more discomfort in cold weather. As noted, adjusting toe straps is hard on a fixed-gear bicycle, because you can't stop turning the pedals.
![]()
![]()
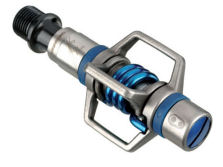
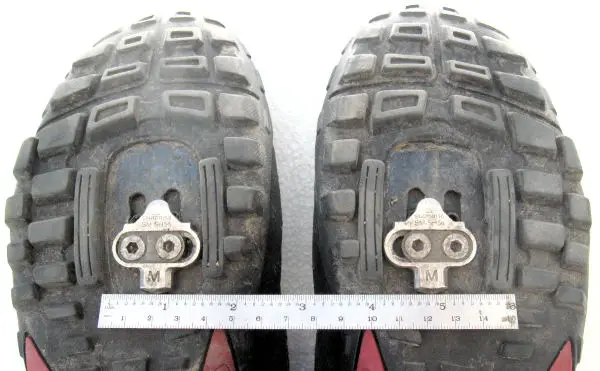
Clipless shoe-pedal systems work somewhat like ski bindings. They allow hands-free release of the foot -- even more important on a fixed-gear bicycle -- and avoid pressure on the top of the foot. Cleats bolt to the soles of the shoes and are sold with pedals, rather than shoes. Different systems use different cleats and bolt-hole patterns, so you need to take care to buy shoes that will work with your cleats and pedals. Most early clipless systems (1980s) had cleats that protruded from the shoe soles, but Shimano SPD, Eggbeater, and Speedplay Frog systems, among others, have recessed cleats and walkable shoes. Some walkable systems shed mud and packed snow well, making them practical for almost any kind of riding.
As with toe clips and straps, practice getting your feet in and out of these pedals before you go riding with them. The motion is different from that with toe clips, and also different with different kinds of clipless pedals. Many of these pedals have a release adjustment, which you set according to your leg strength.
The photos below show a selection of pedals used in clipless systems.
| Speedplay Frog pedal -- walkable, free float. | Look racing pedal, uses non-walkable cleat | Crank Brothers Eggbeater pedal |
 |
 |
 |
| Pair of Shimano SPD/platform pedals. Which side is up? | Two-sided Shimano SPD pedal | |
 |
 |
|
My own choice, for urban cycling as well as recreational rides and bicycle touring, is SPD in its walkable "mountain bike" version. Other systems may be lighter, and easier to adjust, but SPD is relatively economical, and a wide variety of pedals and shoes is available from several makers. Shimano makes two kinds of cleats -- black, which release only with a twist of the ankle to the side, and silver, which also release upward. I prefer silver.
Combination pedals which are plain on one side and clipless on the other -- like those at the lower left in the picture above -- have a disadvatnage. You are likely to fumble getting started because the wrong side of a pedal comes up..These pedals cant make sense for someone who can't have a different bicycle equipped with each kind of pedals. If the bearings run free, these pedals will hang with the flat-pedal side up and you can eventually learn to turn them over with a flick of the toes, without looking. Some pedals are double-sided with platforms but have SPD on both sides, providing better support for the shoe. Long-distance riders report that these pedals improve comfort. The type of SPD pedal at the lower right in the picture is minimalist, designed for light weight. SPD-only pedals like these work best with shoes that have stiff soles, but then most shoes which accept cleats do have stiff soles.
Cleats are adjustable, forward and back, from side to side, and in rotation for toe out/toe in. Most clipless systems also offer some rotational “float” – the feet are free to toe in or out. Float makes rotational alignment less critical, and accommodates the slight changes in the natural angle of the foot at different parts of the crank rotation.
Correctly-aligned cleats make long rides easier and more comfortable, but incorrectly aligned cleats can quickly lead to knee pain -- usually at the outside of the knees. Prolonged misalignment can result in damage to cartilage in the knee joints, so -- deal with this problem promptly!
I have my own history with this! I hadn't known to heed the warning of pain at the ouside of the knees. I had a loose body of cartilage in my right knee that pained me when I stopped riding, my leg straightened out completely and the loose body slid under the kneecap. The surgery removed the loose body; also the "crab-meat appearance" chondromalacia was planed smooth. The doctor said that indoor bicycling would be good for recovery. I didn't have an indoor setup. I rode my bike several miles to a follow-up appointment and back 8 days later.
I was already using low gears and high cadence and have always since, but following this trouble, I adjusted the cleats (slotted ones then, with toe clips and straps) to a natural angle for my feet. I was concerned that I might have problems with my left knee but never had to have it operated on. I have had some tendinitis but that resolved with strengthening exercise at a gym. Occasionally, I have mild knee pain and that is a warning to me to spin. My mileage has been between 1,500 and 5,000 miles per year.
My bikes for local riding have a low gear around 28 gear inches, my touring bikes, low 20s and my Bike Friday, 12 inches, which got me up mountains spinning at 3 mph!
As with toe clips, forward-back positioning of the cleat is a matter of personal preference. The farther forward the cleats, the more strain is placed on the ankles, with the risk of an Achilles tendon overuse injury. This manifests as a "squeaky" feeling and pain at the rear of the calf just above the ankle. I suffered this once. I was able to continue riding by moving the cleats all the way back and pedaling lightly at a high cadence. You'll be glad that your bicycle has low gears if you have this injury. I mean really low, so you never have to push hard, even when climbing a steep slope.
While most systems offer a range of forward-and-back adjustment, legendary long-distance cyclist Lon Haldeman modifies his shoes to place the cleats even farther back. He reports that this eliminates foot pain and without reducing his power output. But then, you probably do not need to do this, because you aren't riding 3000 miles in one week. You may find his advice here..
The cleat attachment on most bicycling shoes has the feet pointing directly forward -- but most people toe out. Except with pedals such as Speedplay that have a wide range of free "float", you will probably need to rotate the cleats. You may also have to move the cleats toward the big-toe side of the shoe soles so your ankles clear the cranks.
A good way to start with cleat alignment is to note how your feet rest on plain pedals. You may also want to ask for the help of an experienced bike shop mechanic who uses the New England Cycling Academy Fit Kit, with its R.A.D. (Rotational Adjustment Device). If a foot feels like it wants to rotate, then it does. In tough cases, you do well to seek professional help from a sports orthopedist. You may need orthotics (shoe inserts, or wedges under the cleats) to align your feet, and/or "knee savers" (pedal axle extenders).
The soles of my Specialized Body Geometry bicycle shoes, with Shimano
SPD cleats. The cleats are rotated to accommodate my
natural toe-out: the cleats are parallel, while the slots under them splay
outward, though intended to point directly forward. Also,
the cleats are installed as far as they will go to the big toe side
of the soles, to get my ankles clear of old Stronglight cranks, and as far back as they
will go, to spare my Achilles tendons.

Adjusting the angle of a Shimano SPD cleat by rotating it with an adjustable wrench
while tightening the bolts that secure it to the shoe.
![]()

Knee savers
![]()
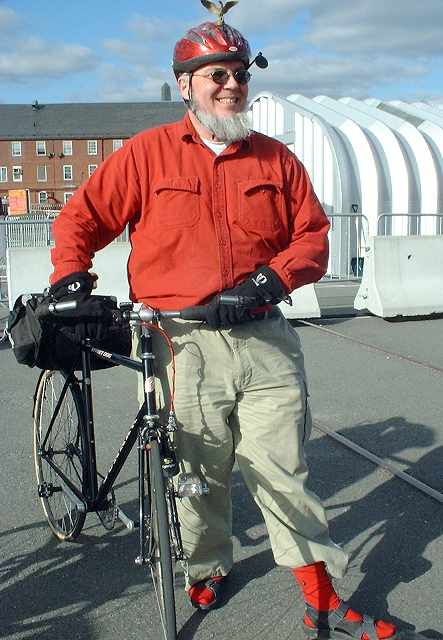
A wide variety of shoes is made for clipless systems -- though if you want cleated business Oxfords or patent-leather pumps, you still have to get them modified yourself. (The market cries out! Really!) You can get sandals, combining high-efficiency pedaling with a 1950s beatnik look. Quoting Sheldon Brown, the founder of this Web site:: "These are my very favorite footwear. In the summertime I go for weeks on end without ever having anything else on my feet. Far and away the most comfortable cycling footwear ever."
This topic deserves a longer discussion, so here it is.
Sheldon wearing Shimano SPD sandals,
New Year's Day 2004, Boston, Massachusetts, USA
Ever making his way upstream against the current of conventional so-called wisdom, Sheldon also wore Shimano SPD sandals in winter. I had to ask him what he was thinking, wearing sandals, as I took the photo above during the Charles River Wheelers bicycle club's New Year's Day 2004 ride. (And, no, the photo is not flipped. About the left-side drive, see this.) The temperature was 40 degrees Fahrenheit (4 degrees Celsius). Sheldon cheerfully explained that sandals, unlike ordinary shoes, do not restrict circulation to the feet, which stay warm. I gave sandals a try in cold weather and can confirm this. With two pairs of wool socks inside my SPD sandals, I have been comfortable on days when fingers of ice were forming in puddles on the road.
The Velcro straps of SPD sandals also are very accommodating of different thicknesses of socks, or no socks at all. On a warm, rainy day, I favor a bicycle with fenders, a Carradice rain cape -- and sandals worn without socks -see our article about fenders and wet-weather riding. Shimano sandals are mostly rubber, so they dry easily. When I get to the end of my ride, I wipe the sandals dry, put socks on, put the sandals back on, and I'm prepared to meet the dress code of offices, shops and restaurants.
I have tried Keen and Specialized brand sandals, but I like Shimano SPD sandals much better -- they have an open toe and don't cramp the feet. My conventional cycling shoes are Specialized Body Geometry shoes, with Shimano cleats..
In case you might think that an avid cyclist's wearing sandals is a new idea, check this out:
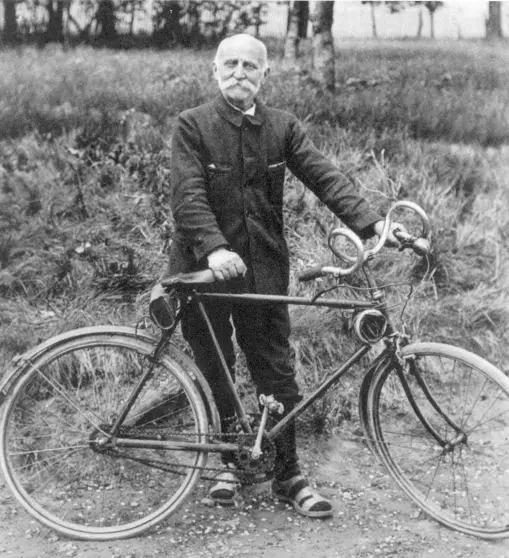
The photo is from before 1930. The cyclist is the Frenchman Paul de Vivie, known as Vélocio, a central figure in cycletouring and experimentation with bicycle gearing systems in the early 20th Century. The bicycle in the photo has bi-chain gearing with gear selection by engaging drive on one side or the other. The Dancing Chain, the definitive -- and entertaining -- book on the history of bicycle gearing, includes the photo and describes de Vivie as wearing monk's sandals, no matter what the weather.
There are more options in bicycle shoes and pedals now than ever before -- and there are also some outside-the-toe-box options worth considering. I hope that I have been able to help you choose shoes and pedals, and set them up to work well.
Installing, removing and servicing pedalsSheldon's article in Adventure Cycling about pedals for touringSpeedplay page about clipless pedals -- archived with detailed info. Current page as of 2025. |
![]()
![]()
Last Updated: by John Allen