Bicycle Frame/Hub Spacing

|

Revised by John "Parallel" Allen
Over the last 40 years, bicycle drivetrains have improved immensely. Indexing has taken much of the guesswork out of shifting; integrated brake/shifters such as Campagnolo's Ergo and Shimano's STI have brought the ability to shift without removing a hand from the handlebars; lower gears help older riders get up the tough hills that didn't bother them when they were younger. Internal-gear hubs are available with more speeds.
While drivetrains have improved, frames have not, and in many ways, they've changed for the worse! Older frames designed for touring or recreational riding are often considerably more comfortable and pleasant to ride than many modern frames that have been optimized to appeal to racers. Older frames have room for wider tires, and for fenders, making them more practical for those who are not just fair-weather cyclists.
Then again, you may have an older bike that you've just become sentimentally attached to...it's not hard to bond to a bike that has carried you for thousands of happy miles.
If you have a beloved older bike, but are not enjoying its antiquated shifting system, it isn't unreasonable to upgrade it with a new rear wheel, derailers and shifters (or internal-gear hub). There's one fly in the ointment, however...will the new wheel fit into the old frame? Often, the answer is "no," because newer hubs are wider, with longer axles, than the older ones.
..But you don't need to take no for an answer! Older frames, assuming they're made of some sort of steel, can be modified to fit. The process is commonly referred to as "cold setting" which is a fancy way of saying bending the rear frame apart so that it is wider. This article tells you how.
An older front fork also may need spreading to fit a modern hub. This is the case with forks of older Raleigh three-speed bicycles and many older French frames.
If you're not sure whether your frame or fork is steel or not, the easy way to tell is to see if a magnet sticks to it. If it does, the frame is steel, and can be cold set.
A bicycle frame and fork should match the wheels that are to be used in it. Older bicycles used narrower spacing, but older frames can often be spread out to match more modern wheels.
The spacing of a frame/fork is measured from the inside surfaces of the forkends (dropouts), where they come into contact with the locknuts of the wheel's axle.
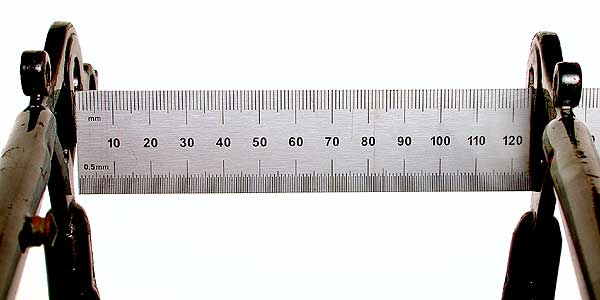
This frame has a spacing of 125 mm
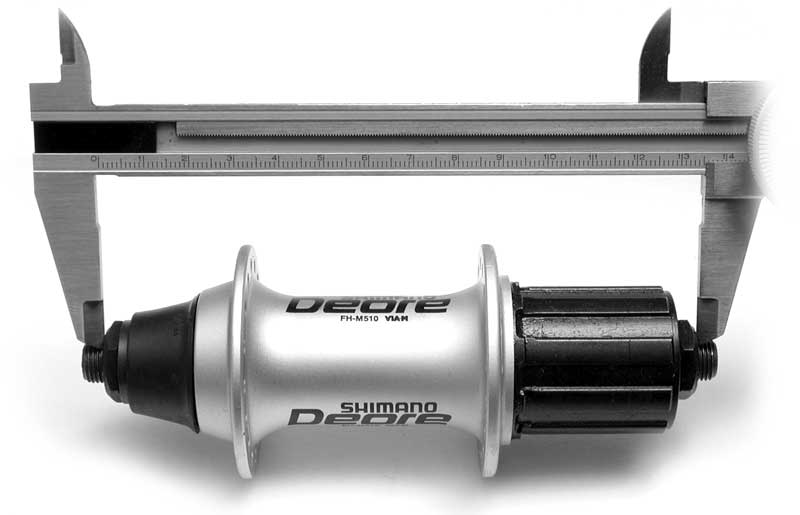
This hub has an O.L.D. of 135 mm
![]()
![]()
As of 2018, fatbikes and disk brakes have led to a several new axle-length standards. The problem of disk brakes' pulling the hub out of the front dropouts (see James Annan's article) has been addressed with through axles, which insert into a fork with a hole rather than a slot at the end of each blade. Also see our article about disc brakes for information on disc-brake issues.
| Front | |
|---|---|
| 70 mm | Birdy, Breezer Itzy front hub. |
| 74 mm | Brompton front hub, 8 mm axle; Schimidt SON XS Bro generator hub. |
| Bike Friday tikit, Dahon Speed, Moulton front hub, 9 mm axle; Schmidt SON XS DaTi generator hub | |
| 79 mm | Dahon Vitesse front hub (report from reader, unconfirmed). |
| 91 mm | Low-end front hubs; Nottinghum Raleighs. |
| 96 mm | Older front hubs, especially French. |
| 100 mm | Modern front hubs with 12 and some with 15mm thru axle |
| 110 mm | "Boost" front hubs with 12, 15, or 20 mm thru axles. |
| 120 mm | Some front "Boost" |
| 135 mm | Front fatbike with quick release. Some are offset, and some front and rear wheels are interchangeable. |
| 142 mm | Front fatbike with rigid thru-axle fork,15mm axle |
| 150 mm | Some fatbike front hubs with 15mm thru axle |
| Rear | |
| 110 mm | Rear older track, coaster brake and other single-speed hubs. |
| 114 mm | Rear 3-4-speed, many internal-gear hubs. This is US, U.K. Same as 4 1/2 inches. |
| 120 mm | Rear 5-speed, Ultra 6, newer track hubs. |
| 126 mm | Rear 6- and 7-speed (road). |
| 130 mm | Rear 7-speed (MTB) and 8- 9-10-11-speed (road) except disc brake |
| 135 mm | Rear 7- 8- 9-10-11-speed (MTB); rear with disc brake (road). Some MTB with 12mm thru axle |
| 135 mm offset |
Original Surly fatbike, offset 17.5 mm to right |
| 140 mm | Rear tandem. |
| 142 mm | Rear with 12mm QR, 12mm or 15mm thru axle |
| 145 mm | Rear tandem (newer models.) |
| 148 mm | Rear "Boost", MTB with 12mm thru axle |
| 150 mm | Retro-Choppers, some Downhill and Freeride models. |
| 157 mm | SRAM rear DH |
| 160 mm | Rear tandem (new Santana proposed standard.) |
| 170 mm | Rear symmetric fatbike with quick release for 4" tire |
| 177 mm | Rear symmetric fatbike with thru axle for 4" tire, 12mm axle |
| 190 mm | Rear symmetric fatbike with quick release for 5" tire, 12mm axle with QR |
| 197 mm | Rear symmetric fatbike with thru axle for 5" tire, 12mm thru axle |
The page on chainline of internal-gear hubs gives overlocknut dimensions of these hubs. When in doubt, measure!
Overall axle length for quick release hubs is commonly 11 mm longer than the overlocknut distance listed, 5.5 mm on each side.
In practice, the axle can be quite a bit shorter than this...even 1-2 mm protrusion past the lock nuts will suffice to locate the axle properly, so, when converting a hub to the next wider spacing, it is usually unnecessary to replace the axle.
For single-sprocket wheels, it is generally best to add equal spacers to each side. This way, the rim remains centered in the frame.
With most internal-gear hubs, spacers can be added on the left end of the axle, and with some also on the right, as described on the page that gives their overlocknut distances.
If you are increasing the spacing of a derailer-type wheel for the purpose of increasing the number of sprockets, you'll generally be adding space to the right side only. If you do this, you'll need to "re-dish" the wheel, by pulling the rim to the right. This is done by tightening the spokes on the right side of the wheel and/or loosening those on the left side. If you don't have experience with wheel trueing, this may be a job you're not yet ready for.
The downside of this is that pulling the rim to the right increases the tension difference between the left and right spokes, resulting in a somewhat weaker wheel.
Conversely, if you're installing a wheel in a wider frame than it was meant for, adding the spacers to the left side will allow you to increase the strength of the wheel by moving the rim to the left.
One of my own bikes is set up with the axle cut off flush with the locknuts, and even this is no problem in use, though it is slightly trickier to align the wheel when installing it. See my page about my fixed-gear mountain bikes.
Note, if you're not careful, you can do serious damage to your frame or fork this way!
If your frame or fork is made of aluminum or carbon fiber, do not attempt to re-space it: these materials are not suitable for "cold setting."
If in doubt, try the magnet test: if a magnet won't stick to it, don't try to re-space it!
![]()
![]()
A conventional cup-and-cone hub tolerates some bearing misalignment, and in general, you can safely go up one size in spacing this way, just springing the frame apart. I can't give you an absolute guarantee that this won't cause damage, but the odds are very much in your favor.
Having to spring the frame every time you replace the wheel is inconvenient, especially if it has a quick-release axle .An internal-gear hub or sealed-bearing hub is very likely to be damaged if the dropouts are not parallel. In this case, cold setting is the better way to go.
If you're going up more than one size, say from 120 to 130, or from 126 to 135, you should definitely cold set the frame.
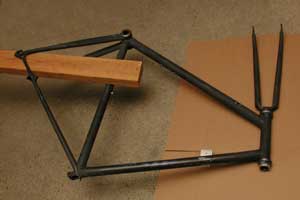
| In the illustrations below, the stays will be bent to the left (up in the photos) by pressing down on the end of the 2 x 4. The other end of the 2 x 4 is on top of a stool. The longer the 2 x 4, the less force is needed. |
|
|---|---|
 |
 |
| The 2 x 4 is under the left forkend, widening the spacing by pulling the left side upward |
The 2 x 4 is under the right forkend, narrowing the spacing by pulling the right side upward |
| The bike does not actually need to be stripped down this far, most parts can remain in place. | |
![]()
A front fork can't be spread the same way as the rear of a frame, because you can't lever against the seat tube. Generally, the front fork is spread by pulling the blades apart from one another. Better-equipped bike shops have jigs to align fork blades. This can be done with a hub axle, placing axle nuts in between the fork blades. Fine adjustments may be made with a rubber mallet.
![]()
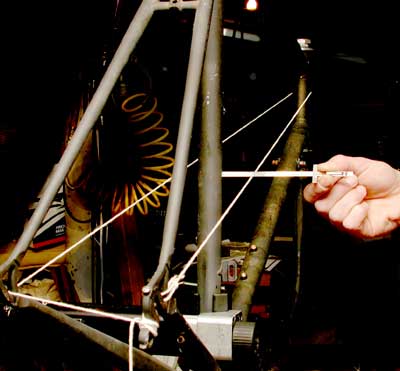
Assuming that a frame was built straight to begin with, alignment can be checked by comparison of the rear triangle with the front triangle. Park makes an adjustable gauge for this, the FAG-2, and this is what most bike shops would use.
The usual "home mechanic" technique, however requires nothing more than a piece of string and a ruler. This is a bit slower than using a purpose-built gauge, but gives good results, if you are reasonably careful.
A bike shop checks symmetry of a front fork with its special jig, but symmetry can also be checked roughly by installing a wheel into the fork and testing whether the rim centers between the fork blades. To be sure that the wheel itself is centered, turn it over and try it the other way. The rim should be the same distance from each fork blade after being turned over. Minor adjustments for symmetry can be made with a rubber mallet. Testing for symmetry of a front fork is more difficult than with the rear of a frame.
![]()
![]()
Spreading a frame or fork will cause a slight change in the angles of the forkends, so they will no longer be exactly parallel to one another (assuming they started that way.)
Check for parallelism after spreading a frame or fork, or whenever you are concerned that forkends might be out of parallel -- if the bicycle has been crashed, a forkend is visibly bent, or a wheel is hard to install and an axle nut or quick release feels "springy" rather than clamping down tight.
Procedures for checking and adjusting parallelism have been moved to another page.
![]()
![]()