Hands Up (Or Down)!
Adjusting Handlebar Stems
Adjusting Handlebar Stems

|

Revised by John "Here's the Lowdown" Allen
Much of bicycle design is driven by the needs of racing cyclists--even though the vast majority of cyclists are not racers. Racing styles and positions are not necessarily suited to the needs of the touring cyclist.
Newer road bikes tend to have longer top tubes and to be sized smaller than was common a few years back. This is good for the racer who is looking for the fastest, most aerodynamic position, or for the weekend athlete out for a brisk high-intensity workout, but is less good for the long distance rider who is likely to spend more time in the saddle.
Racers aim for the holy grail of the "flat back." The racers' high-intensity, high-gear pedaling style allows the reaction forces from their leg work to hold their upper body in position, even when leaning very far forward. Indeed, in a hard sprint, the rider is actually pulling upward on the bars! This intense riding style, however, is not sustainable for long hours in the saddle.
A touring cyclist rides longer, but with less intense pedaling effort. A long-distance rider is seeking not speed, but endurance, and will generally tend to avoid extreme effort, so as not to waste physical resources. Thus, the touring cyclist is likely to seek a more upright posture. As cyclists age, their position preferences also are likely to change.
Similarly, a casual recreational cyclist or beginner cyclist is not likely to be comfortable with a low handlebar position.
On the other hand, a cyclist who is looking for more efficiency in pedaling, and is becoming more physically fit, often will find that the handlebar position on a typical "comfort" bike or hybrid bike is too high. Aside from the aerodynamic issue, the gluteus muscles are fully contracted when the back is upright, and cannot contribute power. And if the handlebars are too close, steering may be difficult with one hand on the handlebar.
Achieving a comfortable position will often involve substituting a different handlebar stem, to move the handlebars higher/lower, closer to/farther from the saddle or both.
Hand position may also be adjusted through choice of handlebars, which is covered in another article on this site.
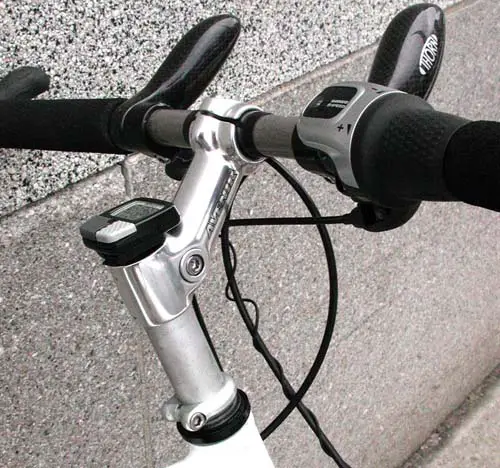
Most "road" bikes use threaded forks, and take a stem that slips inside of the fork's steering column. The stem will have a long bolt running down through the vertical part, connecting to a wedge at the bottom. Tightening the bolt pulls up the wedge, and the wedge jams against the inside of the steerer, securing the stem to the steering column.
Loosening up the bolt, usually with a 6 mm Allen wrench, may free up the wedge and allow you to move the stem in the steerer. Sometimes, loosening the bolt won't loosen the wedge, so you may need to unscrew the bolt a few turns and then give it a tap on top with a block of wood or a soft mallet.
Older stems used a conical "expander" nut, with a split quill (shaft) that would expand against the inside of the steerer, but the principle is the same.
Once the stem is loose in the steerer, you can raise or lower it, and rotate it from side to side. If you decide to raise it, it is important that you don't overdo it. If you raise the stem too high, so that there's not sufficient length remaining inside the steerer, you might find the whole handlebar assembly disconnecting from the bike--your life will pass before your eyes and down you'll go! Most stems have a "minimum insertion" mark that shows how high they may safely be set. If you can see this mark, the stem is too high. If your stem doesn't have such a mark, a good rule of thumb is that there should be at least 2 inches/50 mm of stem inside the fork.
The quill of the stem and the bolt threads should be greased, to help prevent them from corroding together. Removing and relubricating a stem yearly is a good idea, especially if the bicycle is ridden in wet weather. See Jobst Brandt's advice on stuck stems in case you can't loosen the stem.
Be careful not to overtighten a quill stem. Overtightening can bulge out the steerer, potentially leading to its breaking, or not holding the stem securely. Except in technical off-road riding, the hands apply only light torque to the handlebars. If a bicycle has an older quill stem with a conical expander, it is normal to be able to turn the handlebars with moderately strong hand force, when standing in front of the bicycle and holding the front wheel between the legs. It can actually be considered a safety factor in preventing abdominal injury from handlebars, particularly those with swept-back ends. The U.S. Consumer Product Safety Commission thought the opposite, resulting in the adoption of the wedge expander. Newer clamp-on stems are even tighter, and must be to secure the handlebars. Turning the handlebars will be more difficult if the stem has a wedge.
The handlebars should be held securely with a clamp-on stem, as the clamp also has to secure them against tilting. If in doubt, use a torque wrench and tighten to manufacturer's specifications.
If your bike currently has the stem lower than you'd like, don't get your hopes up too high that you can just raise it--most bikes already have the stem set to the max when they leave the shop. If your bars are too low, chances are you'll need to buy a new stem.
Stems for a threadless steerer

If your bike has a "threadless" fork/headset , options for stem adjustment are usually even more sparse. There may be some spacer washers above or below the clamp-on "threadless" stem that could be re-arranged, but, generally, again, the stem is probably already as high up as it will go, with the spacers underneath it.
Clamp-on stems are available in different lengths. Some clamp-on stems angle upwards, and so you can adjust height by replacing the stem. These stems also can be inverted to achieve a lower handlebar position.
The bolts and clamping surfaces of a clamp-on stem should be greased.
![]()
![]()
Threadless forks are generally supplied with very long steerers, intended to be cut to appropriate length for various different bike frame sizes. If you are buying a new fork, or a new frame, you can leave the steerer full length even if you ride a smaller frame. This will let you get the stem nice and high without needing any extra accessories.
On some of my own bikes, I've gone this route, and have used a separate clamp to secure the headset, rather than using the stem for that purpose. A 1 1/8" steerer is 28.6 mm. Pinch-bolt type collars are readily available in this diameter, some of them intended for seat-tube use.
Using the separate collar allows you to mount the stem anywhere on the extended steerer, without any need for spacer washers, and without any need to re-adjust the headset every time you raise or lower the stem.
This system also eliminates the star nut. To adjust the headset, I loosen the pinch bolt in the collar, and also the pinch bolt(s) in the stem. I put the stem as far down on the steerer as it will go, sitting right on top of the collar. Leaning with as much weight as possible on top of the handlebars, I twist the bars back and forth, also wiggle them front/back to get all of the slack out of the headset. I then let go of one side of the handlebar while holding my weight on the other side, and tighten the pinch bolt in the collar to hold the headset in adjustment. Once the collar is tight, the stem may be raised to any convenient height and secured with its own pinch bolt(s.)
I do not recommend this approach for carbon fiber steerers, nor for 1" steerers, but I've had very good results with it on metal 1 1/8" steerers.
![]()
![]()
If you wish to change your stem, in addition to height and reach, you need to consider compatibility with your bicycle's fork and handlebars.
The nominal size of a headset is based on the outside diameter of the steerer. This is a source of confusion, because the steerer is not visible on an assembled bicycle (except with the extended steerer as described earlier in this article). If a bicycle has a traditional threaded fork/headset, the traditional expander/wedge type stem, will be sized to fit inside the steerer and will be 1/8" smaller than the steerer. Thus, a normal 1 inch fork requires a stem of 7/8" (22.2 mm) diameter, while a 1 1/8" fork requires a stem 1 inch in diameter. Depending on how you look at it, either of these stem sizes might be referred to as "1 inch."
1 Inch threaded headset
|
1 1/8 Inch threaded headset
|
|---|
If your bike uses a threadless headset, there's less confusion, because the stem fits the outside of the steerer, just like the headset.
The table below gives dimensions for threaded steerers/headsets and quill stems. The first column gives the outside diameter of the steerer, and the second column, the inside diameter of the steerer and outside diameter of the stem. The remaining columns give information which will be useful if you are rebuilding or replacing the headset.
Threaded Headsets/Steerers
|
||||||
|---|---|---|---|---|---|---|
| Standard | Frame Cup Outside Diameter |
Crown race Inside diameter |
Steerer O.D in mm | Threads Per inch |
Stem diameter, Steerer I.D. |
Notes |
| 1" J.I.S. |
30.0 mm | 27.0 mm | 25.4 mm | 24 | 22.2 mm (7/8") | Older or lower-quality bicycles from Asia. Can be milled to ISO standard. ISO and other 30.2 mm O.D.cups are a very tight fit into the head tube; best mill it to avoid damage. |
| 1" Raleigh |
30.0 mm | 27.0 mm | 25.4 mm | 26 | 22.2 mm (7/8") | Proprietary size used on Raleighs made in Nottingham, England. ISO and other 30.2 mm O.D, frame cups are a very tight fit into the head tube; best mill to avoid damage. |
| 1" ISO Standard |
30.2 mm | 26.4 mm |
25.4 mm |
24 | 22.2 mm (7/8") | This is the standard 1" size. |
| 1" Professional/ Campagnolo |
30.2 mm | 26.4 mm |
25.4 mm | 24 | 22.2 mm (7/8") | Obsolete. Threads are cut at 55 degrees, but an ISO headset can be used. |
| 1" Italian | 30.2 mm | 26.5 mm, 27.0 mm |
25.4 mm | 24 | 22.2 mm (7/8") | Obsolete. Threads are cut at 55 degrees, but an ISO or J.I.S. top headset can be used. Fork can be milled to ISO. |
| French | 30.2 mm | 26.5 mm, 27.0 mm |
25.0 mm | 25.4 (1 mm) |
22.0 mm | Obsolete. French steerers usually have a flat filed on the back, rather than a grooved keyway as with other threaded systems. The bottom headset parts wear faster; you can replace them with ISO parts and use the old top headset. |
| East German (DDR) | 30.6 mm | 26.8 mm (1 1/8") |
26 mm | 26 | 22.0 mm | Very similar to or the same as Austrian. 0.2 mm discrepancy may result from measuring the I.D. of the head tube (press fit). See page on German site. |
| Austrian |
30.8 mm | 26.7 mm | 26 mm | 25.4 (1 mm) |
22.0 mm | These are found on bicycles sold by Sears, made by Steyr in Austria. Higher quality Austrian bikes use English/ISO. |
| BMX/ O.P.C. bikes | 32.6 mm (varies) |
26.4 mm (varies) | 25.4 mm | 24 | 21.15 mm (.833") |
Used mainly on bicycles with one-piece cranks, also some early mountain bikes. |
| French Tandem | Let us know, if you do! | 28 mm | Let us now, if you do! | 25.4 (1 mm) |
22.0 mm | Obsolete and rare. |
| 1 1/8" | 34.0 mm | 30.0 mm | 28.6 mm | 26 | 25.4 mm (1") | "Oversized" (This size is more often used for threadless systems.) |
| Moulton | 30.2 mm top, 36.4 bottom |
33.0 mm | 25.4 mm | 24 | 22.2 mm (7/8") |
Moulton Mark III and earlier. Top headset is standard ISO. |
| 1 1/4" | 37.0 mm | 33.0 mm | 31.8 mm | 26 | 28.6 mm (1 1/8") | Mainly used on tandems |
![]()
![]()
With a threadless steerer, the stem clamps to the outside of the steerer and so the outside diameter of the steerer and inside diameter of the stem clamp are the same. Details about the table below are in our article about headsets.
| Threadless Headsets/Steerers | |||||
|---|---|---|---|---|---|
| Stem I.D., Steerer O.D. |
SHIS term |
Frame Cup/ Cartridge Outside Diameter |
Crown race Inside diameter |
Notes | |
| 21.15 mm (0.833") |
EC32 | 32.7 mm | 26.4 mm | Used mainly on bicycles with one-piece cranks. BMX/O.P.C | |
| 1" (25.4 mm) |
IS38 | 38.0 mm | 26.4 mm | Slip fit, 36° angular contact at bottom of bore. | EC30 | 30.2 mm | 26.4 mm | This is the ISO standard 1" size. |
| 1 1/8" (28.6 mm) |
EC34 | 34.0 mm | 30.0 mm | Most newer mountain bikes with external cups use this size. | |
| IS41 | 41.0 mm | Integrated, angular contact, slip fit. | |||
| ZS41 | 41.3 mm | Low profile, press fit. May have cartridge or cup-and-cone bearings. | |||
| 41.6 mm | Integrated, angular contact. Obsolete. | ||||
| IS42 | 41.8 mm | Integrated angular contact; Campagnolo Hiddenset | |||
| 41.9-42.0 mm | Microtech integrated, press fit, square-bottomed recesses. Obsolete | ||||
| ZS44 | 44.0 mm | Retainer/loose balls or cartridge, which is slip fit into pressed cup | |||
| 44.0 mm | Integrated, 36° angular contact. Obsolete | ||||
| IS47 | 47.0 mm | Integrated lower only, slip fit. | |||
| Various | 52-56mm | Use crown race reducer | |||
| 1 1/4" (31.8 mm) |
EC37 | 37.0 mm | 33.0 mm | Mainly used on tandems | |
| 1.5" (38.1 mm) |
EC49, ZS49 |
49.7 mm | 39.8 mm | OnePointFive standard for downhill and freeride applications. Press fit | |
| 52 mm (2.05") |
IS52 | 52 mm | 39.8mm | Integrated lower headset. Slip fit. | |
| 55 mm (2.165) |
ZS55/40 | 55 mm | 39.8mm | Internal, press fit. | |
| 56 mm (2.21") |
EC56, ZS56 |
56 mm | 39.8mm | Internal or external, press fit. | |
In the past, there was a wild proliferation of handlebar diameters and stems to match. Different countries and different companies would have their own set of "standards." This anarchic situation is gradually being rationalized, to the point that there are now only a few sizes left, the size used for steel handlebars, 22. 2 mm (7/8"), the international ISO standard size (1" or 25.4 mm), the Italian national size, nominally 26 mm, and"oversized' (31.8 mm).
| Handlebar dimensions | ||||
|---|---|---|---|---|
| Stem Clamp Size |
Grip Area Size |
Application | ||
| 22.2 mm | 7/8" | 22.2 mm | 7/8" | Steel bars. Mainly BMX, older Mountain bike bars. |
| 23.8 mm | 15/16" | 22.2 mm | 7/8" | Obsolete British size for steel handlebars, common on older 3-speeds. This size was also used for older British steel drop bars. |
| 25 mm | 23.5 mm | Obsolete French size. | ||
| 25.4 mm | 1" | 22.2 mm | 7/8" | Standard I.S.O. size, used on the vast majority of newer bicycles with upright handlebars. This size was formerly common for steel drop bars. |
| 25.4 mm | 1" | 23.8 mm | 15/16" | Standard I.S.O. size, used on most bicycles with drop handlebars. Also used on older British aluminium upright handlebars. |
| 25.8 mm | 23.8 mm | 15/16" | Unofficial in-between size used by some Italian handlebar makers for handlebars designed to be usable in either ISO (25.4) or Italian (26.0) size stems. | |
| 26.0 mm | 23.8 mm | 15/16" | Italian standard for drop bars, other bars made to fit Italian stems and some high-end aftermarket drop bars. This is sometimes incorrectly called "road" size. |
|
| 26.4 mm | 23.8 mm | 15/16" | Older Cinelli and Cinelli copies. Cinelli changed over to 26.0 mm in 1998. | |
| 27 mm | 23.8 mm | 15/16" | Titan (obsolete). | |
| 31.8 mm | 1 1/4" | 23.8 mm | 15/16" | Road oversized. |
Some people in the industry make a false distinction, referring to the ISO size as "mountain bike" size, and the Italian size as the "road" size.
The vast majority of bikes made in the last 10-15 years use the ISO 1" size, whatever sort of handlebars they use. High end aftermarket drop bars are commonly Italian (26 mm) size, but most drop bars supplied on built-up bikes were ISO (1") through the 1990s.
Many Italian bars are actually closer to 25.8 than the nominal 26 mm size.
Most current-model drop-bar bikes use the 26 mm or 25.8 mm size, or the new "oversized" 31.8 dimension.
If you're shopping for a stem, and are not sure the handlebar size you need, don't guess! Measure, or get somebody to measure for you with a proper caliper. If the bars are too skinny for the stem, it is possible but inelegant to shim the bar with thin metal stock. If in doubt, however, don't take chances, especially with aluminum stems. If you force an aluminum stem to bend to a shape it wasn't made to fit, it may fatigue and crack. If it is going to break, it will break when you are pulling or pushing extra hard on it, and down you'll go. Stem failures are among the most dangerous parts failures, and almost always lead to nasty crashes.
![]()
![]()
Many of the newer bikes are coming with "pop-top" stems. This type of stem has a removable front section held on by two bolts, rather than the usual single bolt. In addition to being light and strong, this type of stem can be interchanged much more easily than traditional one-bolt stems, because you don't need to remove handlebar tape/grips nor brake/shift levers to change the stem. It also is easier to replace the handlebars.
A "pop-top" stem

The horizontal distance from the saddle to the hand position on the handlebars depends on the length of the top tube and shape of the handlebars, as well as the stem extension. The same hand position is possible with different combinations of these, but proportions matter -- not only the total.
In the classic touring position, the back is slightly arched, and the arms are slightly bent to absorb road bumps. Excessive reach to the handlebars typically results in arm and back pain. There is a more detail on this topic in the article on this site about pain.
A low hand position well out in front of the steering axis allows the weight of the upper body to stabilize steering when only one hand is on the handlebar and the other hand is making a hand signal, or holding a water bottle. With drop bars, one hand on the drop can support the weight of the upper body while pushing directly away from the steering axis. In general, a stem extension around 10 cm achieves this with drop bars.
Other types of handlebars or bar-end extensions which place the hands well ahead of the handlebar center achieve some of this stabilizing effect. Back in my college days when I [John Allen] was riding English three-speeds, I would turn their North Road handlebars upside down to achieve this effect.
With flat handlebars and a short handlebar stem, the hands are directly either side of the steering axis, or even behind it. This causes a tiller effect. If only one hand is on the handlebar, a bicyclist must tense the back to avoid unintended steering. Bumps in the road which shake the bicyclist's body also shake the handlebar end forward and back, steering the bicycle unevenly.
This issue highlights one of the differences between comfort as perceived by the casual bicyclist and by the sportier bicyclist. A bolt-upright riding position, with close-in handlebars, can feel comfortable for someone traveling short distances at low speeds on a smooth surface, but for activation of more muscle groups in pedaling and for better steering control, the stem length and hand position must allow the upper body to lean forward at least to some degree. The tradeoff is in the need to develop shoulder and neck muscles to support the head.
Because it is much easier to change a stem than a frame, many bicyclists settle on a frame with the correct top-tube length only after experimenting with stem extensions on a frame which does not fit well.
A selection of pop-top stems allows quick adjustment. A length-adjustable quill stem -- called a Major Taylor bracket after the great African-American bicycle racer who introduced it, is another option for experimentation, and one is currently available. It is also very convenient when different people use the same bicycle.
A professional bicycle fitting can avoid the need for experimentation.
Adjustable stem from Livery Design Group

Upper-body length and arm length vary with relation to leg length. Women, in particular, not only tend to be shorter, but also to have a shorter upper body in relation to leg length. Many if not most women require a woman-specific bicycle frame so the handlebars are close enough without the need for an unusually short handlebar stem. To achieve this without toe-clip overlap, a bicycle with a smaller front wheel (or both wheels) than usual may be necessary. Georgena Terry, of Terry bicycles, pioneered in establishing this market category, but other brands now offer such bicycles. There are many stories of women who were never comfortable on a bicycle until they graduated to one which was correctly proportioned for them.
Stems are measured in ways that are often confusing, and measurement systems will sometimes vary from one manufacturer to another.
The "reach" of a stem is the distance from the centerline of the steering axis to the center of the handlebar clamp area, but the issue is the angle this measurement is taken from.
Traditional "road" stems shaped like the number "7" have a reach measured along the horizontal axis. Newer type stems that have different "rise" angles most often measure the reach along the axis of the rise, which leads to confusion...a 120 mm "7" shaped stem raised to place the handlebars at the same height as a nominal 120 mm stem with 135 degree (45 degree) rise will actually place the handlebars substantially farther forward.
"Rise" refers to the angle of the "extension" part of the stem. This may be referenced either to the steering axis, or to an imaginary perpendicular to the steering axis. Thus, a stem with the extension perpendicular to the quill might be referred to either as a 90 degree stem, or as a 0 degree stem! A traditional "7" shaped road stem might be referred to as a 73 degree stem, or as having a 17 degree negative rise! Caveat emptor!
Many of the newer "comfort bikes" come with pivoting stems with adjustable rise. These are good for the casual pootler who just wants to sit up as straight as possible, but are not always the best choice for a more committed cyclist. As these stems go up, the bars also move back, and this may move the bars back so far as to disturb the weight distribution and steering geometry. That doesn't matter to the occasional bike-path cruiser, but may be a significant issue to the touring cyclist, especially with a loaded bike.
Adjustable stem, with a label "do not adjust." Lawyers have been at work!

Height is an important variable, not usually specified in any clear way. In the case of "7" shaped stems, if height is specified, it is usually the overall length of the vertical part from top to bottom.
Stems are available in a wide range of rise, reach and height, but the range is wider with quill stems.
If you want to raise your bars and your stem is already at the maximum, one option is to replace the stem. The Nitto Technomics is a well-regarded tall quill stem. Another option is to use a "steerer extender", a stepped tubular device that mounts between the stem and the steerer. These are available in 1" and 1 1/8"sizes.
An extender for an expander/wedge type stem is narrow at the bottom to fit into the steerer, and has its own wedge to secure it. Because the quill of the stem must go at least two inches (5 cm) deep into the the top of the extender, 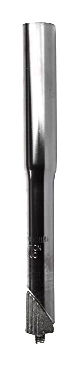 this may raise the handlebar higher than you would prefer. You need an extra-long Allen wrench (or an Allen-wrench head on a rachet-drive extension) to reach down into the extender and tighten its wedge.
 An extender to attach a clamp-on stem to a bicycle with a threaded headset is narrow at the bottom to fit into the steerer, and also has a wedge to secure it. The stem clamps onto the outside of the wider part at the top. This type of extender can mate a 1 1/8" clamp-on stem to a 1" threaded headset.
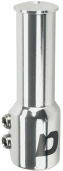 An extender for use with a clamp-on stem and threadless
headset is similar, only it has the wide part at the bottom, narrow at the top. The bottom section will have binder bolts to clamp it onto the threadless steerer, and there will be a deeply recessed bolt in the middle, to connect to the star nut. The original stem clamps onto the narrower upper section of this type of extender.
An extender for use with a clamp-on stem and threadless
headset is similar, only it has the wide part at the bottom, narrow at the top. The bottom section will have binder bolts to clamp it onto the threadless steerer, and there will be a deeply recessed bolt in the middle, to connect to the star nut. The original stem clamps onto the narrower upper section of this type of extender.
Note that the installation of a steerer extender (or tall stem) may be complicated by the need to replace some or all of the brake and shift cables, if the original ones are not long enough to reach the bars in their new, higher position.
Note: Steerers are butted at the bottom, so the hole in the steerer is constant-diameter until near the bottom, then the walls taper inward in the butted section.
It is vitally important that the steerer extender (or stem) is not inserted so far that the wedge is installed where the steerer is narrowing, or it could come loose unpredictably.
When this happens, only the edge/corner of the quill or wedge contacts the steerer, and it is trying to "grab" a slanted surface.
This is sometimes a problem on smaller frames if you try to insert the stem or a stem extender too far down into the steerer.
The stem may also loosen unexpectedly if the steerer has been bulged out by overtightening the expander or wedge.
Avoid this problem by tightening the stem bolt until the plug or wedge just begins to engage, while the stem is installed only partway into the steerer tube. Then as you lower the stem, you will feel when it reaches the butted or bulged section.
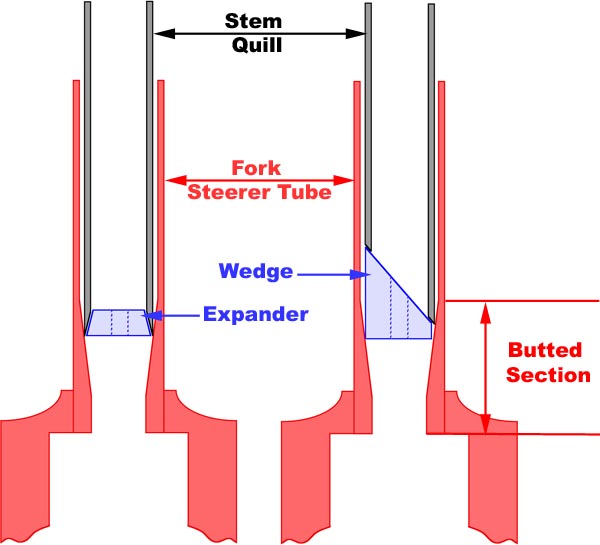
Illustration by Nicholas Flower
Also beware of any stem which has the handlebar clamp bolt behind the handlebar. These stems look superficially as sturdy as other stems, but in fact only half the height of the stem extension is carrying the load -- and there is a hole through it for the bolt. The stem shown below failed catastrophically, resulting in serious injury to the cyclist.

An earlier version of this article appeared in Adventure Cyclist magazine.
![]()
![]()

