Threading/interchangeability Issues for Older Raleigh Bicycles

|

revised by John "Sure, would" Allen
The Raleigh bicycle company is one of the oldest in existence, going back to the early years of the 20th century. Back then, screw threads and other dimensions were not standardized to the same extent that they are now. Each manufacturer would develop its own proprietary "standards."
Over time, this caused so much confusion and difficulty that it led to a gradual movement toward industry-wide (or at least nationwide) standardization.
Around the turn of the 20th century in the U.K.,, the British Cycle Engineer's Institute (CEI) was created to standardize dimensions for the industry. The CEI standards remained until after WWII when they were revised and became known as "British Standard Cycle" or BSC. These standards and ultimately formed the heart of the ISO international standards established in the 1980s.
[B.S.A. (Birmingham Small Arms) was an important bicycle and firearms maker in the early 20th century and was one of the companies which promulgated the BSC standards. The standards are sometimes erroneously called "BSA" standards and indeed Sheldon Brown made that mistake on this site. I thank reader Greg Reiche for alterting me to correct this -- John Allen.]
At the time of this transition, Raleigh was the Microsoft of the bicycle industry, and did not choose to go along with the adoption of B.S.C. standards. Right through the 1990s, the bikes built at the mighty Nottingham Factory were made to Raleigh proprietary dimensions. Since Raleigh made virtually every part of these bikes, there was no compelling need to match standards used by other manufacturers. (We shouldn't be too hard on Raleigh about this. Making the change would have been very, very costly, and wouldn't have benefited the shareholders in any way.)
The main difference is that B.S.C./ISO screw threads for the bottom bracket and fork steerer/headset have a pitch of 24 threads per inch (TPI), while the corresponding Raleigh parts have a slightly finer 26 TPI threading.

The easiest way to identify Raleigh-built bikes is by looking at the rear dropouts. Almost all Raleigh-threaded bikes have the rear fender eyelets located directly behind the axle, instead of above it. (This doesn't apply to roadsters, which don't generally have dropouts or fender eyelets.)
Most Raleighs use a seatpost diameter of 1" (25.4 mm) while other British 3-speed bikes usually use 1 1/16" (27.0 mm)
Some sporty models have more conventional dropouts, but you can identify these by the distinctive Raleigh headset and bottom bracket cups.
The width of the bottom bracket shell is also an indication. Standard British (24 TPI) bottom bracket shells are 68 mm wide, give or take a mm. Raleigh 26 TPI shells are generally 71 mm or 76 mm wide.
In later years, higher-end Raleigh models such as the International, Professional, Competition, Grand Sport and other models built at the separate Carlton workshop used B.S.C. threading, as did models made in Asia and the United States. These bicycles all used cotterless cranks.
Generally speaking, Raleighs that use cottered cranks have Raleigh 26 TPI threading for both the bottom bracket and the headset. These include all Nottingham-built bicycles sold with a coaster brake or internal-gear hub, as well as lower-priced derailer-equipped models up through the Super Course, which had a frame of plain-gauge Reynolds 531 tubing. Although the diameters are the same as B.S.C., the different thread pitch makes the parts incompatible. This article will provide strategies for getting around this problem.
With an older bike, there is often a question of whether to preserve it for posterity in "original" condition or to upgrade it for use. The answer to this question generally depends on rarity, age and condition.
Nottingham Raleighs were built in huge numbers, and they were so well-made that quite a lot of them have survived, so most of them don't really qualify as "rare."
Very few English bikes were imported to the U.S. before World War II, so it is unusual to see really old ones. That said, I'd generally consider anything from the 1960s onward to be fair game, with 50s bikes on the borderline. (I have a separate page about dating your Raleigh bike.)
To be a good candidate for restoration, a bike should already be basically complete, and free from rust.
Note that these issues are a moving target, and will change over time as these bikes become increasingly rare. I think of my father, who grew up tinkering with Model T Fords. When he was a young man, old Model Ts were basically throwaway cars, cheap and plentiful. Hot-rodding or otherwise modifying them was a popular avocation, and perfectly reasonable at the time...even though, now, a complete, original Model T is worth big bucks.
![]()
![]()
![]()
![]()
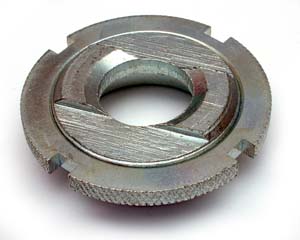
Raleigh bottom-bracket cups have raised ridges on their surfaces, which fit a 5/8" or 16 mm open end wrench. The best tool for them is the Park HCW-11 (TL7063). For information on servicing the stock cottered setups, see my articles on:
There are three ways to upgrade a Nottingham Raleigh to use modern cotterless cranks:
By far the cheapest option is to keep the original 26 TPI Raleigh cups, and install a new spindle with the tapered square ends needed to fit cotterless cranks. Because the inside diameter of the bearing cups is slightly smaller than for other brands, not all spindles will fit, unfortunately, unless you replace the standard 1/4" bearing balls with 15/64" or 6 mm bearing balls. Bicycle shops do not usually stock these sizes, but Internet vendors carry them.
You must check the fit of bottom-bracket spindle, bearing balls and cups before installing the bottom bracket. If the bearing tracks run too low on the spindle, the bearings will wear quickly.
Place some grease in the bearing cup, then assemble the parts, as shown in the photo below. Rotate the spindle, then take it out and examine it.

The next image shows the bearing track too low, as is usual with a JIS spindle and Raleigh cups. The bearing balls actually ride on the little ledge on the low side of the bearing area of the spindle. This also pushes the bearing cup outwards and can deceptively look like a good fit in a wide Raleigh Twenty bottom bracket.

The next image shows a correct fit using 6 mm bearing balls and a JIS spindle. The bearing track is in the middle of the bearing area of the spindle.

Raleigh cups are no longer made, but they are extremely hard. Used cups in good condition may often be salvaged from a trashed frame.
Raleigh bottom bracket shells are wider than the standard 68 mm width of B.S.C./ISO bottom brackets, commonly anywhere from 71 mm to 76 mm. As a result, you'll need a longer-than-normal spindle. Japanese JIS-standard spindles are generally designated by a simple code consisting of a single digit followed by one or more letters.
You may check whether the assembly is wide enough by holding it up next to the bottom bracket. The combination that seems to work best is a 7 series spindle with 6 mm bearing balls, in a 71 mm bottom bracket. You could also install a crank loosely to run a quick check on the chainline.

Just getting a spindle to fit into the frame is a start, but you may still have problems due to the overall length of the spindle. Older cranks used longer spindles than newer, "low profile" cranks. JIS axles are mostly available in longer overall lengths, which are likely to give poor chainline with newer cranks, though they will work. If you are spreading the rear dropouts of a frame to use a wider hub, you may want to increase the chainline anyway.
See my article on Bottom Bracket Sizes for information on spindle lengths for different cranks.
Modern cartridge bottom brackets are much easier to install than the old-style cup-and-cone design. There are three possibilities for running a cartridge bottom bracket in a Raleigh 26 TPI shell:
Phil Wood bottom brackets are sold separately from the mounting rings that screw into the frame. Phil Wood is the only manufacturer still supporting 26 TPI bottom bracket threading. The quality is superb, there's nothing better. Phil Wood bottom brackets are available in a great variety of spindle lengths, too. The bad news is that Phil Wood bottom brackets are among the very most expensive available.
Phil Wood retaining rings don't have any shoulders, so they can be screwed all the way into the shell, even recessed below the edge of the shell. This greatly reduces problems due to the wider shell width, and allows chainline adjustment by several mm.
Stock Phil Wood bottom-bracket cartridges for a 68 to 73-mm bottom-bracket shell are listed on the Phil Wood Web site. They will work with a 71 mm Raleigh bottom bracket. With a 76 mm bottom-bracket shell there is a risk that the mounting rings will run up onto the end of the threads inside the bottom-bracket shell and bind. Phil Wood has in the past made longer cartridges, though as of this writing only a few remain in stock.
Before installing, thread the mounting rings into the bottom bracket shell and measure to make sure that they thread in freely far enough to mate properly with the ends of the cartridge. There is more detail on installation in Raleigh Twentys on the Raleigh Twenty page, and on measurement for a Phil Wood bottom bracket on the cartridge bottom-bracket page.
The Phil Wood bottom-bracket spindle is press-fit into the bearings, and the chainline can be readjusted by realigning the spindle.
It happens that Shimano UN72 bottom brackets can also be used with Phil Wood retaining rings. The UN72 model is the only Shimano series you can use this way, because the other Shimano models have the right side threads machined into the cartridge body. The UN72 is even narrower than the Phil Wood 68-73 mm cartridge, and so it is not usable with a 76 mm bottom-bracket shell.
Unfortunately, for the 2003 model year, Shimano replaced the UN72 bottom bracket with the revised UN73 design. The UN73 is a fine bottom bracket, but it does not have a removable mounting ring on the right side. The threads are part of the shell, as with the other Shimano cartridges, so the UN73 will not work with Phil Wood rings.
Velo Orange makes a bottom bracket that clamps into the bottom-bracket shell with internal-expanding sleeves. It is available in 4 spindle lengths and is described in an article on this site. It will work with a 71 mm Raleigh BB shell, but not 76 mm.
This option is the most versatile, but also the most drastic. Only the top bike shops will have the necessary guided tap set required for this. The threads will not be as strong as they would be if the shell was made for standard threading, but this approach generally works well. You will still need to deal with the overall shell width. A shop that has the correct taps will also have the correct tool to face the ends of the shell, and this tool can be used to bring the width down to a more standard size (though it takes a lot of elbow grease! Beware, though, the welds to the bottom bracket shell of a Raleigh Twenty can be very hard, maybe harder than the taps.
![]()
![]()

The stock Raleigh headsets have proven to be unusually long-lived, so it will rarely be necessary to replace one, unless you wish to install a non-Raleigh fork.
You can even mix and match. If your Raleigh headset cups are worn out or rusted on the load-bearing bottom section, you can replace just the bottom with J. I. S. 1" headset parts, which have the same 30.0mm cup O.D. and 27.0mm fork crown race I.D. , and re-use the Raleigh upper assembly. To use ISO headset parts, you would have to mill the head tube and fork crown: dimensions are 30.2 and 26.4mm.
You can make it possible to ride a Raleigh Twenty no-hands by replacing the Nylon sleeve-bearing upper headset with a 1" threadless upper headset, such as the Aheadset. The original Raleigh top nut and locknut can be used to preload the bearing. You will need to use a quill stem because the Aheadset does not leave enough room for the Twenty's stem clamp. You will need to add spacer washers and/or a cable stop to get enough headset stack height to preload the headset bearings. There's more about this on the Raleigh Twenty page.
The forks used on most Nottingham Raleighs have keyhole-shaped axle slots. These are designed to fit Raleigh hubs, with thin (5/16") solid axles and wheel retention shoulders on the cones. The spacing between the inner faces of the fork ends is less than the modern 100 mm standard. If you wish to mount a modern hub on a Nottingham Raleigh, be prepared to do some filing on the fork ends, to enlarge the lower part of the slots to fit the modern axle. Use a good sharp file, and, if possible, have the fork end itself clamped into a sturdy vise. If you don't, vibration of the fork will make it difficult to file. Make sure you file both sides the same amount, so the axle will not go in crooked.
The fork blades should be spread to match the over-locknut dimension of the hub. The dropouts will need to be realigned as well, to avoid bending the hub axle after the blades have been spread. The fork rake of Raleigh three-speeds is rather large, and so trail is less than optimal, and unbending the fork blades a bit can improve handling. I hesitate to advise realigning a fork unless you have access to a proper jig. You could just replace the fork instead.
Most Nottingham Raleigh rear dropouts have narrow (8 mm) slots intended for the flat-sided axles common on Sturmey-Archer and other older British hubs. This still works with modern Sturmey-Archer and SRAM internal-gear hubs which have flatted axles. Most other modern rear hubs are 10 mm, some are even 10.5 mm, so you will need to file the rear as well. Shimano internal-gear hub axles are flatted, but the anti-rotation washers place the flats at an angle to the dropout slots. We recommend doing all of the filing on the bottom of the slot. This eliminates the risk of making one side higher than the other.
Dropout spacing on bikes made for 3-speed applications is typically 114 mm (4 1/2 inches). 5-speed derailer systems usually used 120 mm. Many upgrades will call for a wider dropout spacing.
See: my article on Frame Spreading for instructions on this.
The typical Raleigh-built 3-speed comes with 590 mm (26 x 1 3/8) rims, with long-reach brakes, around 75 mm at the front and 80 mm at the rear.
If you switch to 622 mm (700c) wheels, you'll need brakes with a reach of about 60 mm at the front and 65 mm at the rear (but measure -- this may vary). 700C wheels are a recommended upgrade, both for the greater variety of available rims and tires, and for better braking. Modern dual-pivot sidepull brakes with the required reach, such as the Tektro R556, will work. The larger wheels will raise the frame by 10-18 mm depending on the width of the new tires, an issue if the frame already borders on being too large.
700C wheels risk interference with the original steel fenders, but modern, adjustable plastic fenders will work fine. They also are much lighter.
If you switch to 559 mm (26" MTB size) you'll need very long-reach brakes. Such brakes are often a bit anemic due to the long arms; also, the bottom bracket will be low, reducing cornering clearance.
If you wish to use 559 mm wheels, it is often a good idea to replace the fork with a MTB fork with cantilever bosses. You then have the option of raising the front end of the bicycle, and with it the bottom bracket too, especially if you use a suspension fork. If you're handy, you can even braze cantilever mounts onto the rear. See the article on installing cantilever braze-ons. Or, you may use a home-made drop bolt.
The Raleigh Twenty has special brake-reach issues, as it was sold with either of two different wheel sizes.
As mentioned above, Raleigh forks are completely standard except for the thread pitch. Thus, any standard stem with a 7/8" (22.2 mm) quill will fit into the forks.
There is an issue, however, at the top end of the stem. This is not a Raleigh-specific issue, but applies to older British bikes from all makers. The handlebar clamp diameters on older British bicycles depended on the material of the handlebars, rather than what type of bars they were. Specifically, steel handlebars (and the stems made for them) used a 15/16" (23.8 mm) clamping diameter at the middle of the bar. Most Nottingham Raleighs have this type of bar/stem.
Thus, if you wish to replace the stem and keep the handlebar, the hole in the new stem will be too large to clamp properly. You can get around this by using a shim to make up the difference, though this is a bit inelegant.
If you want to replace the handlebar, you should really replace the stem too, because it is unsafe to overspread the 15/16" stem to fit a standard 1" (25.4 mm) handlebar.
The eyelets in the fork ends, where the fender/mudguard stays attach to the frame, also use a non-standard, Raleigh-specific threading. It is common to tap these out to the standard 5 x 0.8 metric size.
The location of the eyelets at the back of the rear dropouts calls for shorter fender stays than normal at the back of the fender, and longer at the top of the fender. This is not a problem with most newer fenders because they have adjustable stays.
The eyelet position can also be an issue with some rear luggage racks, because the legs may not be long enough to let the rack clear the top of the fender. Racks designated as being for "hybrid" bikes will usually work.
![]()
![]()
![]()
![]()