Derailerless Drivetrains

|

![]()
This article applies to a bicycle with::
Careful adjustment of the distance between the chainwheel at the crank and the sprocket at the rear hub keeps the chain on the sprockets -- loose enough not to bind, but tight enough not to climb over the top of sprocket teeth and fall off.
Advantages of this arrangement are:
Disadvantages are:
The rest of this article addresses equipment choices and adjustment of a non-derailer drivetrain.
Drivetrains with belt drive have different issues and are addressed elsewhere.
![]()
![]()
One important issue with a frame for a non-derailer drivetrain is whether it has horizontal or vertical rear dropouts.
It is very desirable that a frame for use without a rear derailer have "horizontal" rear dropouts: that is, the slots in the frame that hold the rear axle should run in a more-or-less horizontal direction. This allows you to move the axle back and forth as needed to adjust chain tension, making things much easier than if you try to convert a newer bike with vertical dropouts.
A bicycle which was supplied with a non-derailer drivetrain as original equipment will already have horizontal dropouts. When considering converting a derailer-equipped bicycle, check the dropouts. Horizontal dropouts are preferable, but there are workarounds with vertical dropouts.
Fixed gear, coaster brake and singlespeed hubs are commonly available in with a 110mm overlocknut dimension. 1970s frames built to be used with 5-speed freewheels usually have 120 mm spacing between the rear dropouts. Internal-gear hubs are made in a variety of spacings from 110mm on up to 135mm. Our page on internal-gear hub chainlines lists most of these. Respacing the frame for a hub with a different overlocknut distance is possible only with a steel frame, but on the other hand, spacing on derailer-equipped bicycles has generally increased over the years, so spacer washers on the axle, sometimes with a longer axle, can fit the hub to the frame. You may want to replace the axle in any case, because fixed-gear hubs generally come only with solid axles, not quick release.
1970's road bikes usually have horizontal dropouts, and usually don't have shift-lever bosses, which are unsightly if you aren't using shift levers. Cable stops, however, are available to install to the bosses, and may be used for the shifter cable and rear brake cable, making a neat installation. 1970s frames tended to have more generous tire clearance than newer sport bikes, providing more versatility in the choice of tires and the use of fenders.
 ld three-speeds, particularly English ones, can make quite satisfactory fixed-gear and singlespeed bikes. The rear triangle is already just about perfect for a track hub: they usually have 110 mm spacing. A newer internal-gear hub may require that you respace the frame. The better English 3-speeds had pretty nice-riding frames, and can be very pleasant bikes for not a lot of money.
If you replace the 590 mm (26 x 1 3/8") wheels with 622 (700C) wheels, the bottom bracket gets raised, providing good ground clearance with a fixed gear. Using the larger wheels also allows you to install better, shorter-reach brake calipers. There is a limit to the depth of a 700C tire that will fit under the fork crown, especially with fenders.
ne-speed bikes are very easy to convert, since they usually already have 110 mm spacing. Unfortunately, most adult-sized one-speed bikes are not very good performers, and tend to be too heavy and sluggish for enjoyable fixed-gear riding. Some of the better-quality cruisers work OK as fixed gears, but watch out for low bottom brackets.
One of my (Sheldon's) favorite bikes is my 1916 Mead Ranger. This was originally built as a coaster-brake bike with 28-inch single-tube tires on wood rims. It was wheelless when I bought it at a flea market, so I set it up with some nice-quality '70s-vintage 630 mm (27") wheels and modern tires. It's surprisingly pleasant to ride.
 mountain bike with an single-speed drivetrain or internal-gear hub is fine for heavy-duty urban transport, and, if you are adventurous enough, you can even take it to the woods. Mountain bikes tend to have adequate ground clearance, although most, alas, have vertical dropouts.
 I have an old Bridgestone CB-3 set up for nasty winter conditions, with a 28/15 fixed gear. This gives a nice low gear, a 3.63 gain ratio (49" / 3.88 m) which will take me as fast as I care to go when the streets are snowy. A fixed gear this low makes the brake almost unnecessary: such a low gear lets me slow the bike down quickly by resisting, especially considering that it can't go very fast.
Many newer mountain bikes, however, have rear suspension -- see comments below.
A recumbent may be set up with an internal-gear hub, but doesn't work very well as a singlespeed or fixed-gear bicycle, because the rider can't stand on the pedals to climb hills!
A bicycle with rear suspension can be set up as a singlespeed or with an internal-gear hub, using a chain tensioner, but most bicycles with rear suspension are unsuitable for use with a fixed gear or coaster brake, because the distance between the chainwheel and sprocket varies. Be aware that the torque to the frame from an internal-gear hub can result in "pogo-sticking" -- suspension bounce -- different and greater than with a singlespeed or derailer setup.
![]()
 ear choice is a very personal matter, and will depend on your style, your goals, the terrain you ride in and the type of rear hub. These questions are addressed:
A fixed-gear bicycle may also have a flip-flop hub with a freewheel on the other side. This option is described at length in our article about fixed-gear conversions.
nce you have decided on your gear ratio, then there's the question of which of several different equivalent sprocket/chainring combinations to use.
For instance, 36/12, 39/13, 42/14, 45/15 and 48/16 all give the same 3:1 ratio. Which to choose?
| Bigger | Smaller | |
|---|---|---|
| Good: |
|
|
| Bad: |
|
|
These differences are mostly pretty minor. On a bicycle with a single speed, most riders will be best served by a chainring somewhere in the 30s for technical off-road use, 40s for road or bike-path use, low 50s for track use.
Since 42-tooth rings are very commonly available on road cranksets, this size is particularly popular for conversions.
If you use a flip/flop hub, running smaller sizes gives you a bigger gearing difference for each tooth difference on the flip flop.
While the most common type of three-lug sprockets for internal-gear hubs and coaster brakes has been made in sizes as small as 13 teeth, many hubs cannot accept the smallest sprockets. The smallest sprocket that works may also differ depending on sprocket dishing. Our article on chainline with internal-gear hubs describes which sprocket type works with each kind of hub.
![]()
Track-racing hubs generally come with solid axles and track nuts. Most velodromes have rules requiring this type of wheel attachment.
As a result, it is widely believed that quick-release axles are not suitable for use on a fixed-gear or singlespeed bicycle. This is false!
It is our belief that the velodrome rule dates back to long before the invention of the quick-release, when the choices were standard nuts or wingnuts. The protruding "wings" of wingnuts might constitute a hazard in a crash, and we believe that's why the rule was instituted. Since quick-release skewers don't have any sharp projections, that becomes a non-issue in practice.
Since most newer bikes have vertical dropouts, people have gotten used to wimpy aluminum skewers, and often don't adjust them as tightly as they might.
If you use a hub with serrated locknuts and a good quality (Shimano is the best) skewer, tightened securely, it will hold just fine in any type of dropout or forkend.
A quick release is a considerable timesaver in switching a flip-flop wheel around, and having a QR means that you don't need to carry a big wrench to be able to replace a damaged inner tube.
A coaster brake or internal-gear hub (other than the Rohloff, as of this writing) has a nutted axle, and you'll need to carry the wrench. A 6-inch adjustable wrench will work for most hubs, and other fittings on older bicycles. Some hubs use an Allen wrench.
![]()
![]()
 ost newer bikes (made since the late-1980's) have "vertical" rear dropouts, where the wheel slides upward as you install it. These are a problem when you want to dispense with a derailer, because you need some way to regulate chain tension.
Also: the anti-rotation washers of an internal-gear hub require extra dropout-slot length. Even some horizontal dropout slots can be too short. If the washers have tabs to fit into the slots only on one side of the axle, rotating the axle by a half turn can gain a bit more adjustment range.
| Forged Dropouts | |||
|---|---|---|---|
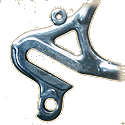 |
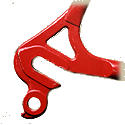 |
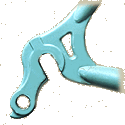 |
 |
| Horizontal Dropout Campagnolo 1010 |
Horizontal Dropout Short |
Semi-Vertical Dropout | Vertical Dropout |
| Stamped Dropouts | Investment Cast | ||
 |
 |
 |
 |
| With Hanger | Without Hanger | Raleigh 3-speed | Track Forkend Not a dropout! |
You cannot use a derailer on a fixed-gear or coaster brake bicycle, even as a chain tensioner, because when you resist the rotation of the pedals, the lower run of chain tightens, and the upper run goes slack. Your could bend the derailer, and the chain could fall off. This presents a problem, because there's no easy way to adjust the chain slack.
Even the chain tensioners used for downhill mountain bike racing are not strong enough to withstand the stress of resisting the pedals. These tensioners have to clamp onto the chainstay, which is more or less round. There is no way to make one that would be secure, short of installing some sort of brazed-on fitting.
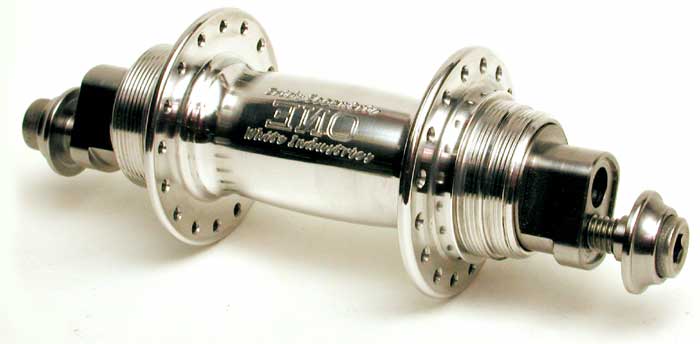
 White Industries has come up with a terrific solution to the problem of vertical dropouts and fixed-gear/singlespeed, a bolt-on hub with offset bolts that allow 15 mm of adjustment even in a frame with vertical dropouts!
This hub is available for 126mm, 130mm or 135mm spacing, and end caps of different lengths are interchangeable for different spacings.
The current (2014) model of the ENO hub uses a proprietary splined fixed-gear sprocket, to avoid issues of loosening and cross-threading. The other end of the hub has standard freewheel threading. You will have to build a wheel to use this hub. It has a nutted axle and cannot be converted to use a quick release.
Some few single-rider bicycle frames with vertical dropouts have an oversize bottom-bracket shell with an eccentric bottom bracket to allow chain adjustment.
The Philcentric, from Phil Wood & Co., uses an ISIS-standard splined bottom-bracket axle and is available for all bottom-bracket threadings. A version for a square-taper axle also is available. The similar Trickstuff Exzentriker is an eccentric bottom bracket which fits a conventional threaded bottom-bracket shell, using external bearing cups and cartridges and a 24mm or 24/22mm axle. 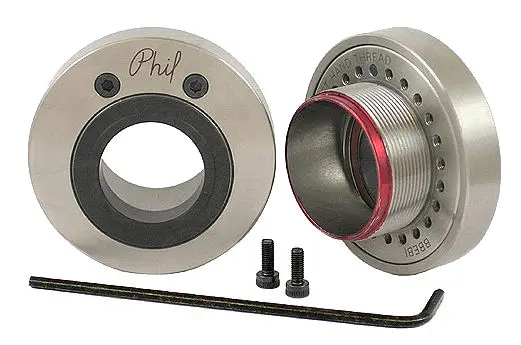 Fourier and Wheels Manufacturing make eccentric bottom brackets to fit Pressfit30 and BB30 threadless shells. See our unthreaded bottom bracket cribsheet for more about compatibility.
These aftermarket eccentric bottom brackets tend to be expensive, but they will work with any hub.
Before the development of the White Industries eccentric hub, I (Sheldon) used to recommend a bunch of different workarounds for a fixed gear or singlespeed with vertical dropouts. If the White Industries hub or an eccentric bottom bracket is too expensive for you, these options are still available, though by comparison with these solutions, they're all basically kludges. You may have to try several installations before you get the chain adjustment right.
Fortunately, most "vertical" dropouts are not exactly vertical: they usually have a bit of a slant to them. You may have to play games with chainwheel sizes. One of my fixed-gear bicycles is based on a Cannondale touring frame. It happens that there is just enough adjustment to make it work with my preferred 42/15 combination. If the chainstays were a bit different in length, I could replace the 42 with a 41 or 43.
Adding or subtracting a link in the chain will move the axle 1/2". Changing either sprocket size by one tooth will move the axle 1/8" (3.2 mm). Thus, if I wanted a 5.75 gain ratio (75" / 6 meter gear), I might first try a 42/15: this gives a gain ratio of 5.77 (75.6" / 6.05 m gear). If the chain was too loose, I could take up 1/8" (3.2 mm) of axle movement by replacing the 42 with a 43. This 43/15 combination would raise my gain ratio to 5.91 (77.4" / 6.19 m). Alternately, I could get the same axle position with a 42/16 --5.41 (70.9" / 5.67 m).
If I was not happy with these choices, I could add a link to the chain and switch to a 45/17 --5.45 (71.5" / 5.72 m) If I added two links to the chain, I could get the same axle position with a 48/18 --5.49 (72.0" / 5.76 m)
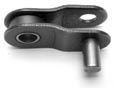 It is also possible to use a special "half link" or "offset link" to lengthen or shorten your chain by only 1/2", and adjust the sprocket-to chainwheel distance by 1/4". Half links are available for both 1/8" and 3/32" chain. Not all chains have the same diameter rivet pins: use a half-link of the same brand as the chain, or at least check.
Another possibility would be to do a little bit of filing at the back of the dropout to let the axle move back just a bit.
It is also possible to grind or file a flat on each end of the axle to allow a bit more adjustment, like this:
I used a more drastic solution on my Bianchi Osprey. I cut the rear axle short so that it didn't protrude past the surfaces of the locknuts. Thus, only the quick-release skewer went through the dropouts. Since the skewer is quite a bit thinner than the actual axle, this gives me considerably more adjustment room.
If the skewer is properly tightened, the axle is held in place by the friction of the locknuts' being pressed against the inside of the dropouts. If this were not the case, horizontal dropouts would not be usable, since the forward pull on the chain creates a larger force against the axle than supporting the rider's weight does. Just to be on the safe side, I carried a spare skewer along with my spare inner tube.
I rode that setup for a couple of years with no problems, but later got a deal on a Bianchi B.a.S.S. purpose-built singlespeed frame that fits me better, is lighter and has horizontal track-type forkends, so I'm no longer using that setup.
Quite a fine adjustment is possible by positioning a "ghost chainwheel", as shown on our home-built tandem page. It does reduce drive efficiency slightly. The larger it is, and the closer to the rear hub, the more slack it takes up, the smaller the risk of its falling out, and the less likely it will rub on the chainstay. The range of adjustment with a "ghost" chainwheel is greater than with the other "kludge" solutions described here.
As the chain wears, it lengthens, and to keep it from falling off the sprockets, it should be adjusted a couple of times before it needs to be replaced. The limited range of adjustment possible with the kludge solutions may require replacement of a chain sooner than otherwise.
Eric House has prepared a whole web site devoted to the problem of finding sprocket combinations that will work with vertical dropouts. He has developed charts and Java applets that show the options available for particular chainstay lengths.
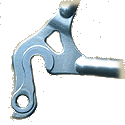
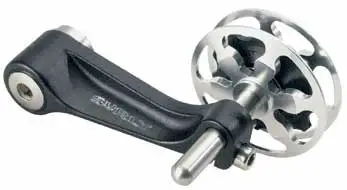
An adjustable tensioner
Adjustable tensioners are set for the particular chain length/sprocket combination you will be using, and then tightened up to hold the pulley in the correct position. These are mainly intended for use on (yuck!) downhill bikes, and are designed to supplement a derailer to keep increase the chain tension, reducing the risk of accidental derailment.
Some, such as the no-longer-available Tektro unit shown above, are also useful for singlespeeds. If you have a pure singlespeed, without a flip-flop hub, this type is adequate, and may even be very slightly more efficient, because there is no spring loading on the chain. I (Sheldon) used to like the Tektro unit, but it proved a bit too delicate in practice, and clamping onto the chainstay isn't all that secure. A tensioner which clamps to the chainstay is not suitable for a bicycle with rear suspension and will very likely damage a carbon-fiber chainstay. I now prefer units that attach to the derailer hanger.
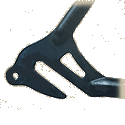
A spring-loaded tensioner
These are like partial derailers, with a single spring-loaded pulley. They attach to the derailer hanger of your dropout, or to an adapter claw. Like many purpose-built singlespeed parts, they are often rather expensive considering how simple they are. If you plan to use different gear ratios, for instance with a flip-flop hub, a spring-loaded tensioner is the best choice.
If you are lucky, you may be able to get a frame with vertical dropouts to work as a singlespeed without a chain tensioner, as you would have to with a fixed gear. You will probably have to be a bit flexible in your gear choice. We've already addressed that in this article.
Do we have to say this again? Well, maybe. Chain tensioners are usable only with freewheeling hubs. They must not be used with fixed gears or coaster brakes,which tension the lower run of chain when you backpedal. No chain tensioner is built to withstand this force. With a sprung tensioner, the upper run of chain hangs loose, so the chain is at risk of coming off
![]()
![]()
any bicycles with a non-derailer drivetrain use a wider chain than is common on multi-speed bicycles. Derailer-type chain (up through 9-speed) has a nominal internal width of 3/32". Non-derailer bicycles, including most track bicycles, use the wider 1/8" size. You can buy sprockets in either width.
(Some people mistakenly refer to the width as "pitch", speaking of "road pitch" or "track pitch". This is a malapropism. The pitch is the distance between the rollers, and all modern bicycle chain has the same pitch, 1/2"/12.7 mm.)
The 1/8" size is slightly heavier, but doesn't seem to perform any better in our experience. Your choice may be dictated by the width of the rear sprocket, and a 1/8" rear sprocket will usually wear longer. A master link for 1/8" chain can be removed and replaced without loosening the rear wheel, making it easier to remove the chain for cleaning; not so with a master link for derailer chain on a derailerless bicycle.
For the true retro fixed-gear fan, another option is 1" x 3/16" chain. This used to be common on track bikes. This requires special sprockets with only half as many teeth as standard 1/2" pitch sprockets. Serious old-time trackies used "block" chain, which had no rollers. This is no longer available. Roller chain is still sometimes findable in this size.
Even more obscure is the 10mm pitch chain promoted by Shimano in the early 1980s. The idea was to save weight by making everything littler. An idea whose time never came.
 erailer bikes can work fairly well even with the chain running at a considerable angle, but this should not be done with a derailerless setup. It is quite important to get the chainline just right.
You can check the chainline by installing the hub in the bike, with no chain installed. By placing your head just in front of the chainwheel, you can sight along the chainwheel and see back to the rear hub, to see if the chainwheel lines up exactly with the rear sprocket. If it doesn't, re-arrange spacers or change the bottom bracket axle as necessary. You might also hold a yardstick or other straightedge against the side of the chainwheel, reaching back to the sprockets.
Usually, on a bike that came with double chainwheels, the inner chainwheel will be more in line with the rear sprocket. For a neat appearance with a single chainwheel, you can buy a set of shorter "stack bolts" (the 5 bolts that hold the chainwheel(s) to the crank spider). You may find it easier to locate these in a shop that deals in BMX bikes.
Many modern cranks splay outward to increase ankle clearance, while decreasing cornering clearance. A right crank is often farther outboard than the left one, so chainrings can clear the chainstay. With only a single chainring mounted in the outermost position, a short bottom-bracket spindle can reduce the tread ("Q factor") and increase cornering clearance, for the same chainline. This trick is especially advantageous with a fixed-gear, because of the impossibility of coasting when cornering. With no front derailer, washers under the chainring can allow the crank to be even farther inward, as long as it does not strike the chainstay.
Most older one-speed hubs, such as BMX, fixed-gear and coaster-brake hubs have a chainline of about 40-42 mm (centerline of the frame/hub to center of the sprocket.) The wider chainstays on mountain bikes often don't let you place a medium-sized chainwheel that close to the centerline of the bike, so there is a secondary de-facto standard chainline of about 52 mm for singlespeed mountain bikes. Stock MTB triple cranks usually have the outer chainring at around 52-57 mm; the middle is normally 47.5-50 mm.
If you convert a cassette Freehub ® to singlespeed, you can put the rear chainline anywhere you want to match that of the chainring.
There is more detailed information on chainline and chainline adjustment in our Bicycle Glossary's Chainline Entry and even more in our Chainline Articles.
 hen your install the rear wheel on any bicycle which has only a chainwheel and sprocket, no additional pulleys, there are basically three things you need to adjust simultaneously:
This basically means that the tire needs to be centered between the frame's chainstays. If it is properly dished, and you get it centered between the chainstays, it is properly aligned.
Note: if the hub has a nutted axle, it is vitally important that the threads be properly lubricated with grease or oil. You should also have grease or oil on the contact surface where the axle nut presses against the washer that contacts the frame.
Some folks who are used to derailer bikes find wheel installation frustrating, especially with a nutted hub. This is usually because they don't know the technique of "walking" the wheel back and forth in the fork ends -- our next topic.
 he chain slack on a bicycle without a rear derailer or chain tensioner is quite critical, and is regulated by moving the rear axle back and forth in the forkends. If the chain is too tight, the drivetrain will bind, perhaps only at one angle of the pedals (chainwheels are not usually perfectly concentric). The chain should be tight as it can be without binding. If the chain is too loose, it can fall off, so there is no braking through the pedals with a fixed gear or coaster brake. The chain also might jam. (A bicycle should have a front-wheel handbrake in case of these dangerous problems!)
A rear sprocket intended for use without a derailer has tall teeth, to allow the chain to loosen more with wear before it is at risk of falling off. Chainrings and sprockets for use with derailers have shorter teeth, to make shifting easier, but also making adjustment more critical. Lightweight ("track") aluminum chainwheels with tall teeth are sold in the 1/8" width but are rare in the narrower widths. Generally, older 3/32" chainwheels have somewhat taller teeth than newer models optimized for smoother shifting.
When adjusting the chain, you need to be able to turn the cranks. With a fixed gear or coaster brake, the rear wheel has to be off the ground. Keep your fingers away from the sprockets: the momentum of the rear wheel can crush a finger caught between a sprocket and the chain.
Start by installing the wheel at approximately the correct position and tightening the axle nuts. They don't need to be super tight at this stage, but should more than finger tight. Check the chain tension and wheel alignment.
Most likely, the chain will be a bit loose, but perhaps the wheel is correctly aligned. Loosen the right-side axle nut and push the tire to the side so that the right end of the axle moves to the rear, then tighten the axle nut.
Now the chain should have less slack, but the wheel is no longer centered between the chainstays. Loosen the left-side axle nut and re-center the wheel in the frame. This will tighten the chain a little bit more. Repeat as needed. The key is to keep one or the other of the axle nuts tight at all times, and "walk" the wheel forward and back. This takes a bit of practice and getting used to how much axle movement is needed to adjust a given amount of chain droop, but it isn't really hard as long as you keep one side secured at all times.
The chain should droop as little as possible without your feeling increased resistance as you turn the crank. If you get the chain a bit too tight, tighten the right-side axle nut partway. Tap the middle of the top run of the chain with the wrench to move the rear wheel forward just the tiny bit needed to make the chain run smoothly. The wheel will then be skewed, and you need to readjust the left end of the axle.
Note, this technique doesn't work with a quick-release hub, but those are generally easier anyway. Stand on the left side of the bicycle and hold the rear wheel centered between the chainstays with your left hand, pushing it back until the chain is nearly taut; then tighten the quick release. If the bicycle is on a workstand or hanging with the rear wheel downward, gravity pulls the wheel back, making adjustment easier. With the rubber side down, if you grab the rear wheel with a rim brake and try to roll the bicycle forward, the wheel will slide back in the dropouts. You need to have a way to lock the rear brake (old toe strap, bicycle glove wadded under an open run of brake cable, a friend to lend a helping hand, etc.).
If the chain is seriously worn, adjusting it just short of binding will result in rough running and low efficiency, because it will not engage the teeth of the sprockets evenly. A new chain on a worn sprocket will also run roughly. Check the chain and sprocket for wear and replace as needed.
![]()
![]()
Once you have adjusted the chain slack, you will probably find that it doesn't remain constant as you turn the crank. The slack varies because the chainring and sprocket aren't perfectly centered. If you press the wrench down against the middle of the top run of chain while turning the cranks, you can easily see how the amount of slack varies.
It is usually possible to center the chainring. Set the rear axle so that the chain pulls taut at the tightest part of the cranks' rotation. One at a time, loosen up each of the stack bolts, and tighten it back just finger tight. Turn the crank slowly and watch for the chain to get to its tightest point. Strike the taut chain lightly with a convenient tool to make the chainring move a bit on its spider. Then rotate the crank some more, finding the new tightest spot, and repeat as necessary.
This takes a little bit of your hands' learning how hard to hit the chain, and how loose to set the stack bolts, but it is really quite easy to learn.
Tighten up the stack bolts a bit and re-check. Tighten them in a regular pattern, like the lug nuts on a car wheel. Our standard pattern is to start by tightening the bolt opposite the crank, then move clockwise 2 bolts (144 degrees), tighten that one, clockwise 2 more, and so on. Never tighten two neighboring bolts in a row (well, not unless there are only 3 or 4 in all -- than you have no choice). You may prefer to go counterclockwise, but try to get in the habit of always starting at the same place and always going the same way. This reduces the chances of accidentally missing a bolt.
Once you have the chainrings centered and secured, adjust the position of the rear axle again to make the chain as nearly tight as possible without binding. Notice how freely the drivetrain turns when the chain is too loose. That is how freely it should turn when you are done, but with as little chain droop as possible.
Some rear sprockets are not well-centered either. You may try to center the sprocket using a similar technique, or you may just have to try another sprocket or put up with the problem. This problem is most common with the 3-lug sprockets used on internal-gear hubs and coaster brakes.
If you want to get the maximum life from your chain and sprockets, select even-numbered sizes when possible. A drivetrain without a derailer can have a full-coverage chain case, which protects the chain from water and grit -- and your clothing from chain dirt. See our Chain Life Extension Article.
Unfortunately, fixed-gear and singlespeed riding is somewhat of a fringe activity from a commercial point of view, and those who have not learned to love it tend to write fixed-gear fans off as nuts and fanatics. If you have a local bike shop that stocks fixed-gear stuff, you are in a lucky minority, and I urge you to patronize it.
Internal-gear hubs are common on conventional "city bikes" which usually are not designed for sporty performance. If you would like to install an internal-gear hub on a different type of bicycle, you may have to build a wheel or have one built.
If you don't have a shop nearby which can help you meet these challenges, check out:
Singlespeed Parts from Harris Cyclery |
|---|
![]()
Internal-Gear Hubs |
|---|
Do you really need to coast? See also:
Sheldon Brown's Fixed Gear and Singlespeed Articles |
|---|
![]()
![]()