Chainline on Bicycles with Derailers
|
Translations of this article (older version): German
|

|

revised and expanded by John "Cross-Chain" Allen
|
Translations of this article (older version): German
|
|
Read this article in connection with the main article on chainline. That article covers chainline measurement, and adjustment of the front chainline (at the crankset). This article covers the adjustment of the rear chainline (at the cassette or freewheel).
The word "chainline" refers to how straight the chain runs between the front and rear sprockets. Ideally, both sprockets should be in the same plane, so that there is no sideward motion or stress to the chain. This constitutes "perfect chainline".
In the case of derailer geared bicycles, the chainline is not perfect in most gears. Chainline mismatch can cause the chain to rub against the side of an outer, larger chainring when engaged with a smaller one, and can cause problems with shifting, especially with the front derailer. The worse the chainline, the worse the mechanical efficiency of the drive train, though research has shown the loss to be minor, at least with modern, flexible chains.
"Correct" chainline for a derailer system is a matter of opinion, and depends on the intended use of the bicycle. There are three "simple" answers to the question of what constitutes proper chainline:
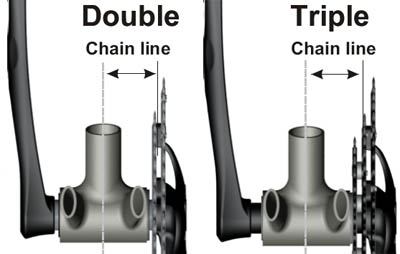
From the rider's point of view, chainline is partly dependent on how you are going to use your gears. For instance, consider a road triple vs. a mountain-bike triple:
![]()
![]()
| Application | Dimension | Notes |
|---|---|---|
| Road Double | 43.5 | Shimano spec, measured to the midpoint between the rings. With typical 5 mm chainring spacing, this puts the inner at 41 mm, the outer at 46 mm. |
| Road Triple | 45 | Shimano spec, measured to the middle ring. |
| MTB Triple | 47.5-50 mm | Shimano spec, measured to the middle ring. 47.5 preferred, but for frames with oversized seat tubes, the longer dimension may be needed, because the fat tube places the derailer mechanism farther to the right. |
![]()
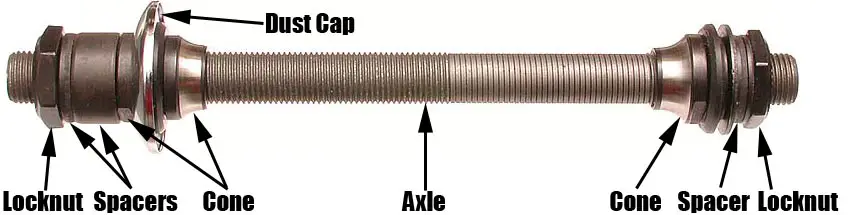
Chainline may be adjusted at the rear wheel by rearranging spacers on the rear axle, and with a steel frame, also by re-spacing the rear dropouts to allow use of a longer or shorter rear axle. Adjustable hubs use conventional threaded axles, so you can increase the OLD spacing by adding spacer washers under the locknuts. If the OLD is only a few mm greater, you can almost always use the same axle; otherwise, you may have to replace the axle, especially a quick-release axle.
You will need to adjust the chainline when replacing a multi-speed freewheel or cassette body with a wider one. Then you will also have to re-dish the rear wheel, unless you are going to a a wider OLD and can add the same number of spacers on both sides. The wider OLD is better, as it will maintain the same front chainline, and the rear wheel will be stronger. A cassette with 8 or more sprockets should be used only with an OLD of 130 mm or greater.
If you add equal thicknesses to both sides, the chainline is unaffected, since it's measured from the middle outward.
If you add more spacers to one side, or move them from one side to the other, you can change the chainline.
Moving spacers from one side to the other will disturb the alignment between a disc brake rotor and caliper. Even if you leave the same width of spacers on the left side, re-spacing a frame will tilt the caliper slightly and cause a slight lateral misalignment. Avoid these modifications unless the brake allows adjustments to compensate.
This lets you adjust the chainline of a multi-speed bicycle, or modify a wheel to use with a different overlocknut distance. .
The spacers are located just behind the outer locknuts, between the locknuts and the cones (or the bearing mounting nuts, if your hub uses cartridge bearings.) You will need cone wrenches and a general understanding of hub bearing adjustment to do this job.
Assuming the rear hub's spacing already matches your frame's spacing, you can take spacer washers from one side of the hub and move them to the other side, thus shifting the entire hub from side to side. In the case of a hub originally meant for a multi-speed freewheel, there is usually a rather thick spacer on the right (freewheel) side of the hub. You can replace this with a stack of thinner spacer washers that add up to the same overall thickness, then distribute the washers from side to side as needed to get the chainline where you need it to be.
Once you have done this, you'll need to re-dish the wheel by adjusting the spokes. This is a bit of trouble, but, if you can move the wheel to the right, the re-dishing actually results in making the wheel much stronger than it was.
Also see my article about frame spacing.
With a multi-sprocket freewheel, it is best to re-space the axle, so the dishing of the wheel can be kept to a minimum, though instead, a spacer may be used behind a freewheel or cassette.
Older Sturmey-Archer internal-gear hubs have two 1/16" (1.6 mm) spacer washers next to the sprocket. Shimano makes the same diameter of washers in 1 mm thickness, for use behind a 10-speed cassette, or in 4.5 mm to use behind a 7-speed cassette on an 8- 9- or 10-speed body.
These spacers can be used with freewheels, if there is sufficient thread engagement on the hub. Plastic washers that fit between the sprockets on a Shimano cassette have the correct internal diameter, but, have internal lugs that get in the way, and compress too easily to be suitable for use with a threaded sprocket or freewheel.
![]()
![]()
 Modern 8-through 10-speed cassettes are intended for use with a 130 or 135 mm dropout spacing. 7-speed cassettes and freewheels are a few mm narrower and are intended for use with a 126 mm spacing. With any of these, a wider dropout spacing will reduce dishing and increase the chainline, possibly improving the alignment with a single chainwheel or where the outer chainring is used with all the sprockets -- see Sheldon's advice on multi-range gearing.
Racing teams need to maintain compatibility among wheels for quick replacement. Bicycle rental agencies and touring groups may have the same concern. Other than that, the closer you can get the sprocket cluster to the right dropout, the better. The closest possible adjustment without interference can prevent chain jams, strengthen the rear wheel, and in some cases allow for an additional sprocket. This is usually only a matter of a few mm. The chain may curve a bit to the right of its normal position during a shift, so do check that there is enough room between the smallest sprocket and the dropout for smooth shifting. Avoid creating a space between the smallest sprocket and the dropout which is just wide enough for the chain to fall into and jam.
A second choice is for the space between the smallest sprocket and right dropout to be wide enough so the chain can fall onto the axle assembly. Then the bicycle will freewheel forward, but the chain will not jam. The rear wheel will be dished deper, and so weaker, and there is a greater risk of bending the axle.
![]()
![]()
If the chain can fall between the largest sprocket and the spokes, it can jam, spokes can be damaged or broken, the rear derailer pretzeled, the dropout bent or broken -- not a happy situation, which can be prevented by a spoke protector disk -- or, if you find the cost in weight and coolness unbearable -- by careful derailer adjustment.
Hubs leave enough space so the rear derailer will still clear the spokes when the smallest possible inner sprocket is used. With a larger sprocket, the spokes are farther away, making room for a spoke protector disk -- or for one more sprocket.
8-speed cassette on 7-speed body, using dished inner sprocket

A dished sprocket lets you use a variation on Sheldon's "8 of 9 on 7" trick to place all 8 of 8 sprockets on a 7-speed cassette body, and reduce the dishing of the rear wheel on a frame with unchangeable 126 or 130 mm dropout spacing. You could even have a 9 of 9 or 10 of 10 by bolting the largest sprocket to the next smaller one.
![]()
![]()
![]()
Last Updated: by Harriet Fell