Brakes for Tandem Bicycles

|

For pure stopping power, good rim brakes, properly adjusted, can stop a tandem as well as they can stop a solo.
The greater momentum of a tandem reduces the margin for error in brake setup, however, so if the brakes are not properly adjusted, or there are cable routing problems, poor quality brake shoes, or slippery rims, braking power may be inadequate.
Cyclists with inadequate braking often are tempted to cure the problem by buying more expensive brakes, but this is usually not worthwhile if you have a decent quality bike to begin with. Before replacing the brakes, make sure the ones you've got are working up to their full potential.
This site has several articles on brake setup that can help you with this:
The limitation of caliper brakes is tire clearance. Since a caliper brake has arms coming down from above the tire, the use of a large tire, especially if you want clearance for fenders, would require a caliper with long arms. The longer the arms, however, the lower the mechanical advantage of the brake, so modern high-performance caliper brakes are only available with short arms, and typically provide clearance for, at best, 28 mm tires. 28 mm tires are definitely on the narrow side of what's practical for tandem use, so bikes equipped with short-arm caliper brakes are not generally suitable for touring or for use on rough pavement.
In the 1970's, center-pull caliper brakes were common, which did provide reasonable tire clearance, but these have gone out of fashion and are not provided on new bikes.
The mechanical advantage of conventional (center-pull) cantilevers can be adjusted by varying the lengths of the cables. This is explained in detail in my articles on Cantilever Adjustment and Cantilever Geometry.
One drawback of conventional cantilevers is that the mechanical advantage varies over the course of the stroke, in most cases, becoming less the closer the shoe gets to the rim. This is the opposite of what would be desirable.
This design can apply greater braking force for less finger force than a conventional cantilever, but is difficult to modulate. The original Scott Pedersen SE brakes were available either for front or rear use (opposite direction threadings), but when Sun Tour bought the design, their legal department vetoed the front version, so only the rear model was made by Sun Tour. I advise against the use of Self Energizing brakes, because they make it too easy to lock up the wheel.
Because the mechanical advantage of direct-pull cantilevers is so high, they require special brake levers with reduced mechanical advantage (the levers pull twice as much cable, half as hard.) Although the necessity for special brake levers is unfortunate, it has the happy side effect that the cable tension is cut in half, which reduces the effect of cable "stretch" (a significant concern on the rear brake of a tandem, due to the long cable.)
For tandems with upright handlebars, direct-pull cantilevers are definitely the best choice.
Unfortunately, there are only a few models of brake lever for drop handlebars that work with direct-pull cantilevers -- see our advice on brake levers later in this article.. These levers are a fine choice if you have barcon shifters, but won't help you if you prefer integrated brake/shifters such as Campagnolo Ergo or Shimano STI.
There are aftermarket devices to change the mechanical advantage at the cantilever by the use of an eccentric pulley, and these are sometimes a good solution for rear brakes, especially on smaller frames where there may not be sufficient clearance above the rear cantilever for optimal adjustment of a conventional cantilever. See my cantilever articles for details on this.
Some conventional cantilevers can be converted into direct-pull operation, again a good choice for rear brakes. See my cantilever articles for details on this.
To mechanics unfamiliar with them they appear a bit daunting at first, but they're actually quite easy to work on.
![]()
![]()
Why have a brake that won't stop the bike? All brakes work by turning the energy of the bicycle's speed into heat. If a heavily-laden tandem is used in hilly conditions, especially for long, slow, descents, the rim brakes can heat up the rims and tires to the point that the tires will blow off the rims! Using a hub brake to help keep the bicycle's speed in check on long descents heats the hub, instead of the rim, reducing the risk of blowouts.
This is not a good arrangement if the bike will be used at anything much above walking speed. Tandems of this sort commonly have idler-adjusted synch chains, and when the brake is applied, the idler is subjected to fairly considerable loads from the captain's braking action. This increases the risk of the chain falling off, making the coaster brake inoperable.
Tandems with coaster brakes often are set up with the assumption that the coaster brake will be the primary brake, and they commonly have rather pitiful caliper brakes in front. These calipers are generally inadequate to stop the bike in an emergency. The coaster brake, as with any rear brake on a tandem, becomes almost useless when the bike is ridden without a stoker, or with a child stoker, because there's not enough weight on the back tire to provide adequate braking traction.
A further objection to coaster brakes for tandem use is the difficulty of getting the pedals set at a good position for getting started. This is a problem with coaster-brake bikes in general, but tandems are always harder to get started than solo bikes are, so the difficulty is compounded.
There is a lot of current work being done on disc brake design, and this may be the way of the future. Some new Santana models have a rear disc brake which is supposed to be powerful and reliable enough to dissipate heat in downhill speed control, and to eliminate the need for a rear rim brake. Here's a link to the page about the Santana brake.
Except with this disc brake, a rim brake should also be installed.
I would not like to see disc brakes in the front of bikes that don't have suspension forks. A "rigid" fork is actually designed to flex a bit, to provide a small measure of natural suspension. A hub brake with a reaction arm pressing on one side of the fork causes unpleasant feelings. I speak from some experience, having run a front drum brake on a tandem for a while.
Suspension forks have very rigid lower blades, so a suitably-designed suspension fork can work well with a disc brake, if you don't mind the extra weight and the extra stresses on the spokes. Be aware of the issue of the brake's potentially pulling the wheel out of the fork: see our article on quick releases.
Some disc brakes are designed to work with long cable-pull levers also used for direct-pull brakes, others with conventional levers.
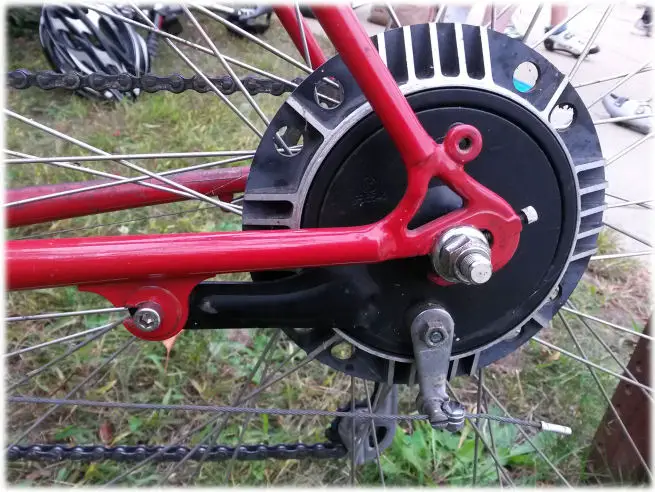
Drum brakes, either built into the hub or screwed onto threads similar to freewheel threads have long been popular for heat dissipation on tandems used in hilly terrain. Drum brakes suitable for tandem use are a specialty item, with extra-large heat-dissipating fins. Everyday drum brakes are not up to the task.
The standard of the industry used to be the very reliable Japanese Arai unit -- unfortunately, no longer made, though still available reconditioned as of 2018 and even found on some cheap Columbia tandems which can be worth buying just for the brak -- though these tandems can be worth the trouble to upgrade. The Arai brake is external to the hub shell, avoiding potential overheating of the grease in the hub bearings. The drum screws on to the left side of many tandem rear hubs, and the mechanism plate with the internal expanding shoes is secured to the axle by a locknut. There is a reaction arm which must be securely attached to the chainstay...all of the braking force is transferred through this arm, and if it comes loose, it creates a mess.
Arai drum brake on Santana tandem with cable quick-release
and "Pac-man" fitting for reaction arm, allowing quick wheel removal and replacement
Also see our article about drum brakes and Precision Tandems's article about the Arai brake.
![]()
![]()
The danger of this setup is that a fearful stoker might apply the brake at an inappropriate time. For instance, suppose both the captain and stoker notice a car approaching on a collision course from a side street. The captain may try to put on a burst of speed to clear the intersection...if the stoker panics and grabs the brake, the results can be disastrous!
Another example...flying down a twisty mountain road, the stoker may decide that the bike is going too fast and apply the brake...but the captain may decide the bike is going too fast at the same time, and apply both brakes. The extra rear braking from the drum may be enough to break the rear tire loose, and cause the bike to skid out on the next switchback.
A stoker entrusted with a brake control must never use it unless the captain asks for it!
A friction-type shifter allows the captain to set the hub brake to apply the desired amount of drag, even once he or she has let go of the hub brake control. The captain then uses both hands on the rim brakes to modulate the bike's speed, and to stop if it becomes necessary.
Due to the greater length of a tandem, it is not possible to lift the rear wheel off the road by applying the front brake...the front tire will skid first. Consequently, maximum braking for a tandem involves the use of both brakes, at the point just short of what will skid both wheels.
For less than maximum braking, it is best to just use the front brake in most circumstances, as with a solo bike (if this strikes you as a bizarre suggestion, read my Braking & Turning Article!)
Using the rear brake can be particularly dangerous if you're riding with a light stoker or with no stoker, when the traction on the rear wheel is less than normal.
![]()
![]()
If you don't have direct-pull cantilevers, conventional levers will work fine. Some, but not all, levers made for direct-pull cantilevers have a mechanical advantage adjustment feature which allows them to work with either system.
If you use levers made for direct-pull cantilevers with conventional cantilevers or calipers, the reduced mechanical advantage will not let you stop unless you squeeze very, very hard on the levers.
If you use conventional levers with direct-pull cantilevers, there will be too little cable travel and too much mechanical advantage. The lack of travel can mean that the brake shoes will drag on the rims even when the brakes are released, or, it can mean that you can squeeze the levers all the way to the handlebars without having the brakes engage...it all depends on how they're adjusted. If you get this setup adjusted just right (wrong) the brakes will work but grab too abruptly, possibly causing skidding.
At present (2018) there are several drop-bar brake levers designed to work with direct-pull cantilevers: the Dia Compe 287V, Cane Creek SCR-5V "Æro" levers, Tektro RL520 and perhaps others. Due to the nature of drop-bar levers, it is not so easy to make a suitable lever that can be operated both from the drops and from the hoods.
There are also accessory devices that change the mechanical advantage so that the mismatch is avoided. These are pulley devices that mount on one of the caliper arms. The most readily available of these is the QBC "Travel Agent." The "Travel Agent" uses a stepped pulley to change the mechanical advantage of the cable..
Since the mechanical advantage change occurs at the cantilever-end of the cable, the cable-stretch benefits of the direct-pull system are lost, but this can still be a very worthwhile system, especially for rear brakes on small frames.
These devices allow direct-pull brakes to be used with combined brake-shift levers, which are made for use with conventional cantilevers and caliper brakes.
Note however that any pulley with a diameter smaller than about 2 inches will fray the cable and result in its failure sooner or later. Check the cable frequently for frayed strands.
Traditional drop-bar levers have exposed cables running straight up from the fronts of the hoods, and arching over in mid air as they run toward the brakes. This design is virtually extinct today.
"Æro" levers have concealed cables, running out the back of the hoods and underneath the handlebar tape toward the center of the handlebar. Combined brake/shifter units, such as Campagnolo's Ergopower and Shimano's STI incorporate æro-type brake levers.
Æro levers have a number of advantages besides the cleaner look of the concealed cables:
Since the mechanical advantage of conventional cantilevers can be adjusted, the usual cure is to raise up the cable yoke, as described in my Cantilever Adjustment article. This is generally not a serious problem with the all-important front brake, but the added stretch of a long tandem rear brake cable may preclude a satisfactory adjustment of the rear brake. If the suggestions in my Cantilever Adjustment article don't solve this problem for you, you may need to buy levers made specifically for cantilever use, such as the Dia Compe 287, or convert to a direct-pull system with a pulley.
Fortunately, inexpensive adaptors are readily available to let you add a cable adjuster anywhere the cable runs through housing.
![]()
![]()
![]()
Last Updated: by Harriet Fell