Pinnacle Studio 15 and 16 Video Editors

|

by John Allen
Pinnacle Studio is a video editing software package that runs in Windows.
In 2011 or thereabouts, Avid, primarily a maker of high-end video software and hardware, bought up Pinnacle Systems, and created Avid Studio as a prosumer product -- incorporating many of the features of Pinnacle Studio software. Avid more recently sold the product to Corel, which did some additional work on it and renamed it Pinnacle Studio 16. I'm using the version with the most bells and whistles: Pinnacle Studio 16 Ultimate. Less-expensive Pinnacle products work essentially the same but are missing some features -- mostly, add-on effects; the least expensive does not support keyframing, so you can only have static effects such as pans and zooms. You may compare the newest versions of the newest release, Pinnacle Studio v. 17, here (click on "compare'), v. 16 here and v. 15 here. There's a big difference, both in performance and in the user interface, between releases up through v. 15 and the newer ones based on technology from Avid. Still, many commands are the same. This makes transition to the newer version easier.
This review is mostly about Pinnacle Studio Ultimate 16 -- which I'm using as I write this. I found Pinnacle Studio Ultimate 15 (and earlier versions) to have the features I needed for my purposes. However, these versions are rather slow, even on my Intel i5 computer, very crash-prone and allow only 3 video tracks. One of version 15's best features, I would rather not need: it almost always reloads a project intact on restarting after a crash. Pinnacle Studio 16 has the same feature but needs it less often. I have lost work when Pinnacle Studio 16 crashed while I was in import mode. I had not saved the file previously. So, save frequently!
It is easy to dislike a new application which manages tasks in an unfamiliar way. It is also easy to notice features that are missing, or more difficult in the new application, so, even while the new version may work much better all in all, it may seem worse at first.
As I write this review, I am climbing the learning curve in Pinnacle Studio Ultimate 16. I have come to like and appreciate many things about it, but I am still having growing pains. I think that is a good perspective from which to write. I still need to look things up in the Help and the Manual, and so I am in a good position to comment on their quality. Much of this review will be about them.
There's a lot more information, by the way, at http://www.pinnaclestudio.info/ and http://www.dtvpro.co.uk/. I highly recommend the book Pinnacle Studio Plus and Ultimate Revealed, by Jeff Naylor. The link is to Amazon.com, but DTVpro may offer a better deal.
![]()
![]()
Let me discuss some things I like first.
Pinnacle Studio Ultimate 16 is much faster than any version up through 15. It can export a 1920 x 1080 HD video to an MP4 on my Intel i5 machine at nearly real-time speed.
Pinnacle Studio Ultimate 16 offers an unlimited number of tracks (lesser versions, fewer), and makes good use of 64-bit processing -- also, it takes advantage of an Nvidia graphics card's CUDA processing power -- though this advantage is not available with other brands of cards. Still, scrolling in the timeline, rendering, and other processor-intensive tasks run much, much faster and more smoothly than in version 15. Version 16 is much less crash-prone than version 15, and more versatile. Version 16 supports more output formats. It easily converts among image sizes and even between video frame rates -- example: I just burned a 25 FPS, 576-line DVD to send to Australia, from video shot and edited at the US standard of 29.97 FPS and 480 lines. It went off without a hitch -- though motion is a bit jerky. (For a smooth conversion, I use Gooder Video MotionPerfect, which is slow, but does amazing time interpolation).
The upgrade from version 15 is inexpensive; version 16 can read files created in earlier versions, a major advantage when upgrading. (You must select "import previous Pinnacle Studio projects" rather than attempting simply to open them).
All versions can render video during editing of a project, so composited segments (picture in picture, pan and zoom, transitions, etc.) will play smoothly as editing continues.
The Ultimate version of v. 15, and all versions of v. v16 and 17, include "Scorefitter" automated background music, with the same free selections, dozens of them, and many sound as if they are being played by live musicians. There are very good piano, electric guitar, Hammond organ, pizzicato string and drum kit sounds. Wind and bowed string instruments don't sound as realistic -- so, all in all, if you choose a selection which uses rock band instrumentation, it will sound realistic. The music is automatically edited to fit the length of time you select for it. Rendering of music selections to fit different lengths can be painfully slow in version 15; it is much faster in Avid Studio and version 16. Additional selections may be purchased.
The Library feature in Pinnacle version 16 makes it easier to access resources stored on the computer, so you don't have to make your way among irrelevant files and folders in the computer's directory structure. The ability to apply effects to clips in the Library avoids having to do it over and over again in each new project. You must import files into a Library in order for them to be usable in Pinnacle Studio 16.. Having done this, you can then create "collections" which can span across different folders and storage media. This feature which lets you quickly access all the media which you are using in a project.
The Library is dependent on the actual file locations on the computer. If you move them, it will lose them, though you can relink to them in their new locations. About preserving the Library when reinstalling Pinnacle, or Windows, or moving the installation to another computer, see further information under "Storage Locations" below.
Version 16 has a useful "navigator", a miniaturized version of the timeline, which can be added above the timeline. The "navigator" indicates the position of the playback head and the part of the timeline which is visible onscreen. That onscreen segment can be broadened, narrowed and moved by clicking and dragging in the "navigator" or by grabbling the ends of the timeline This is a real improvement over the Windows scroll bar in version 15, and eliminates the need to collapse the timeline to get the big picture of the project.
Version 15 does not allow clips to be inserted after empty time at the end of the last clip in a project, so it is necessary to extend the last clip or insert a dummy clip. Similarly, version 15 does not allow the first clip to be dragged away from the start. In version 16, it is even possible to drag the start of the first clip to the left, off the timeline, to extend it, effectively moving all others later in time. This feature makes it easier, for example, to insert a title at the beginning of a project.
However, not all is a bed of roses. I had some serious issues with Avid Studio. Some have been fixed, though many remain in Pinnacle Studio 16, and a few new ones have cropped up.
![]()
![]()
Some of the following comments are as of May 2013, and changes may have occurred since then.
Registering Pinnacle Studio 16 is can be confusing. Access to support registration is only by clicking on the "to submit a technical question" line in the registration e-mail. Clicking on Online Support > Technical Support from Help in Pinnacle 16 doesn't go to that same place.
Avid Studio and Pinnacle Studio 16 claim to need a screen at least 1200 x 768 but it will run on a smaller screen. My primary (work) screen is 1024 x 768 and I have a second, viewing screen which is 1920 x 1080. Video playback can be moved to the second screen. Turning the primary monitor to portrait orientation can make it display the work screen better, especially when looking through a Library.
When you have used an optional effects plugin such as Red Giant in a project, be sure to install the plugin if you are reinstalling Pinnacle or installing it on a different system. If you don't, the effects will not work and other things as well can go wrong.
When setting up Pinnacle Studio 16, you need to be careful how you import files. Following installation, Pinnacle 16 may copy all of your video files onto your computer's C: drive. That will take a very long time and can overflow the drive if you have much video. Be sure to select "link" instead unless you are importing from external media -- tape, memory chip, DVD. Then you will usually want to copy the content onto a hard drive. If the data is already stored on a hard drive on your computer, you usually will not want to copy it. (An exception would be to copy from an external hard drive which you use only for archiving.) Be careful not so have "delete original file" selected, if you only want to copy a file or link to it.
It is better not to keep large video files on your boot drive. Use another hard drive for that data.
I changed "copy" to "link" in the Import dialog box, and directed the Library function to access the folders where I keep files for my first project.
I had to install activation keys to view and use files encoded with h.264 compression -- .mp4 files, and many others besides. These files all appeared with a lock icon and a play arrow, and I didn't see how to get the key to unlock the files until I clicked on the icon to play one of the the files which wouldn't play. I was then informed that I had to purchase a key, but the key installed for free. If a key is free, what is the point? (Maybe it's to assure that they are being unlocked only by people who have purchased the software legally and registered it?...) Installation of activation keys is accessed in the Help menu rather than the Control Panel. This is not exactly an example of the best user interface management, but oh well, OK, it worked. Now, more about that user interface...
Pinnacle Studio 16 manual and help are clearly written for what they do cover, but it's often hard to find what you need in them, due to commands which are accessed with wordless icons, and the lack of synonyms in the manual and help index. To understand Pinnacle Studio 16, you will have to review the tutorials online, or Jeff Naylor's book -- or else you will become frustrated hunting around to find functions. The manual and the help don't provide an easy way into many important topics. I'll grant that the user interface is better than that of Final Cut Pro 7 on the Mac, which can best be described as a quagmire.
Help index entries for several common words describing each function would be nice, but why should I have to look up common functions in the Help at all? Menus or labeled buttons would give me words that are either self-evident, or that I could look up in the Help or the manual. Sometimes the Help will describe a function but not how to access it. Example: "To create a new Collection, click the icon in the header line of the Collections branch" Where is the Collections branch? No info on that. Icons, and functions accessed only by clicking here or there onscreen, can require hunting expeditions if you don't also have a way to access the same function through a menu.
Online tutorials in the copy of version 16.0 which I received were in German. The automatic update to version 16.1 provided access to tutorials in English.
Pinnacle Studio up through version 15 uses icons to illustrate and enable transitions. between clips -- fades, dissolves, wipes etc -- and uses them intelligently. Clicking on the Transitions icon (in orange in the mercifully short column near the upper left of the screen shot below) displays transitions in the two-dimensional table shown. The blue and orange display at the upper right is animated and cycles repeatedly between A in blue and B in orange to show how each transition works. Dragging one of the icons to the timeline inserts it. In the lower half of the screen, you can see the icons for a number of dissolves which have been inserted between clips.
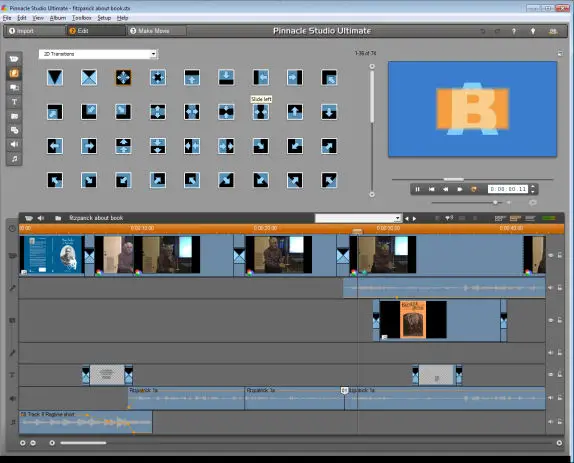
These icons graphically depict the functions they perform. That's a good use of icons.
Icons which are merely symbolic, on the other hand, leave me cold. The "desktop" analogy on a computer screen doesn't do much for me if the items on the desktop are unfamiliar, unlabeled and strewn around the screen. Learning the meaning of the icons is like learning to read Chinese, and there are many of these in Pinnacle Studio 16.
There are tooltips -- text which appears when you hover the mouse pointer over an icon, and that can help if the tooltip is descriptive, but on the other hand it is often necessary to look up a function in Naylor's book to identify and locate the icon.
Most effects are organized through the Effects Editor, which opens by right-clicking on a clip, or by double-clicking and selecting "Effects Editor" from a context menu. Effects are a basic feature, but a hidden feature. No icon or menu item opens the Effects Editor.
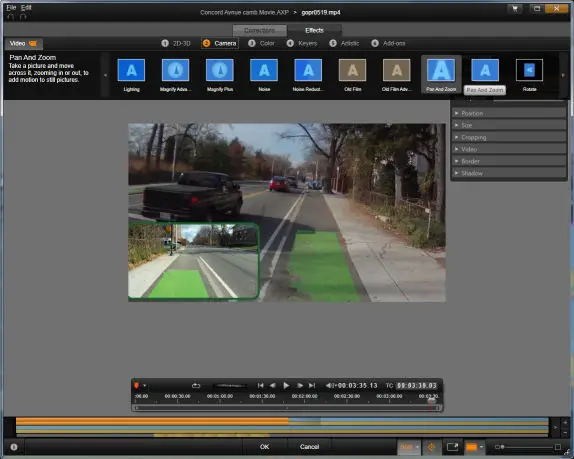
Let's take as an example my hunt for the Pan and Zoom function. After quite a bit of searching, I found Pan and Zoom in the Camera Effects list of the Effects Editor.
The Effects Editor uses its own image display, in an applet which overlays the main display screen. The display occupies much of the screen space in the Effects Editor, even when you are only selecting an effect. As a result, there is only a single line of icons for effects -- unlike the two-dimensional table of Transitions in Pinnacle Studio. The effects are in 6 categories, each of which displays separately: 2D-3D, Camera, Color, Keyers, Artistic and Add-ons. The categories are not entirely logical: what is the meaning of a "camera" effect? Well, it is one that a camera might create, even though it is being created here in software. You must scroll past some rather exotic effects to reach more important ones. Ordering by function ("Image reshaping' "Image resizing", "Color and brightness", "Sharpen/soften", "Noise") would have made more sense. The image below highlights Pan and Zoom (second from the right in the line near the top), but it is off the screen at first, and to get to it you must first know that it is categorized as a Camera effect, then scroll past 12 effects including bread-and butter ones like Earthquake, Old Film and Noise. (Please excuse sarcasm.)
Similarly, one picture in picture function is called "Studio PiP" but "Picture in Picture", and "PiP" do not appear in the help index. To get to this feature, I learned in a tutorial, you need to go into the Effects Editor, then to 2D-3D, then scroll to the right -- this function is off the screen until you scroll.
This is the only picture-in-picture effect whose name is intuitive. There are four others, with somewhat different lists of parameters. I suspect that the redundancy results from the need to achieve compatibility with more than one legacy application. Studio PiP is the worst of these effects, the only one which requires you to set the height and width of the embedded image separately. .
I have published another article with a table comparing the features of the picture-in-picture effects.
I recommend checking out all of the conventional effects to see what they do. Not all have descriptive names. The Red Giant effect 3D Stroke, for example, lets you draw a circle or ellipse to draw attention to a part of the image.
Once you have brought up an effect, the interface is different from the one in Pinnacle v. 15, and actually better.
The Effects Editor offers a well-integrated set of parameters for each effect (the list next to the top right corner of the image display, above), and these are easier to access than in version.15, where the dialog box for some effects, in particular Color Correction, requires scrolling to reach all of the adjustments. In version 16, though, numerical display and entry of parameters is in a very small typeface; and most annoyingly, the Effects Editor won't let you scroll from one clip to the next. To get to the next clip, you have to close the Effects Editor and reopen it. (There may possibly be a way to do this, but it is not obvious...) In version 15, on the other hand, you select an effect -- Pan and Zoom, Color Correction, Picture in Picture -- and then you can continue to use and adjust it in a sequence of clips in which it has been activated. This makes it easier to match clips to one another.
In version Studio 16, there is a way though to save parameters from one clip to apply to another, but it isn't very intuitive. It involves clicking on the pink line which appears at the top of a clip which uses an effect. I'll say more about it when I figure it out. It is also possible to copy and paste keyframes in the Effects Editor.
Version 15's "Grab Video Frame" applet is straightforward and opens from a menu item, but in Avid, this function is hard to find. There's no top menu leading to this function, and no entry in the Help index for "freeze" or "frame" or "grab" or "still". The "snapshot" function in the Avid version was only under the Corrections tab in the Effects Editor, even though creating a Snapshot doesn't change anything in the original clip. Don't ask me to explain this!
Pinnacle v. 16 puts Snapshot in the control bar above the timeline too, with a camera icon -- a significant usability improvement.
A still image may also be created by dragging the beginning or end of a clip past the start or finish of the original video take.
"Snapshot" is slang, and this points out a problem which is widespread in the help and manual for version 16. "Snapshot" is a nice folksy term but it is not the same as "Grab Video Frame") in Pinnacle Studio 15 -- a real issue for people who are upgrading -- and as I've already noted, this and other common synonyms -- say, "freeze frame", "still" -- are missing from the Help. Once I knew what to call this function, I found information in the Help and the manual about grabbing a snapshot from a source clip.
The snapshot from the camera icon saves automatically in Pinnacle Studio 16 and copies the exact image which appears at the playback head. If you are still using Avid Studio or if you want to make use of special effects, follow the steps listed below and indicated in the image following the list.

Unlike the "Grab Video Frame" command in Pinnacle version 15 or the timeline function in version 16, "Snapshot" in the Effects Editor extracts a still image from the video clip which you have opened -- not from the Timeline. That is useful if it is what you want, but if you want to create a still of a composed image such as a picture in picture, this is much easier to in either version of Pinnacle Studio than in Avid Studio, where you would have to recompose the image, copy it from an exported file or maybe from a "subproject" -- a feature I haven't explored yet.
The snapshot functions in the Effects Editor have their own Pan and Zoom commands, but I avoid these because they do not integrate with the ones used for video clips and in the timeline. Between keyframes or start and end locations, the Pan and Zoom function in the Snapshot dialog box in Avid Studio generates curves which reveal areas outside area of the start and end frames or keyframe locations. This can bring black borders or video from underlying tracks into your image. Worse than that, the same parameters do not give you the same results for two consecutive keyframes. I wanted to zoom in on an image and then hold it at the same size. I was unable to do this by using the same settings for the second-to-last and last keyframes. (I haven't checked yet whether the same issues occur in Pinnacle Studio v. 16).
Once I have inserted a still image into the timeline, then I can used the integrated pan and zoom command, making it possible, for example, to match a freeze-frame to the video clip from which it was taken.
The "Snapshot" example is too typical. Explanations in the help and the manual often say to click on an icon without showing it. Commands are strewn around the screen; in many cases, the next step is not obvious. Many of the help screens have no graphics to show the icons, or to indicate where to click.
Pinnacle version.15 crashes when some combinations of effects are too much for it to handle. I was able to make progress even when this happened, because of the priceless feature of resuming editing after a crash. If Avid Studio, and its successor, Pinnacle Studio v. 16, weren't so very much faster, more stable and more versatile than Pinnacle Studio v. 15, I wouldn't be taking the trouble to get past the obstacles.
![]()
![]()
In Pinnacle v. 15, Scorefitter is accessed by the menu item "create background music" in the Tools menu. In Avid, and Pinnacle v. 16, Scorefitter is accessed by clicking on a G-clef icon above the timeline. A G clef could have any of a number of meanings. Again, you need to know the right words ("Scorefitter", "Audio Creation tools") to look up the help on this topic -- "Music" doesn't get you there --, though in this case, the icon is shown in the Help.
In Pinnacle v. 15, the icons at the left side of the screen (already mentioned) select among video clips, transitions, still images, audio and pre-designed titles. In Avid, and Pinnacle v. 16, dissolves and fades are accessed by dragging on the upper right or upper left of a clip in the timeline, something that you aren't going to figure out until you look it up in the manual. The lookups shouldn't be necessary. The actual clicking and dragging is easier to use, once you have figured it out.
In Avid, and Pinnacle v. 16, there is no keyframe automatically placed at the end of a clip. This is an improvement, because it avoids the need to readjust parameters if those of the previous keyframe have been changed.
There are some odd, obsolete or off-topic items in the manual's glossary in Avid, and in Pinnacle v. 16 -- listings for Extended Parallel Port (most PCs don't have a parallel port at all any more); IRQ, which is something that PC users don't have to think about any more. "Non-interlaced...A non-interlaced image (most computer monitors) flickers much less than an interlaced image (most TVs)." Not true, the purpose of interlace is to avoid flicker at low frame rates on CRT monitors where the image goes dark between scans -- and so on. The manual needs a complete rewrite.
I record voice-over narration while editing, usually one sentence at a time, and I often have to re-record a sentence several times before I get it right. I like to have controls which speed this process. Oddly enough, Pinnacle Studio v. 15 offers a faster workflow than the newer products. Step by step:
To delete and re-record a voice-over in Pinnacle Studio 15:
The recording dialog box stays open. The playback/record head returns to the same place as when you started recording, and you are ready to re-record.
In Avid Studio, or Pinnacle v. 16:
Why do you have to return the record/playback head manually to its original position? Probably because, as with the Effects Editor, the recording function is an applet in its own dialog box rather than working directly in the timeline.
One thing about voice-over recording that is better than in Pinnacle v. 15 is the audible countdown. This makes it easier to start speaking just as recording begins. In Pinnacle v. 15, there's only a visual countdown.
In all versions, recording is delayed, resulting in silence at the start of a clip which must often be deleted in order to avoid unnaturally long gaps between clips. You must also wait a moment to stop recording after you have finished talking, or else the end of your voice-over will be clipped off.
In Pinnacle v. 15, a new voice-over will stop when bumping into a later one. In v. 16, choose "overwrite" mode (the down arrow above the right end of the timeline --in other modes a right arrow or magic wand -- darn icons!!!!)), and then a new voice-over does not move later ones aside. Recording will overwrite and delete the start of the next clip, but you can drag the start of that clip to recover it.
This is an important reason to upgrade from Avid -- whose overwrite mode doesn't work for voice-overs. If you insert a new voice-over ahead of others, they all are pushed to later times. (You can prevent the later clips from being moved in time by dragging them to a different track before your record ahead of them. Or, recording the new clip, copy it to the clipboard, click on "Undo" or type Control+Z and then paste the clip, in overwrite mode. But if you forget to do one of these workarounds, every clip later in your voice-over track will have moved. Upgrade!)
In both Pinnacle versions and in Avid, voice-overs post promptly. (In the supposedly very fast Cyberlink PowerDirector, by way of contrast, even the shortest voice-over takes 10 seconds to post on my Intel i5 machine. This behavior makes for very slow work. PowerDirector would be a topic for another article if I hadn't given up on it in exasperation.)
In Pinnacle v. 15, adding audio volume changes directly in the timeline is a bit tricky. In Avid, I had trouble locating this feature. The same can happen after you upgrade from Pinnacle v. 15 to v. 16. I opened the effects dialog box and didn't find any way to use keyframes in an audio clip. Another hunt through the help...oh, there's a tiny icon above the upper right of the timeline "turn on/off volume keyframing." Found it by hunting around, then searched on Volume in the help index and found the following under "Audio on the timeline":
"The audio levels and stereo or surround positioning of individual clips can be adjusted directly on the project timeline using audio keyframing. The same operations can also be accomplished with the Audio Mixer panel, which pops out to the right of the timeline header when you click its access button."
The location or appearance of neither the icon nor the button is shown in the Help. After a bit of a search, I found them. The audio mixer button is the one with a little bar graph, above the left end of the timeline. Audio keyframing is the button with the zigzag line, near the right end.
So, audio keyframing is accessed differently from video keyframing, and maybe that's necessary but it is unnecessarily confusing.
The mixer uses rotary controls, imitation knobs. Knobs are great to turn with fingers. Sliders are much easier to work with the mouse. But actually, the rotary knobs work like sliders if you mouse across the tops of them.
Even with volume keyframing turned on, the knob which is labeled "adjust volume at the current location in this clip" adjusts volume for the entire clip. (After 15 minutes of searching): OK, now I found the solution, in the Avid Manual, page 158. You have to click (and release) on the audio track to create a keyframe. Then you can drag to increase or decrease the volume. In Pinnacle v. 15, you only had to drag a location in the clip. Actually, clicking first is better -- it avoids creating unwanted volume handles, but still, this example shows how minor changes in the interface can lead to annoyance. These need to be robustly documented. Avid Studio, and Pinnacle Studio v. 16 have quite a number of tooltips, but there wasn't one for this.
Storage of voice-overs in Pinnacle v. 16 will be covered under "storage locations," below.
In all versions, resizing or splitting a clip makes the positions of keyframe proportional to the new length of the clip. It is very unfortunate that this behavior can't be turned off. You have precisely located your keyframes, for example, to pan and zoom a clip, and if you shorten or lengthen a clip, the changes move to different times. I split clips ahead of time, either side of the place where I will be using keyframes, so as to confine the damage. Another workaround is to leave the clip the same length and overlay it on a different track, rather than to split it.
You split clips in Pinnacle Studio v. 15 using the "Split Clip" menu command, which appears in the clip properties right-click menu and also in the Edit menu at the top of the screen. In Avid Studio and Pinnacle v. 16, you split clips using an icon of a razor blade, an antiqued convention from the days of movie film and reel-to-reel audio tape. (like using an icon of a floppy disc for "save...") This difference highlights an important distinction between ease of learning and ease of use. They are not the same.
In Pinnacle Studio v. 15, if you have two clips from the same source file lined up so the transition matches, you can recombine them back into a single clip. I didn't find any way to recombine clips in Avid Studio or Pinnacle Studio v. 15, once they have been split. Maybe there is, but I have yet to find it.
File storage, backups and crash recovery are different in Pinnacle v. 15 and in the newer products. It is important to know how to manage these when saving, archiving or deleting files, and to avoid losing a project due to a crash or other problem.
Any video application is pushing the envelope of performance on today's home computers, and even more so with high-definition video. Even the fastest home computers do not respond instantly to commands in video software. Some processing tasks cannot be managed quickly enough to allow editing to continue. You may have to wait through lunch, or overnight. Expect this. Cues explaining that the computer is busy, and how long it will take, can be useful.
Video files are huge, and HD video files are bigger. Even with the best data compression, an hour of HD video will be several gigabytes in size. By default, all Pinnacle and Avid versions store your work on the C: drive, which they must share with the operating system or other applications -- also slowing performance. I place the source files, project files and render files each on a different physical drive, so a drive doesn't have to shuttle back and forth among bits of different files. Each of the drives I use is at least one terabyte in size.
The application loads faster from a solid-state drive, and putting render files there speeds rendering somewhat -- though rendering actually works the CPU much harder than storage.
In Pinnacle v. 15, the project file serves only as a placeholder and pointer. In older versions, its size is zero bytes, and in newer ones only a few bytes. Editing instructions, as well as items generated or processed during editing, are stored in a subfolder of the folder where the project file resides. The subfolder has the same filename as the project.
Deleting projects in Pinnacle v. 15 uses a special applet inside the program, in order also to delete the subfolder. In this way, you can delete older versions of a project once it nears completion, in order to free up disk space. The placeholder file and subfolder must stay together. You must be careful not to edit or delete either or you will be unable to open your project.
The project file in Avid, and Pinnacle v. 16, is formatted as a list of program instructions, much of it readable in a text editor, but with a binary segment at the end. There is no separate folder with processed clips. The format in Pinnacle v. 16 is .movie.axp.
In Pinnacle v. 16, click on Setup > Control Panel > Storage Locations to select default locations for project files. You also can choose "Save As" and put a project file wherever you want. Choices for other types of files -- titles, menus and voice-overs -- are more limited because Pinnacle creates these files automatically -- there is no "save as" option. All of the titles, menus and voice-overs from different projects are stored in the same folders, unless you change the folder setting for each project. The locations for audio and snapshots are under the Import heading in setup, though these also are storage locations! The option on where to store voice-overs is not in Setup at all, it is in the voice-over dialog box. You can move and relink files later, but you must be careful to keep track of them.
Warning: While snapshots are named with reference to the project in which they are created, voice-over files in Pinnacle v. 16 are numbered sequentially without reference to projects. If you reinstall Windows and Pinnacle, then load your documents folder from a backup. Pinnacle wild start the numbering again from zero and overwrite earlier voice-overs! For this reason, it is very important to move the voice-overs from a project to a location where Pinnacle will not overwrite them.
Really, it would be much better to store the files in the same folder with the project. You can manage this manually, though. If you would like to keep all the files which Pinnacle v. 16 uses for a particular project in one place, you have three options:
Voice-overs are are stored openly as .WAV files, so you can at listen to them in Windows Media Player or another application to help identify them.. Because these are uncompressed audio, they are rather large. Snapshots are stored as JPG, .BMP, .TIF or Targa, and so they can be edited in another application, if you like.
When you save a file in Avid or Pinnacle v. 16, it renames the previous version as a backup file. This saved my bacon once when Avid wrote an incomplete and unreadable project file. Avid doesn't direct you to the backup if the project file won't open -- you have to go to the folder with the backup, and rename it with the appropriate .axp filename extension before Avid Studio will recognize it. Both the project file and the backup file get overwritten with each save, and so, in Avid as well as Pinnacle, it is useful to store a project under a new filename every once in a while during editing. However, Avid and Pinnacle v. 16 do not create a subfolder, and when you save a new project file Pinnacle v. 15, you do not also save the voice-overs, menus and titles created during editing. This saves disk space., but you only create a full backup if you save the folders holding these, or create a package file.
The Library imports input files either by copying them -- which is very wasteful of disk space as already mentioned, and puts them all in the same folder -- or by linking to them. The links are absolute -- they only hold if the input files remain in the same location. You can, however, re-link either within a project or in the Library itself. If you transfer your Pinnacle installation to another computer, you need to keep all of the file locations the same, or you will have to re-link them. You will also have to copy the Library database, and instructions on how to do that are online at http://www.pinnaclestudio.info/page31.html.
All versions generate render files which they use to display the edited video. These files serve only to smooth playback during editing. They may be deleted to free up disk space once editing is complete. The software reconstructs them if you return to editing later. This takes time, but you will not have lost any of your work.
![]()
![]()
These applications can only have one project open at a time. It is, however, possible to copy and paste material between projects by opening the source project, copying, then closing that project, opening the destination project, and pasting.
Both projects need to be in the same file format, and the source files must be where the destination project can find them.
In this way, you can copy and paste multiple clips at once, along with the the formatting instructions from the source project.
One you have exported a video, you can use it, or part of it, as a clip in another project, but you can't change the edits in it.
Avid Studio and Pinnacle Studio v. 16 let you include a previous project in the timeline as a "subproject" --another way to copy material which has already been edited.
These occurred in Avid Studio. and may also occur in Pinnacle Studio v. 16, but I haven't checked them all. I'll indicate which ones I have.
(Checked) The splash screen sits in front of anything else while the program is loading, taking up to 20 seconds on my fast desktop computer -- a serious case of bad manners.
(Checked!) Opening files from earlier versions is not intuitive. Most software just lets you click on the file in Windows Explorer. In Pinnacle Studio 16, you must use FILE, import previous project.
(Checked!) The section on "Video Tools" in the Help is emblematic of my issues with the Help. This section reads like a specification written for programmers assigned the task of creating a graphic user interface, when the interface does not yet exist. Each function of the Video Editor preview is described in detail in words, but there is no image to illustrate most of them.
(Fixed!) All of the controls for the Preview window are described as being below it, but the time code display is actually above it.
There's nothing in Help about how to exit loop mode (which plays a clip repeatedly). You must click on the Exit Trim Mode icon above the timeline -- or click on the loop icon a second time: it is a toggle.
The timeline Marker function in Avid Studio and Pinnacle Studio v. 16 places markers in the timeline rather than inside clips, making it useless to adjust timing of one clip relative to another. However, if you place a market in a clip in the Effects Editor, that marker will stay in the same place in the clip, and even if you adjust the start or end time, and also will be visible in the timeline. This is covered somewhere in Naylor's book, but it it not intuitive and not covered in the Help -- or in Naylor's index.
The "import from" panel pushes everything else in the import dialog box to the right, occupying an entire column on the screen even though it only sits at the top of the column. The parameters dialog box occupies the entire right column. They could both be at one side or at the top and then the entire remainder of the screen could be filled with content. There can be hundreds of photos or clips in a folder, and it doesn't make any sense to waste screen space.
(Checked this!) It is very easy to see in Pinnacle v .15 which clips are selected in the timeline: they turn a very different color. In Avid, and Pinnacle v. 16, they stay nearly the same yellow color and get a thin, almost invisible orange outline. It is easy to make mistakes when cutting or deleting clips, and have to hit the Undo button and try again.
(Checked this!)In the Effects Editor, there is a File menu header but there is nothing in the menu except "create new shortcut" and it is grayed out.
(Checked!) There is a "back" button in the Help, but no "Forward button! There is a "Forward" menu item under 'Options".
Once you have used the "back one frame at a time" arrow under the Preview window in Avid, the "Forward one Frame at a time" arrow also works backwards; you can get past this problem by clicking on the "play" arrow.
(Checked.)When the playback head is snapped to a keyframe diamond, it doesn't always line up exactly with the diamond. The values of effects are those at the playback head location, not the diamond location. Clicking on "delete" deletes the diamond. Changing a value creates a new keyframe.
(New!) The active keyframe in the Effects Editor does not "glow" in Pinnacle Studio v. 16 as it does in Avid Studio. You have to look at the keyframe icon to see whether the cursor is aligned directly over the keyframe.
(New!) I can't get the speed function in Pinnacle Studio 16 to work. It works in the earlier products. (I think this is a usability issue. I did get it to work later but the controls are different.
"Browse for folder" doesn't either ask for a response, or close automatically, when the program is closed.
If the frame for a title extends off the screen, a multi-line title may show entirely on the screen when editing, but extend off the screen instead when exporting the project.
(Fixed!) As described earlier, overwrite mode does not work for voice-overs.
(Checked) It isn't possible to remove the display from the second monitor when the program is in Export mode -- when that display is in any case frozen and useless. You must complete or abort the export and return to movie mode to clear the second monitor.
(New!) Sometimes the record-playback head gets stuck so that if you move it to a new time and then try to start play, it instead only just jumps back to its earlier location. You may have to save, close and reopen the project to restore function.
In both Pinnacle 15 and Pinnacle 16, sometimes there is a gaps in the audio when audio is detached from video and butting one part of an audio clip up against another. Workaround: place one of the audio clips in a different track.
If you display a video source clip on the second monitor, and you have also put the timeline display on that monitor, your icon in the upper right of the small display only switches between these two displays on the second monitor. To clear the second monitor, you must switch to a resource which displays in its own window, such as an audio clip, or click on "source" above the preview window.
Sometimes exporting of a file will stop at 99%. The exported file will have a long number as its name. Sometimes it will play and sometimes not. You may have to change the file extension to the one you intended. I find that this happens when a Scorefitter track extends past the last video in a project. Placing a blank title at the end, extending past the end of the audio, has solved thsi problem for me.
![]()
![]()
Last Updated: by John Allen