Wheelbuilding
|
Translations of this article (earlier version):
French Russian This article (earlier version) in pdb format for your Palm OS PDA |

|

substantially expanded by John "Bespoke" Allen
|
Translations of this article (earlier version):
French Russian This article (earlier version) in pdb format for your Palm OS PDA |
|
![]()
The wide availability of inexpensive, well-built replacement wheels has reduced the need for wheelbuilding in retail bike shops. Nevertheless, there are still times when custom-built (or rebuilt) wheels are needed, especially in the case of higher-end bikes that have expensive hubs that are too good to throw away.
Also, the combination of hub and rim that you want may not be available off the shelf: commonly, for example, if you would like to use an internal-gear hub.
Learning to build wheels is an important milestone in the education of an apprentice mechanic. A "mechanic" who has not mastered this basic skill cannot be considered to be a fully-qualified professional, and will always feel inferior to those who can list wheelbuilding among their skills.
Although this article was originally directed to shop mechanics, a knowledge of wheelbuilding can be invaluable to any cyclist who wishes to do his or her own maintenance and repair.
Building wheels from scratch is the best way to learn the craft of wheel truing, to get the feel for how a wheel responds to spoke adjustments. It is much easier to learn this with new, undamaged parts than to start right in trying to repair damaged wheels.
While an experienced wheelbuilder can build a wheel in well under an hour, a beginner should expect to spend several hours on the task. It is best not to try to do this all at one sitting, because you are likely to get frustrated at the slowness of the truing and tensioning process. Better to put the job aside, even overnight, than to get careless and ruin a good wheel-in-progress.
This article focuses on building a rear wheel, because that is the more complicated one. For front wheels, disregard that which does not apply. This will be a 36 spoke, cross 3 wheel.
If you're doing a 32 spoke wheel, just substitute "32" wherever I write "36", "16" where I write "18" and "8" where I write "9."
Use a similar substitution for other spoke numbers.
![]()
![]()
You will need a spoke wrench (I use a DT spoke wrench, but most people aren't ready for a $50 spoke wrench. My favorite inexpensive spoke wrench is a plastic one with a metal bit, called a "Spokey"). You will also need a small flat-bladed screwdriver; and optionally, a truing stand and a dish stick.
The truing stand and dish stick are by far the most expensive of these tools. Improvised tools or the bicycle itself can substitute. If you are on a tight budget, read the section of this article on truing, so you know the technical terms, and then check out the section near the end of this article on improvised tools.
| Spoke wrench | Truing stand | Dish Stick |
|---|---|---|
 |
 |
 |
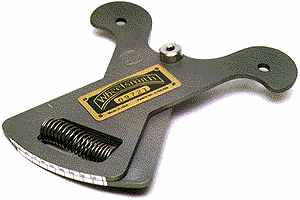 Besides the essential tools, a spoke tensiometer (picture, right) and an electric screwdriver with an appropriate bit are helpful. My preferred bit is a worn-out Phillips bit, on which I have ground off two of the four fins. This leaves a pointed flat blade. The point pokes into the hole in the middle of the spoke nipple, and helps keep the driver from sliding off.
Better hubs have thick flanges and spoke holes flared like the bell of a trumpet, to support the elbows of the spokes, though this is not essential -- aluminum is softer than steel, and the spokes will bed themselves into it. But if the flanges are not thick enough to pull the elbows against them, then you may need to use washers under the spoke heads.
If you are buying new hubs, the best value for the money, in most cases, is Shimano. If you want the very best, cost no object, in many applications, this is Phil Wood.
The leading brands of spokes available in the U.S. market are DT and Wheelsmith.
Titanium is also used for spokes, but, in my opinion it is a waste of money. Titanium spokes should only be used with brass nipples, and the combination is not significantly lighter than stainless spokes with aluminum nipples. Carbon fiber, aluminum alloy and polycarbonate plastic (Kevlar®) spokes also have been available, but they all have to be thicker than steel spokes, and the added air resistance slows you down more than the weight saving speeds you up -- unless you ride only uphill. Carbon fiber spokes turned out to be brittle and dangerous. If you bend one, it breaks like uncooked spaghetti! .
Up until the early 1980s, virtually all adult bikes had 72 spokes.
32 front/40 rear was the standard for British bikes, 36 front and rear for other countries. The exception was super-fancy special-purpose racing wheels, which might have 32 spokes front and rear.
The Great Spoke Scam: In the early '80s a clever marketeer hit upon the idea of using only 32 spokes in wheels for production bikes. Because of the association of 32-spoke wheels with exotic, high-performance bikes, the manufacturers were able to cut corners and save money while presenting it as an "upgrade!" The resulting wheels were noticeably weaker than comparable 36-spoke wheels, but held up well enough for most customers.
Since then, this practice has been carried to an extreme, with 28-, 24-, even 16-spoke wheels being offered, and presented as it they were somehow an "upgrade."
Actually, such wheels normally are not an upgrade in practice. When the spokes are farther apart on the rim, it is necessary to use a heavier rim to compensate, so there isn't usually even a weight benefit from these newer wheels!
This type of wheel requires unusually high spoke tension, since the load is carried by fewer spokes. If a spoke does break, the wheel generally becomes instantly unridable. More, thinner spokes make a stronger wheel than fewer, thicker ones. Some wheels being sold these days defy engineering principles: The hub may break too; see John Allen's article.
If you want highest performance, it is generally best to have more spokes in the rear wheel than the front. For instance, 28/36 is better than 32/32. People very rarely have trouble with front wheels:
Spoke length is measured from the inside of the elbow to the very end of the threads, most usually in millimeters.
When you buy spokes to match the rim, hub and pattern you will use, your dealer should be able to determine the correct length(s) for you. Most dealers these days use a computer program called "Spokemaster" which comes bundled with a wholesale database called "Bike-alog on disc". If you need to do your own calculations, there are several spoke-length utilities available on the Web, including:
This site includes a page on how to measure the hub and rim to get the numbers you need to enter into a spoke-length calculator.
Sutherland's Handbook for Bicycle Mechanics, 6th Edition, has charts and tables by which you can calculate spoke lengths. Alternatively, you can measure an existing wheel of the same lacing pattern and get reasonably close.
Most spoke calculators give results to the tenth of a mm, but spokes are usually sold in 1 mm size increments (some brands only in 2 mm increments.) Generally, I round upward to the nearest available larger size. The length is not super-critical, but it is worse to have spokes a bit too long than a bit too short. If spokes are too long, they prevent you from using the screwdriver. Unless a rim has recessed spoke holes, you will have to file off protruding spoke ends to avoid their puncturing the inner tube. The right-side spokes of a dished rear wheel are ideally 1 or 2 mm shorter than the left-side spokes
It is important to get spoke length right. If the spokes are too short, threads will show at the nipples, which are prone to breakage. If spokes are 2 or 3 mm too long, and the rim doesn't have recessed spoke holes, you'll have to grind down the spoke ends. If spokes are longer than that, they will bottom out on the threads and can't be tightened. You may not dicover measurement error until you tesnion the spokes -- so check measurement carefully.
![]()
![]()
The diameter of spokes is sometimes expressed in terms of wire gauges. There are several different national systems of gauge sizes, and this has been a great cause of confusion. A particular problem is that French gauge numbers get smaller for thinner wires, while the U.S./British gauge numbers get larger for thinner wires. The crossover point is right in the popular range of sizes used for bicycle spokes:
Newer I.S.O. practice is to ignore gauge numbers, and refer to spokes by their diameter in millimeters:
Spokes come in straight-gauge or swaged (butted) styles. Straight-gauge spokes have the same thickness all along their length from the threads to the heads.
Swaged spokes come in 5 varieties:
Double-butted spokes do more than save weight. The thick ends make them as strong in the highly-stressed areas as straight-gauge spokes of the same thickness, but the thinner middle sections make the spokes effectively more elastic, allowing them to stretch (temporarily) more than thicker spokes.
As a result, when the wheel is subjected to sharp localized stresses, the most heavily-stressed spokes can elongate enough to shift some of the stress to adjoining spokes. This is particularly desirable when the limiting factor is how much stress the rim can withstand without cracking around the spoke holes.
Triple-butted spokes, such as the DT Alpine III, are the best choice when durability and reliability are the primary aim, as with tandems and bicycles for loaded touring. They share the advantages of single-butted and double-butted spokes. The DT Alpine III, for instance, is 2.34 mm (13 gauge) at the head, 1.8 mm (15 gauge) in the middle, and 2.0 mm (14 gauge) at the threaded end.Single- and triple-butted spokes solve one of the great problems of wheel design: Since spokes use rolled, not cut threads, the outside diameter of the threads is larger than the base diameter of the spoke wire. Since the holes in the hub flanges must be large enough for the threads to fit through, the holes, in turn, are larger than the wire requires. This is undesirable, because a tight match between the spoke diameter at the elbow and the diameter of the flange hole is crucial to resisting fatigue-related breakage.
Since single- and triple-butted spokes are thicker at the head end than at the thread end, they may be used with hubs that have holes just large enough to pass the thick wire at the head end.
There was a fad in the early '90s for Hoshi "blades" which had a double bend instead of a conventional head. The double bend allowed the spokes to be inserted "head first" into the hub flange, so that they could be used with normal hubs. Unfortunately, they turned out to be prone to breakage, and I can't recommend them.
I recommend thicker spokes for the right side of a dished rear wheel (a wheel used with a multi-sprocket cluster) than the left side, because the left-side spokes are under lower tension. The thinner spokes on the left side will be working more nearly at the tension for which they are designed, and so they will be stretched more and less likely to go slack. For more details, see my article on spoke tension.
The preferable ratio of spoke cross-sectional area depends entirely on the ratio of lateral distances between the centerline of spoke holes in the rim and the hub flanges. With derailer-equipped bicycles, this is often as high as 2 to 1. In that case, the thickness of the spoke shafts, with round spokes, is ideally 1.4 to 1, because the cross-sectional area changes at the square of thickness. Measuring gets more complicated with oval or bladed spokes, but usually there is a section you can measure at the end., or you could weigh the spokes: weight is roughly proportional to cross-sectional area.
With a different type wheel, such as one with a disc brake, the tension ratio may be different. The spoke gauges should reflect the flange location (and offset of spoke holes in the rim if there is an offset).
Also to be considered is how high a tension the rim can withstand. There is an ideal tension for a spoke, based on the strength of the steel and the spoke gauge. Spokes (on the more highly-tensioned side, or both sides if lateral spacing is equal) should be at that tension to produce the most reliable wheel. But also, the rim must withstand that tension. If spokes are too light for a rim, the wheel could be stronger with thicker spokes. If spokes are too heavy and at their ideal tension, the rim is likely to fail. Complicating this problem is that spokes with 2mm shafts and larger ends are generally a special-order item. But most rims can't benefit from butted spokes with ends larger than 2mm anyway.
All modern ISO-standard spokes are threaded 56 threads per inch (TPI). A spoke nipple made for a thicker spoke may thread onto a thinner one, but then the threading will be weak. A correct spoke nipple will be nearly snug on the spoke: it will not rock. Check nipple fit before inserting spokes into the rim: you may not notice looseness when inserting a nipple through the rim.
[Now, returning control to Sheldon...]
My Bicycle Glossary has a Table of Spoke Weights, for those who care about such things.
For light-weight, high-performance wheels, aluminum nipples are available. Aluminum nipples do save a small amount of weight, and they can be quite reliable if used properly. They should be used only with rims that have eyelets of some material other than aluminum, because aluminum/aluminum contact between rim and nipple can result in chemical welding, immobilizing the nipples.
Most modern rims are made of extruded aluminum, that is, the semi-molten aluminum is squeezed out of specially-shaped openings which determine the cross section of the rim. The extrusions are formed into hoops, then joined either by welding or by the insertion of a filler piece into the hollows of each end of the rim.
[Following paragraphs added by John Allen]
A single-wall rim has a simple U shape with a a single layer of metal across the bottom where the spokes attach. A double-wall (or box-section) rim has two layers, with a cavity in between. The spokes then attach at the lower layer, closer to the hub, and the upper layer has holes large enough to allow insertion of the nipple heads or a screwdriver. Many good quality rims have "eyelets" or "ferrules" to reinforce the spoke holes. The best double-wall rims have sockets which spread the load to both layers, allowing these rims to be lighter and/or stronger.
With a single-wall rim, a spoke can puncture the inner tube if the rim tape does not protect it. The puncture may occur because the spoke is too long and protrudes from the spoke nipple, or the rim tape is inadequate, or from turning the spoke nipple to adjust spoke tension while the tire is inflated. With a double-wall or eyeleted rim, the rim tape must bridge the holes in the rim, and a puncture can occur if the rim tape is weak. You win some, you lose some.
| Rim cross-sections | ||||
|---|---|---|---|---|
| Rim without eyelets | Rim with eyelets | Rim with recessed spoke holes and no eyelets | Rim with recessed spoke holes and eyelets | Socketed rim with eyelets |
 |
 |
 |
 |
 |
Weight considerations? A socketed double-wall rim can be light because two layers resist spoke tension but note that strength goes up as the cube of thickness, so the same amount of metal in the base of a single-wall rim will have eight times the strength in a socketed double-wall rim, assuming that the holes are the same size, but they aren't. Eyelets or sockets distribute the force on the rim and increase strength somewhat.
There has been a trend toward deeper-section rims in recent years, in the interest of ærodynamics. Moderately deep-section rims are spoked like any others. Extremely deep-section rims can work with somewhat fewer spokes than conventional rims. As few as 20 in a front wheel may be practical -- also an ærodynamic advantage.
Extremely deep-section rims are excessively stiff, and must be very true as supplied, without coaxing from the fewer spokes. If the tire bottoms out on a rock or other obstacle, such a rim does not provide a "crush zone" to the same extent as a conventional rim. There is more likelihood of damage to the bicycle's fork and frame. The rim will probably crumple and be unrepairable. These rims are heavier, too, all other things being equal.
Some rims nowadays are made partly or entirely of carbon fiber. A carbon fiber rim must have reinforcement around the spoke holes to withstand spoke tension. Many carbon fiber rims have aluminum braking surfaces. These may be used with ordinary rim brakes. Carbon fiber rims without aluminum braking surfaces must be used with hub brakes or with special brake shoes, but in that case are prone to rapid wear. Carbon fiber rims also are expensive. They are very true as supplied but non-repairable if damaged.
The strength of the traditional wheel design is in the spokes, not the rim. Where high ærodynamic efficiency is important, a good technical solution is a spoked wheels with rims of the required strength and stiffness, a lightweight wind fairing for the rear wheel, and ærodynamic spokes for the front. Triathletes and HPV racers have used wheels with fairings for many years. The hidebound rules of the U.C.I, on the other hand, prohibit any part of a racer's equipment from serving only an ærodynamic purpose. The result has been "Frankenstein" equipment such as deep-section rims and "æro" helmets whose long, protruding tail adds weight and can twist the rider's neck if he/she lands the wrong way. Pro racers put up with all this because any tiny speed advantage could win a race, and because the team pays for their equipment.
Even less practical than wheels with very deep sections are wheels with unevenly-spaced spokes, or with spokes which attach to the rim and hub in unconventional ways and locations. Rims for tubeless tires may not have spoke holes which extend all the way through. Some of these wheels provide a real advantage to racers; others only a placebo effect. These wheels tend to be very expensive, and a real headache to repair or rebuild, because of the special parts and tools needed.
Do you need to relace the wheel with new spokes? An impact with a pothole edge, rock, etc. can damage a rim. Rim brakes slowly wear down the sidewalls of aluminum rims, especially in wet-sandy conditions. Eventually, the air pressure in the tire can bulge a weakaned sidewall out, causing a blowout. You'll want to replace the rim before this happens! You can usually just transfer the old spokes to a new rim -- see Jobst Brandt's article.

Flange thicknesses vary, but the spoke's elbow should be snug against the flange. If it is not, the spoke's tension will try to bend the spoke at the elbow -- a frequent cause of spoke breakage.
You solve this problem by sliding a small washer onto each spoke before inserting it into the hub. Most spokes other than bladed spokes will accept a 2 mm (metric bolt size) or #2 (US bolt size) washer. Brass washers are best. These are not commonly available through bicycle parts suppliers, but they can be purchased over the Internet, for example here, or at a hobby shop. Some hub/spoke combinations need two washers per spoke. Other combinations need washers only on the spokes that run from the inside of the flanges, or need two washers on inside spokes and one on outside spokes.
Spoke nipple heads or access holes in the bottom of the rim must be covered with a rim tape, so they can't puncture the inner tube. Rim tape must be thick and strong enough to smooth out any sharp edges, and to withstand pressure from the inner tube if the rim has recessed or socketed spoke holes. Some rim tapes are simple hoops of rubber, similar to the rubber of the inner tube, with a hole for the valve. These rim tapes are adequate for use in wider rims without recessed spoke holes, but must be stretched over the rim when installed. Narrow rubber rim tapes often break at the valve hole. Better rim tape is an adhesive-backed strip, sold in a roll like handlebar tape, and has a hole near one end which fits over the valve hole of the rim. Placing a valve temporarily in the hole will prevent the tape from slipping during installation. The tape is laid down all the way around in the bottom of the rim, and the other end is trimmed just short of the valve hole. Duct tape or glass-fiber reinforced strapping tape can be torn lengthwise to the needed width and works too. Use three or four layers. If adhesive-backed tape can't be wide enough to get past the valve, it can just stop at either side.
The rim tape must be just wide enough to fit the bottom of the rim. Too narrow, and it doesn't cover what it needs to. Too wide, and it rides up on a bead seat of the rim as shown in the photo below, preventing the tire from seating correctly. The tire will sit too far out where it rides on the rim tape, and too far in at another place. It will give a bumpy ride, and there is a risk of a blowout.
Rim tape is not added until the wheel truing is complete.Rim tape too wide
![]()
![]()

Spoke threads and spoke holes in the rim should generally be lubricated with light grease or oil to allow the nipples to turn freely enough to get the spokes really tight. This is less important than it used to be due to the higher quality of modern spokes, nipples and rims, but it is still a good practice. In the case of derailer rear wheels, only the right-side spokes and spoke holes need to be lubricated.
Spoke threads are easily lubricated by holding the spokes together in a bunch, tapping it on the workbench to get them even with each other, and dipping them into a gob of grease which you have spread out on a paper plate or other surface. Spoke holes in rims may be lubricated using a spoke to carry the grease.
The left-side spokes will be loose enough that it will not be hard to turn the nipples even dry, and if you grease them they may loosen up of their own accord on the road. In fact, it is often a good idea to use a thread adhesive such as Wheelsmith Spoke Prep on the left-side spokes to make sure they stay put. This is only necessary on a rim with recessed spoke holes. On other rims, the rim tape and pressure from the inner tube will prevent the nipples from turning, at least with a high-pressure tire.
If you are transferring spokes to a new rim, you lubricate the threads without removing the spokes from the hub. Follow the instructions in Jobst Brandt's article and skip the steps about lacing here. If you are cutting the spokes to take apart a wheel, be sure to remove a thread-on sprocket, freewheel or brake drum first. You often can't get new spokes past thread-on parts. This is good advice even if you are only transferring spokes, because you might find that you have to replace one or more of them. In case any spokes or nipples are damaged, it can be helpful to have a few spares on hand, and Vise-Grip pliers to loosen rounded nipples.
Lacing is most easily done sitting down, holding the rim on edge in your lap. People who build wheels all day long start by putting all of the spokes into the hub, then connecting them to the rim one after another. This approach is slightly faster on a production basis, but the occasional builder runs a higher risk of lacing errors this way.
Non-production wheelbuilders usually put the spokes in one "group" at a time. A conventional wheel has 4 "groups" of spokes: Half of the spokes go to the right flange, and half go to the left. On each flange, half are "trailing" spokes and half are "leading" spokes.
The instructions below assume a 36 spoke cross 3 wheel but are easily adapted to different patterns by substituting appropriate numbers.
For example, if you're building a 32 spoke wheel, just:
With all cross patterns, only the outermost crossing is "interlaced" so the spokes go behind one another.
[Comment by John but I learned this from Sheldon] The greater the cross number, the less the spoke length depends on the hub spoke circle diameter -- and so, there is a useful trick with 36 spokes X4. With this pattern and lwheels 24" (600 mm) and up, the same length of spokes can be used with a wide range of hub spoke hole circle diameters. Spokes may be selected while knowing only the effective rim diameter. (Why does this work? Spoke holes in hub and rim are 10 degrees apart. The two closest spokes on one side of the rim are 180 degrees apart at the hub, and the diameter of the hub spoking circle approximates the distance between the two spokes where they reach the rim.)
However, with the smallest hub flanges, there may be an issue with the shaft of one spoke covering the head of the next one, making it hard to replace a broken spoke. And with small rims and large hubs, the spoke angle at the rim will be excessive. A small wheel with a large hub such as a Shimano Nexus 8-speed would be better laced X2.
I'm going to use use colored text here, corresponding to the color of the spokes in the illustrations.
The first spoke to be installed is the "key spoke" .
This spoke must be in the right place or the valve hole will be in the wrong place, and the drilling of the rim may not match the angles of the spokes. The key spoke will be a trailing spoke, right (drive) side. It is easiest to start with the trailing spokes, because they are the ones that run along the inside flanges of the hub. If you start with the leading spokes, it will be more awkward to install the trailing spokes because the leading spokes will be in the way.
Since the key spoke is a trailing spoke, it should run along the inside of the flange. The head of the spoke will be on the outside of the flange. (see the section "Which side of the flange?")
If you are re-spoking a hub, see that the key spoke inserts in the same direction as the previous spoke which inserted into the same hole. The spoke will seat into the flange more easily when tensioned.
It is customary to orient the rim so that its label is readable from the bicycle's right side. And if the hub has a label running along the barrel, it should reads right-side-up through the valve hole when standing over or behind the bike (well, assuming that the bike is riding on bare rims...). So, the key spoke inserts on the side of the hub clockwise of the label. For a three-cross wheel, the head of the key spoke is a: a bit past two-o'clock position when the label is at the top. Once you have installed the key spoke, you can twist the hub clockwise and check that the label on the hub barrel faces the valve hole. If it does not, remove the spoke and reinsert it into another hole, as needed.
These things will not affect the performance of the wheel, but good wheelbuilders pay attention to these things as a matter of pride and esthetics.
Rims are drilled either "right handed" or "left handed". This has to do with the relationship between the valve hole and the spoke holes. The spoke holes do not run down the middle of the rim, but are offset alternately from side to side. The holes on the left side of the rim are for spokes that run to the left flange of the hub. With some rims, the spoke hole just forward of the valve hole is offset to the left, with others it is offset to the right (as illustrated). Which type is "right handed" and which "left handed"? I have never met anyone who was willing to even make a guess!
The key spoke will be next to the valve hole in the rim, or one hole away.
As viewed from the right (sprocket) side of the hub, the key spoke will run counterclockwise to either the hole just to the right of the valve hole (as illustrated) or the second hole to the right, depending on how the rim is drilled. The aim is to make the four spokes closest to the valve hole all angle away from the valve, giving easier access to the valve for inflation.
Screw a nipple a couple of turns onto the key spoke to hold it in place. Next, put another spoke through the hub two holes away from the key spoke, so that there is one empty hole between them on the hub flange. This spoke goes through the rim 4 holes away from the key spoke, with 3 empty holes in between, not counting the valve hole.
Continue around the wheel until all 9 of the first group of spokes are in place. Double check that the spacing is even both on the hub (every other hole should be empty) and the rim (you should have a spoke, 3 empty holes, a spoke, etc. all the way around. Make sure that the spokes are going through the holes on the same side of the rim as the flange of the hub. It should look like this:
Now examine the hub. The holes on the left flange do not line up with the holes on the right flange, but halfway between them. If you have trouble seeing this, slide a spoke in from the left flange parallel to the axle, and you will see how it winds up bumping against the right flange between two spoke holes.
If the key spoke is next to the valve hole, insert a spoke into the left flange so that it lines up one hole clockwise (when viewed from the right/drive side) of where the key spoke exits the hub flange. Run this spoke to the hole in the rim that is just clockwise of the key spoke., as shown in the illustration.
In the illustration, the key spoke is right next to the valve hole.
Some rims are drilled with the opposite "handedness", where the key spoke is the second spoke from the valve hole.
If this is the case, insert a spoke into the left flange of the hub from outside to inside (left side to right side), one hole counterclockwise (when viewed from the right/drive side) from the key spoke. When you insert this spoke into the rim, install it to the hole between the key spoke and the valve hole.
When viewed from the right side, the spoke you have just installed will, then, be one position counterclockwise from the key spoke, instead of one position clockwise, as shown in the illustration. Either way, the spokes will be in the first and second positions to the right of the valve hole.
If your left-side spoke is counterclockwise of the key spoke at the hub, it will also be counterclockwiset of it at the rim. Like the first group of spokes, it will be a trailing spoke, it will run along the inside of the flange, and the head will face out from the outside of the flange. Install the other 8 spokes in this group following the same pattern.
At the end of this stage, the wheel will have all 18 of the trailing spokes in place. In the rim, there will be two spokes, two empty holes, two spokes, two empty holes...etc. as shown below:
Now, with the right/drive side toward you, insert a spoke into any hole, but this time from the inside of the flange. Twist the hub clockwise as far as it will conveniently go. Since we are building a cross 3 wheel, this new spoke will cross 3 trailing spokes that go to the same flange of the hub.
The first two crosses, this spoke will pass outside of the trailing spokes, but for the outermost cross it should be "laced" so that it goes on the inside of the last trailing spoke. You will have to bend this leading spoke to get it around the last trailing spoke on the correct side.
After this leading spoke has crossed 3 trailing spokes, there will be two possible rim holes to connect it to. Use the rim hole that is on the same side as the flange you are working from. It should not be right next to one of the trailing spokes that runs from the same flange of the hub.
Install the other 17 leading spokes following the same pattern. If you can't get some of the spokes to reach their nipples, make sure that the nipples on the trailing spokes are seated into their holes. When you are done, double check around the rim to make sure that every other spoke goes to the opposite flange of the hub.
Different cross numbers: The instructions above are based on a normal cross 3 pattern. If you are using a different cross pattern, substitute the appropriate numbers in the instructions above. With any cross number, only the outermost crossing is "laced" so the spokes go behind one another.
Once the wheel is laced, adjust all of the nipples so that each is screwed equally far onto its spoke. You should be able to do this with a screwdriver, preferably electric. A good starting point is to set them all so that the threads just disappear into the nipples. If the spokes are a bit on the short side, you may have to leave a few threads showing. The important thing at this stage is to get all 36 spokes as close as possible to the same setting, all pretty loose. Some may be a bit tighter or looser, but they should all be adjusted the same to provide a baseline. If you find some are much tighter than others, double check the spoking pattern. With some rims, the rim seam is thicker than other parts of the rim, so you may need to loosen up the two spokes closest to the seam (usually opposite from the valve hole) a couple of turns.
At this stage, the spokes will not be running straight, but will be noticeably curved where they leave the hub. The leading spokes, in particular,  will be swooping outward as they leave the hub, then gradually curving back toward the rim. Before you start applying tension to the spokes, you should bend them by hand so that they fit snugly against the sides of the hub flanges. This can be done easily by pressing on each spoke in turn with your thumb about an inch out from the hub. If you don't do this, the spokes will still be slightly curved when the wheel is finished. These curves will gradually straighten themselves out over the first few hundred miles on the road, and the wheel will lose tension and go out of true.
[I like to tension the spokes partway instead, then give each leading spoke a light tap with a hammer to straighten it, as in the photo at the right -- only a light tap so you do not bend the flange. Use a claw hammer, which has a nearly flat face. Hold the hammer so its face is parallel to the spoke. The advantage of this method is that the hammer face will not bend the spoke outside the flange. The spoke should bend over the edge of the flange, then run straight as shown.-- John Allen]
![]()
![]()
Now you are ready to put the wheel into the truing stand. If you are lucky, it will already be fairly true, but don't be surprised if it is way off. If the spokes are still very loose, so that you can wiggle the rim back and forth easily, tighten each spoke one full turn. Start at the valve hole and work your way around until you get back to it, so that you won't lose count. Make sure you are turning the nipples the right way.
When you work with a screwdriver, it is easy to figure out which way tightens the screws, clockwise. It gets confusing when you start using the spoke wrench, because now you are working from the back side of the clock!
Continue bringing up the tension one full turn at a time until the wheel begins to firm up.
Once there begins to be a little bit of tension on the wheel, you should start bringing it into shape. There are 4 different things that you need to bring under control to complete the job: lateral truing, vertical truing, dishing, and tensioning. As you proceed, keep checking all 4 of these factors, and keep working on whichever is worse at the moment.
You can see the irregularities in the rim as you start to true the wheel, but as it comes more nearly into shape, you can listen to the scraping of the truing stand's feelers against the rim for a more sensitive adjustment. High-end truing stands have dial indicators, though these are not really necessary.
Try to make your truing adjustments independent of each other. For lateral truing, spin the wheel in the stand and find the place on the rim that is farthest away from where most of the rim is. If the rim is off to the left, tighten spokes that go to the right flange and loosen those that go to the left flange. If you do the same amount of tightening and loosening, you can move the rim to the side without affecting the roundness of the wheel. For example, if the rim is off to the left, and the center of the bend is between two spokes, tighten the spoke that goes to the right flange 1/4 turn, and loosen the spoke that goes left 1/4 turn; If the center of the left bend is next to a spoke that goes to the right flange, tighten that spoke 1/4 turn, and loosen each of the two left spokes next to it 1/8 turn; If the center of the left bend is next to a spoke that goes to the left flange, loosen that spoke 1/4 turn, and tighten each of the two right spokes next to it 1/8 turn. After adjusting the worst bend to the left, find the worst bend to the right, and adjust it. Keep alternating sides. Don't try to make each bent area perfect, just make it better, then go on to the next. The wheel will gradually get truer and truer as you go.
For vertical truing, find the highest high spot on the rim. If the center of this high spot is between two spokes, tighten each of them 1/2 turn. If the high spot is centered over one spoke, tighten that spoke one full turn, and each of the two spokes next to it that go to the other flange, 1/2 turn. It takes a larger adjustment to affect the vertical truing than the horizontal truing. Vertical truing should usually be done by tightening spokes, gradually building up the tension in the wheel as you go along.
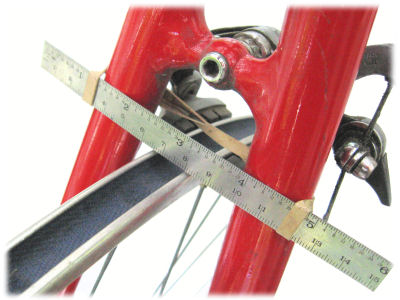
As soon as the lateral truing gets reasonably good (within a couple of millimeters) start checking the dishing. Put the adjustable feeler of the dish stick over the axle on one side of the wheel and adjust it so that both ends of the dish stick touch the rim while the middle feeler rests against the outer locknut on the axle. Then move the stick to the other side of the wheel without re-adjusting the feeler. If the dish stick rocks back and forth while in contact with the outer locknut, the spokes on that side of the wheel have to be tightened to pull the rim over. If the ends of the dish stick sit on the rim but the feeler won't reach the locknut, the spokes on the other side of the wheel need to be tightened. If the dishing is off by more than 2 or 3 millimeters, you should start at the valve hole and work your way around the rim tightening up all 18 spokes on the appropriate side the same amount, perhaps 1/2 turn.
When the dish is starting to get within 1 or 2 millimeters of being correct, go back to working on the lateral truing, except now you will not be alternating sides. If the rim needs to move to the right to improve the dish, find the worst bend to the left, adjust it, then find the new worst bend to the left, and so on.
All the time you are doing this, you need to keep checking the vertical truing, and whenever the vertical error is greater than the lateral error, work on the vertical.
A rim may be a bit irregular at the seam -- usually directly opposite the valve hole -- see Machined Rim Sidewalls. If the rim is welded, grinding away excess metal may have left a slight hollow. If the rim is pinned, the ends may not line up perfectly. You may need to relax your truing standards slightly at the seam, average the vertical truing for the two sides, or guide by eye on the underside of the rim.
You also need to keep monitoring the tension on the freewheel-side spokes. There are three ways to check tension. One is by how hard it is to turn the spoke wrench. If it starts to get hard enough that you have to start worrying about rounding off the nipple with the spoke wrench, you are approaching the maximum. Fifteen years ago, this would be the limiting factor, and you would just try to get the wheel as tight as you could without stripping nipples. Modern, high quality spokes and nipples have more precisely-machined threads, however, and now there is actually a possibility of getting them too tight, causing rim failure.
The second way of judging spoke tension is by plucking the spokes where they cross and judging the musical pitch they make. If your shop doesn't have a musical instrument or pitch reference, and you don't have perfect pitch, you can compare it with a known good wheel that uses the same length of spokes. This will get you into the ballpark. Before I started using a spoke tensiometer, I used to keep a cassette in my toolbox on which I had recorded my piano playing an F#, a good average reference tone for stainless spokes of usual length. (For more details on this method, see John Allen's article: Check Spoke Tension by Ear.)
The third, and best way is with a spoke tensiometer. Every well-equipped shop should have one. Average freewheel-side tension should be up to shop standards for the type of spokes and rim being used. More important is that it be even. Don't worry about the left-side tension on rear wheels. If the freewheel side is correctly tensioned, and the wheel is correctly dished, the left side will be quite a bit looser. You should still check the left side for uniformity of tension. (Using thinner spokes on the left side avoids most of the problems which the looseness causes -- also see John Allen's article.)
As the wheel begins to come into tension, you start to have to deal with spoke torsion. When you turn your spoke wrench, the spoke will first twist a bit from the friction of the threads. Once the nipple has turned far enough, the twist in the spoke will give enough resistance that the threads will start to move, but the spoke will remain twisted. What a good wheelbuilder can do that a robot machine can't do is feel this twist. If you "finish" your wheel up, and it is perfectly true in your stand, but the spokes are twisted, the wheel will not stay true on the road. The twist in the spokes will eventually work itself out, and the wheel will go out of true.
This problem can be prevented by sensitive use of your spoke wrench. You need to overshoot and back off. In other words, suppose you want to tighten a particular spoke 1/4 turn. You don't just turn the wrench 1/4 turn, you turn it a little farther, then back it up that same little bit. The nipple winds up being 1/4 turn tighter, but the backing up releases the twist in the spoke.
This is much easier to do on straight-gauge spokes, because they are stiffer torsionally, and it is easier to feel the twist than it is with butted spokes. One of the reasons I like "ærodynamic" spokes so much is not so much for the ærodynamics, as that you can tell visually that they are twisted.
Before a wheel is ready for the road, it must be stress-relieved, because the bend in the spoke has to accommodate itself to the shape of the hub flange and vice versa, and a similar process may go on where the nipple sits in the rim. Some wheelbuilders do this by flexing the whole wheel, others by grabbing the spokes in groups of 4 and squeezing them together. My preferred technique is to use a lever to bend the spokes around each other where they cross. My favorite lever for this is an old left crank:
This particular technique has the added advantage of bending the spokes neatly around each other at the crossing, so they run straight from the crossing in both directions. As you go around the wheel this way you will probably hear creaks and pinging sounds as the parts come into more intimate terms with each other.
After you do this, you will probably have to do some touch-up truing, then repeat the stressing process until it stops making noise and the wheel stops going out of true.
Jobst Brandt , author of the excellent book The Bicycle Wheel, points out a less-obvious benefit of this stressing of the spokes:
"...After cold forming, steel always springs back a certain amount (spokes are entirely cold formed from wire). Spring-back occurs because part of the material exceeded its elastic limit and part did not. The disparate parts fight each other in tension and compression, so that when the spoke is tensioned, it adds to the tensile stress that can be, and often is, at yield.
"...When spokes are bent into place, they yield locally and addition of tension guarantees that these places remain at yield. Because metal at or near the yield stress has a short fatigue life, these stresses must be relieved to make spokes durable.
"...These peak stresses can be relieved by momentarily increasing spoke tension (and stress), so that the high stress points of the spoke yield and plastically deform with a permanent set. When the stress-relief force is relaxed, these areas cannot spring back, having, in effect, lost their memory, and drop to the average stress of the spoke."
![]()
![]()
This article uses 3 non-standard terms, because standard terms have not been agreed upon in the industry:
The "trailing" spokes pull harder under drive torque to make the rim turn, and the "leading" spokes contribute by pulling less hard under driving torque. Each group of spokes contributes equally in its own way to turning the rim to keep up with the hub. |
 Trailing Spokes |
|---|
Derailer rear wheels should be laced with the trailing spokes running up along the inside of the flange. There are three reasons for this:
* In the case of fixed-gear or coaster-brake wheels, it is better to lace the opposite way, because a derailed chain is more likely to get jammed by backpedaling in these cases.
Note: This is not an important issue! There is a sizable minority of good wheelbuilders who prefer to go the other way around, and good wheels can be built either way.
Conventional "semi-tangent" spoke patterns are indicated as "cross 3", "cross 4", etc. For example, cross 3 means that each spoke crosses 3 other spokes that run from the same flange of the hub. Most wheels are built cross 3. Higher cross numbers cause the spokes to leave the hub flange more nearly at a tangent. This makes them better able to withstand the twisting forces of hard pedaling in low gears, and also braking forces from hub brakes. Lower cross numbers make the spokes more nearly perpendicular to the hub flange, and to the rim.
In the case of the "radial" (cross 0) pattern, the spokes go straight out from the hub without crossing at all. Lower cross patterns use shorter spokes, so they are slightly lighter, and they can also be slightly stronger side-to-side.
The more spokes a wheel has, the higher the cross number for a similar spoke angle. 48-spoke wheels are usually built cross 5, 40 spokes, cross 4; 36 spokes, cross 3 or 4; 32 spokes, cross 3; 28 or 24 spokes, cross 2...
In the case of unusually large hubs, particularly large hubs in small rims, fewer crosses are often indicated, to avoid bending the spokes where they exit the nipples. For example, the Rohloff Speedhub has 32 spoke holes, but is usually laced cross 2.
For extremely large hubs such as electric-bicycle hub motors, you may need to use a special spoking pattern. We have an article describing how to do this.
Radial spoked (cross 0) wheels have the spokes going straight out from the hub. This pattern is suitable only for front wheels that don't use hub brakes. They are very cool-looking, and are often a good choice for the ultimate in performance, because they are slightly lighter and, in theory, may have a very slight ærodynamic edge.
There are two things to watch out for with radial wheels. Because the nipples point straight inward from the rim, they can turn more easily in most rims than when they are bent to a slight angle by a semi-tangent spoke pattern. This ease of turning increases the risk of their unscrewing themselves on the road. To prevent this, nipples on radial wheels should not be lubricated, and it is a good idea to use a spoke adhesive such as Wheelsmith Spoke Prep or one of the milder flavors of Loctite ® on them. (Or, if a rim does not have recessed spoke holes, the rim tape and air pressure in the inner tube will keep the spokes from turning -- at least with a high-pressure tire).
The other potential problem with radial wheels is that the spokes, trailing straight outward on the hub flange, can possibly rip the outer edge of the flange right off along the line of the spoke holes. This is most likely to happen with small-flange, 36 hole hubs, because there is less metal between the spoke holes. If a used hub is re-laced radially, the notches left by the old spokes can act as stress risers, further weakening the flange.
Many hub manufacturers specifically recommend against radial spoking for this reason, and will not honor warranties on hubs that have been spoked radially.
Some folks will say that no bicycle wheels should be radially spoked for this reason, so do this at your own risk. In my experience, it's generally OK with good-quality hubs that have forged shells.
[Note from John Allen: heed this! Back in 1980, unaware of these issues, I built a front wheel for my tandem with 40 radial spokes on a medium-flange, "boutique" hub with machined flanges. After a few months of use, the wheel mysteriously went slightly out of true, and I trued it. I might better have taken the loss of true as a red-flag warning. One day, I just happened to be sitting on the floor next to my tandem, glanced at the front hub and noticed a crack extending along the line between several spoke holes. I had been foolish, and I was very lucky. I rebuilt the wheel on a large-flange hub, using the same spokes in a semi-tangent pattern, and I have ridden that wheel for 30 years since without any problem. If you ever notice a radially-spoked front wheel -- or, actually, any front wheel -- mysteriously going slightly out of true, stop, get off the bicycle and call for a ride home or to a bike shop.]
If you want to take your chances and try a radial-spoked front wheel, I would advise avoiding using thick spokes and very high tension. Since front wheels are generally pretty trouble-free compared with rears, you don't need super-high tension on a front wheel that uses a reasonable number of spokes.
[Another note from John Allen: I don't recommend leaving spokes slacker than their optimum. If you use thin spokes, you can raise them to their optimum tension without their putting undue stress on the hub.]
Bicycle folklore has it that radial-spoked wheels give a "harsh" ride, because the shorter spokes are less "stretchy" than the longer spokes used in semi-tangent wheels. This is hooey!
Drive wheels and wheels with hub brakes should never be radially spoked. Due to the near-perpendicular angle of the spoke to the hub's tangent, any torque applied at the hub of a radial-spoked wheel will result in a very great increase in spoke tension, almost certainly causing hub or spoke failure.
[Yet another note from John Allen: I have seen such a wheel. To protect the guilty, I will not say who built it. No, it wasn't Sheldon. A friend and I inspected the bike. He held the front brake and pushed down on a pedal with his foot. The spokes of the rear wheel changed angle noticeably, pinging as they rotated in the spoke holes of the hub, and ringing with rising musical pitch like an electric guitar when the player pulls up on the tremolo bar.]
More and more rear wheels now are built "half-radial" with semi-tangent spoking on the right side and radial spoking on the left. Radial front wheels offer mainly esthetic benefits, but half-radial rear wheels can be substantially more durable than conventional ones, if the wheel is highly dished. The high amount of dishing with more and more sprockets has caused an increase in spoke breakage on the left side of rear wheels. This is caused by metal fatigue. Just as you can break a paperclip by bending it back and forth a few times, you can break spokes by flexing them back and forth by a much smaller amount, millions of times -- even if they don't flex enough to take a permanent set. (A bicycle wheel turns several hundred times per mile. In 1500 miles, it turns more than a million times.)
A spoked wheel relies on having all of the spokes in constant tension. A highly-dished rear wheel starts with very light tension on the left side spokes. The torque of hard pedaling combined with cyclical weight loading can cause the left-side "leading" spokes occasionally to go completely slack.
Repeated cycles of tension and slackness cause these spokes to fatigue at the bends, and ultimately break.
 With half-radial spoking, the amount of dish is very slightly less to begin with if you run the radial spokes up along the inside of the flange ("heads out.") In addition, since there are no left-side "leading" spokes, no amount of torque on the hub can reduce the tension on any of the left-side spokes. In fact, if you have an old wheel that has been breaking left-side spokes, "half rebuilding" the wheel into a half radial will solve the problem once and for all.
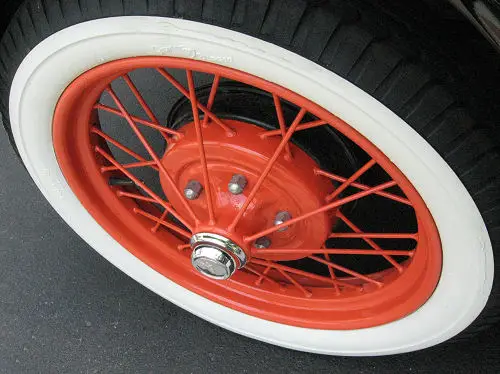
I used to think that this was exotic, cutting-edge technology, until I happened to look at a couple of Model A Fords in a local parade. Their wheels were highly dished inward, and were laced in the same half-radial pattern, for the same reason.
[Note from John Allen: The thin barrel of a conventional bicycle hub cannot withstand the torque of pedaling, or of a hub brake. A flip-flop rear hub, or one with a disk or drum brake, must resist torque on both sides, and should never be laced half-radial unless it has a large-diameter, one-piece shell.
Also, I don't think that the Ford wheel is half-radial for quite the same reason as a bicycle wheel. The outboard spokes of the Ford wheel attach to the hub at a much smaller diameter than the inboard spokes, and would change tension very little due to torque if in a semi-tangent pattern.
The Ford, like any dual-track vehicle, imposes large sideways stresses on its wheels when turning. The wheels at the outside of the turn also bear most of the weight. The sideways force on these wheels increases the tension of outboard spokes at the bottom of the wheel, while the weight load decreases it. The large dishing angle of the outboard spokes tends to balance the increase and decrease in tension. The low dishing angle of the inboard spokes minimizes their decrease in tension.
Ford engineers must have carefully considered all these factors as they designed this wheel. Cutting-edge technology? No, the Model A was introduced in 1927, 51 years after James Starley introduced the tangent tension-spoke wheel. There had been plenty of time for thought and experimentation.
The Ford wheel has twice as many inboard spokes as outboard spokes, optimizing the tension despite the different dishing.
Doubling the number of spokes on the right side of a bicycle wheel might also be used to optimize tension -- for example, a wheel might have 24 spokes on the right side and 12 on the left -- though at the expense of special rim and hub drillings.]
These are not the only possibilities, but they are the practical ones. It you want information on whimsical patterns such as the crow's foot, et. al. check out Rowland Cook's wheelbuilding site.
Even more whimsical are my own POWerwheels spoking pattern, and the SYMMETRISPOKE nipples that go with it. To avoid dishing problems in a rear wheel, you might just try the ShelBroCo 5 and 5 system.
For a more thorough analysis of some of the theoretical aspects of spoked wheels, the standard reference book is The Bicycle Wheel, by Jobst Brandt (1981 Avocet, Palo Alto, California ISBN 0-9607236-6-8.) This is available at better bicycle shops everywhere.
John Forester's article Held Up by Downward Pull describes wheel theory in the light of some interesting experiments Forester conducted, and busts the myth that the wheel hangs from the spokes at the top.
The use of musical pitch to determine spoke tension is explained by John Allen at https://www.sheldonbrown.com/spoke-pitch.html. John has written an article describing his experiment comparing musical and tensiometer measurement.
Want to try to build a wheel using mismatched hub/spokes with different drillings? See Benjamin Lewis's "Perverse Wheel Building" article on this site.
Rafæl Raban has an interesting Web page on spoke metallurgy, with photomicrographs illustrating grain structure.
A useful set of charts for determining spoke lengths may be found in the 6th edition of Sutherland's Handbook for Bicycle Mechanics by Howard Sutherland et al, Sutherland Publications, Box 9061, Berkeley, California 94709. ISBN 0-914578-06-5
This page by Graham Moult lists dimensions for a large number of internal-gear hubs.
This is not the only wheelbuilding site on the Web. I'd also direct your attention to:
![]()
If you have trouble finding tools and materials, in your local area, you can order from Harris Cyclery:
[This section can be blamed on John "Cheapskate" Allen :-) ]
An old front fork chucked in a vise can work very nicely as a truing stand, though for only one overlocknut dimension and a limited range of rim diameters. For a rear wheel, you could modify a front fork by bending the blades apart. You could also use the entire bicycle when truing either wheel -- best if you start by lowering the bicycle onto the wheel so the bicycle's weight rests on the wheel and centers it -- or at least make sure that you pull the wheel up all the way into the forkends.
Get the chain out of the way before working on the rear wheel. Hang the bicycle from a hook or ropes, or place it on a workstand so the wheel you are truing is off the ground, and the rim passes between the seatstays or fork blades at eye height.
This approach is not quite as convenient as using professional tools, but the results can be just as good. The following techniques work with improvised tools.
The spoking illustrations have been around! I created them in the early '80's on a modified Digital PDP-11, using Management Graphics (old MGI page archived) proprietary software, outputting Kodachrome slides. Years later, the slides were scanned onto a Photo CD, then manipulated on my Macintosh, using Adobe Photoshop.
Thanks to John Allen, , Jobst Brandt , John Foresterand Kurt Kaminer for their kind assistance.
![]()